CV Word Generation
To define a Word template for decídalo we use Word’s Mail Merge feature. Your template will consist of several fields and sections where placeholder content should be replaced by the real content of the consultant to use the CV. Those fields and sections need to be identified and replaced by the appropriate merge fields, which are in fact technical placeholders.
Adding Merge Fields to a CV Template
To display merge fields in a word document, press ALT + F9. If you do this with a template that already has merge fields in it (e.g. the downloadable DecidaloTemplate1_English.docx used in the application), the merge fields will be shown in the document as follows:
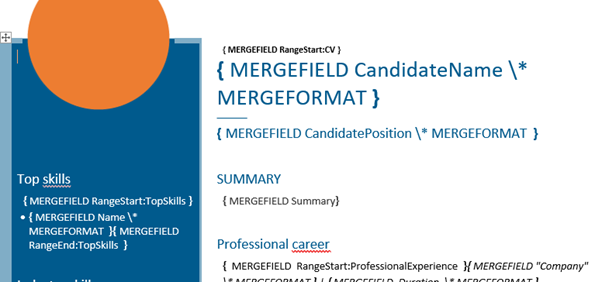
Each merge field is enclosed by curly brackets and starts with the text “MERGEFIELD” followed by the field name, e.g. “CandidateName”, the identifier of the data field to enter at this point, and optionally attributes like “* MERGEFORMAT” that additionally describe the appearance of the field in the template. All merge fields should be contained between "{MERGEFIELD RangeStart:CV}" and "{MERGEFIELD RangeEnd:CV}"

To add a merge field you navigate with the cursor to the desired place in the document and either press Ctrl + F9 or more comfortably click through the menu and select Insert > Quick Parts > Field… and in the opening popup “MergeField”:

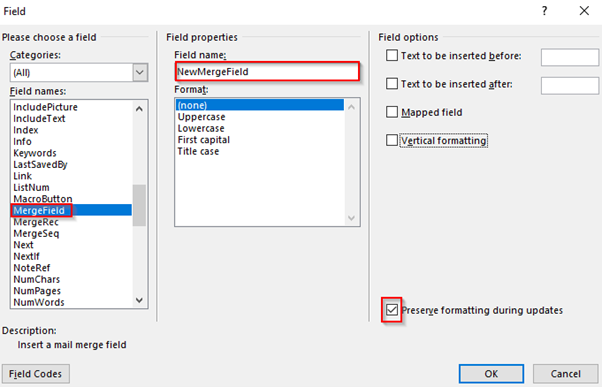
Here you can enter the name of the merge field. Usually, you want to make sure that the checkbox to preserve formatting is checked. This will add the MERGEFORMAT attribute to your merge field and ensures that the text format of the merged content matches the format of the merge-field .
The Different Merge Fields
Every data field that can be displayed on the CV is represented by a merge field name. Some data fields are of a nested nature like e.g., a collection of projects: Your CV usually includes a list of several projects that all have re-occurring fields like the project name or the duration of the project. Nested fields are organized in “ranges”.
The following table shows all the fields currently available.
| Field | Description |
|---|---|
| CandidateName | The name of the candidate the CV is created for. |
| CandidatePosition | The position of the candidate. |
| HighestEducation | The highest education of the candidate. |
| YearOfBirth | The year when the candidate was born. |
| Nationality | The nationality of the candidate. |
| Summary | A text summary on the CV. |
| CreatorEmail | The email of the person who created the CV (for contact information). |
| CreatorAddressCity | The location of the person who created the CV (for contact information). |
| CreatorName | The name of the person who created the CV. |
| CreatorPosition | The position of the person who created the CV. |
| CreatorMobilePhoneNumber | The mobile phone number of the person who created the CV. |
| CreatorOfficePhoneNumber | The office phone number of the person who created the CV. |
| CareerLevel | The career level of the candidate. |
| DeliveryModel | The engagement location model for service delivery (onshore, nearshore, offshore). |
| BusinessUnit | The organizational division the employee belongs to (e.g., Sales, Consulting). |
| PracticeArea | The specific area of expertise or focus within the organization (e.g., Project Management, IT Security). |
| EmployeeType | The type of employment for the user within the organization (e.g., Internal, External). |
| CostCenter | The organizational unit or budget code that the employee’s costs are charged to (e.g., marketing, R&D, operations). |
| LegalEntity | The registered company or legal entity the employee belongs to (e.g., Main Company). |
| ServiceLine | The specific line of service provided by the employee within the organization (e.g., Consulting, IT Services, Marketing & Advertising). |
| Team | The specific team the employee is assigned to within the organization. |
| TeamManager | The manager of the team the employee belongs to. |
| EntryDate | The date when the employee joined the organization. |
| ExitDate | The date when the employee left or is planned to leave the organization. |
| WeeklyWorkingHours | The total number of hours the employee is expected to work per week (e.g., 40). |
| EmployeeID | A unique identifier for the employee, typically used across systems (e.g., external user ID). |
| HolidayCalendar | The calendar that defines the employee’s official holidays and non-working days, as it applies on the day the CV is created. |
| Country | The country where the employee is based or originates from. |
| Roles (Range) | The section where the roles are shown. (How to implement ranges) |
| • Name | The name of a single role. |
| SkillSections (Range) | The section where all skills, organized in categories, are listed. (How to define the categorization level, how to implement ranges) |
| • Name | The name of the skill section. |
| • Skills (Range) | A sub-section for a single skill topic. (How to implement ranges) |
| ◦ Name | The skill name. |
| ◦ LevelNumber | A score describing the candidate's skill level represented by an image (How to implement level images). |
| SkillSection_<Skill_Section_Name> (Range) | A section to display skills of a specific category or sub-category (How to specify the displayed category, how to implement ranges) |
| ◦ Name | The skill name. |
| ◦ LevelNumber | A score describing the candidate's skill level represented by an image (How to implement level images). |
| SkillSection_<Skill_Section_Name>_GroupByLevelNumber (Range) | A section to display skills of a specific category or sub-category grouped by skill level number (How to group by level number, how to implement ranges) |
| • LevelNumber | The proficiency level number for this group. Empty for skills without an assigned level(How to implement level images) |
| • Skills (Range) | The skills belonging to this skill group. (How to implement ranges) |
| ◦ Name | The skill name. |
| ◦ LevelNumber | A score describing the candidate's skill level represented by an image (How to implement level images). |
| SkillCategory_<Category_Name>_GroupBySubCategory (Range) | A section to display skills of a top-level category, grouped by its subcategories (How to group by subcategory, how to implement ranges) |
| • SubCategoryName | The name of the subcategory. |
| • Skills (Range) | The skills belonging to this subcategory. (How to implement ranges) |
| ◦ Name | The skill name. |
| ◦ LevelNumber | A score describing the candidate's skill level represented by an image (How to implement level images). |
| CustomSkillSection_<Name_Of_Your_Section> (Range) | A section to display skills of a template-specific category (or grouped by level) (How to work with custom sections, how to implement ranges) |
| ◦ Name | The skill name. |
| ◦ LevelNumber | A score describing the candidate's skill level represented by an image (How to implement level images). |
| Certificates (Range) | The section where all certificates are listed. (How to implement ranges) |
| • Name | The certificate name. |
| • IssuingOrganisation | The issuing organisation linked to the certificates. |
| • IssueMonth | The issue month of the certificate. |
| • IssueYear | The issue year of the certificate. |
| • ExpirationMonth | The expiration month of the certificate. |
| • ExpirationYear | The expiration year of the certificate. |
| • CredentialUrl | The credential URL of the certificate. |
| TopCertificates (Range) | Certificates that are particularly relevant for this CV. (How to implement ranges) |
| • Name | The certificate name. |
| • IssuingOrganisation | The issuing organisation linked to the certificates. |
| • IssueMonth | The issue month of the certificate. |
| • IssueYear | The issue year of the certificate. |
| • ExpirationMonth | The expiration month of the certificate. |
| • ExpirationYear | The expiration year of the certificate. |
| • CredentialUrl | The credential URL of the certificate. |
| TopProjects (Range) | Projects that are particularly relevant for this CV. Typically used for a highlighted display on the first page. (How to implement ranges) |
| • ProjectName | The name of a single project. |
| • ProjectID | The ID of the project reference linked to this project. Empty if the project history entry was entered manually without a linked project reference. |
| • ProjectPosition | The candidate’s position in the project. |
| • ProjectDescription | A description of the project. |
| • PersonalProjectDescription | The candidate’s own description of the project. Hidden by default; enable it under Administration > Entity Customization. No central fallback. |
| • Contribution | A text describing the candidate’s contribution to the project. |
| • Duration | The duration of the project. (Date and duration options) |
| • StartDate | The start date of the project. (Date and duration options) |
| • EndDate | The end date of the project. (Date and duration options) |
| • Company | The name of the company the project is associated with. If the customer data is hidden on the project, see Project Anonymization for the value used. |
| • CompanyIndustry | The industry the project is associated with. |
| • CompanyRegisteredName | The officially registered name of the company the project is associated with. |
| • CompanyAlias | An alias of the company the project is associated with. May be used for anonymization purposes. |
| • ProjectLocation | The location where the project was carried out (city / country / site). Sourced from the Location field on the project reference. |
| • Skills (Range) | The skills used in this project. (How to implement ranges) |
| ◦ Name | The skill name. |
| Projects (Range) | The section where the project history is shown. (How to implement ranges) |
| • ProjectName | The name of a single project. |
| • ProjectID | The ID of the project reference linked to this project. Empty if the project history entry was entered manually without a linked project reference. |
| • ProjectPosition | The candidate’s position in the project. |
| • ProjectDescription | A description of the project. |
| • PersonalProjectDescription | The candidate’s own description of the project. Hidden by default; enable it under Administration > Entity Customization. No central fallback. |
| • Contribution | A text describing the candidate’s contribution to the project. |
| • Duration | The duration of the project. (Date and duration options) |
| • StartDate | The start date of the project. (Date and duration options) |
| • EndDate | The end date of the project. (Date and duration options) |
| • Company | The name of the company the project is associated with. If the customer data is hidden on the project, see Project Anonymization for the value used. |
| • CompanyIndustry | The industry the project is associated with. |
| • CompanyRegisteredName | The officially registered name of the company the project is associated with. |
| • CompanyAlias | An alias of the company the project is associated with. May be used for anonymization purposes. |
| • ProjectLocation | The location where the project was carried out (city / country / site). Sourced from the Location field on the project reference. |
| • Skills (Range) | The skills used in this project. (How to implement ranges) |
| ◦ Name | The skill name. |
| Languages (Range) | The section where the languages are listed. (How to implement ranges) |
| • Name | The language name. |
| • LevelDescription | A textual level describing the candidate’s fluency in the language. |
| • LevelNumber | A score describing the candidate's fluency in the language represented by an image (How to implement level images). |
| Industries (Range) | The section where the industry experience of the client is listed. |
| • Name | The name of an industry. |
| TopSkills (Range) | A section to display selected top skills. (How to implement ranges) |
| • Name | The name of the skill. |
| ProfessionalExperience (Range) | The section where the candidate’s professional career is shown. (How to implement ranges) |
| • Company | The company of a single entry in the candidate’s career. |
| • JobTitle | The position taken in that company. |
| • Description | A description of the role in the company. |
| • Duration | The duration of the employment. (Date and duration options) |
| • StartDate | The start date of the employment. (Date and duration options) |
| • EndDate | The end date of the employment. (Date and duration options) |
| Trainings (Range) | The section where the candidate’s training history is shown. (How to implement ranges) |
| • Company | The provider of a single training in the candidate’s training history. |
| • TrainingName | The name of the training. |
| • TrainingDescription | A description of the training. |
| • Duration | The duration of the training. (Date and duration options) |
| • StartDate | The start date of the project. (Date and duration options) |
| • EndDate | The end date of the project. (Date and duration options) |
| Publications (Range) | The section where the candidate’s publications are shown. (How to implement ranges) |
| • Title | The title of the publication. |
| • PublicationType | The type of the publication. |
| • PublicationLink | A link of the publication. |
| • PublicationDate | A date of the publication. (Date and duration options) |
| • Authors | Authors of the publication. |
| • Volume | Volume of the publication. |
| • Pages | Pages of the publication. |
| Testimonials (Range) | The section where the candidate’s testimonials are shown. (How to implement ranges) |
| • Testimonial | The testimonial of the customer. |
| • CustomerContact | The contact of the customer. |
| • ContactRole | A role of the contact. |
| • Comment | Comment or notes about the testimonial. |
| • ProjectName | Name of the relevant project. |
Custom Properties
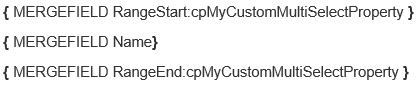
Custom properties that have been added to any entity via the administration page, can be added to the templates as well.
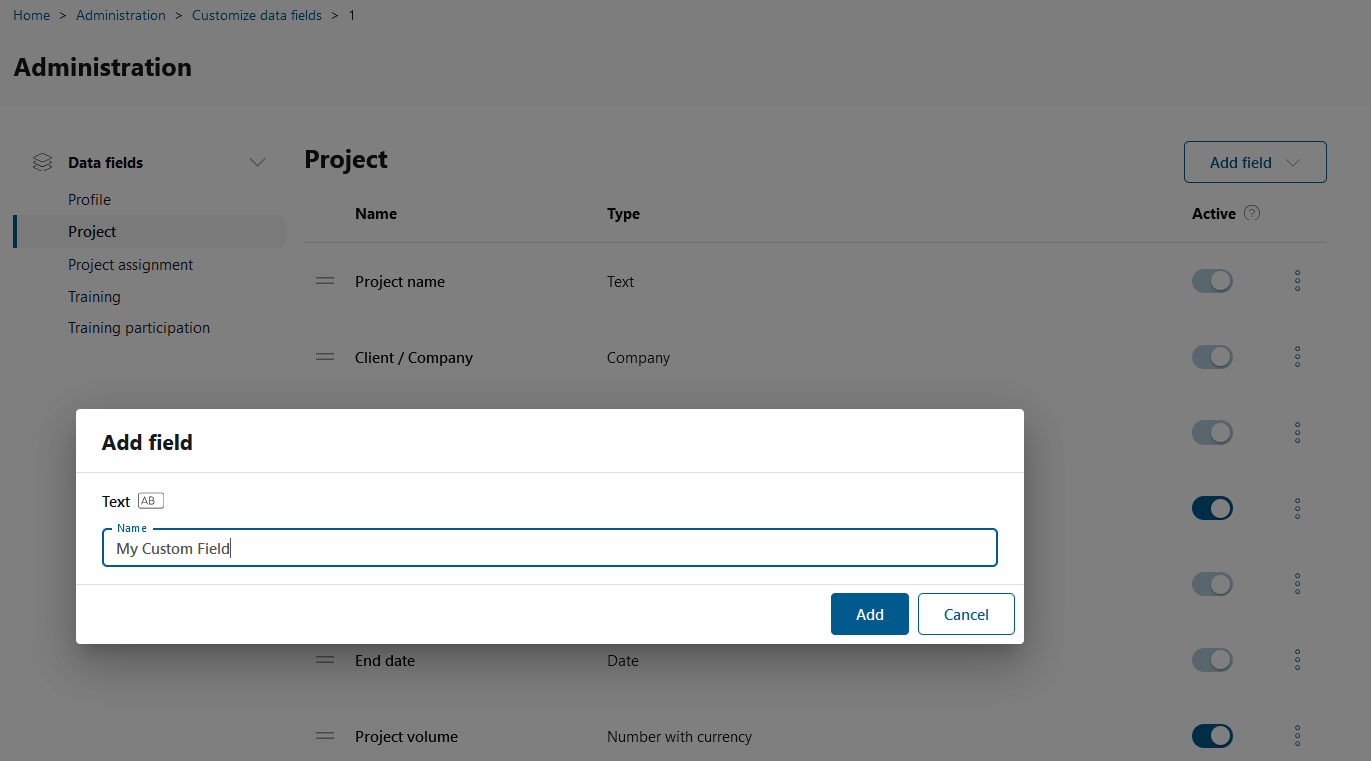
Custom properties are nested fields, intended for use within ranges. The only difference is that the merge field name for a custom property must begin with cp, followed by the name of the custom property.
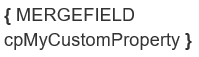
Custom properties that contain multiple values must be added to the template using range syntax.
Images
Similarly, images can be added for candidate core data and supported list items, such as certificates, projects and top projects. Placeholders can be inserted in the form of **@@ImageIdentifierX@@**, where X is a number starting from 0 and incrementing by 1 for each subsequent image. Placeholder text needs to be a part of a shape object and the replaced images will have the position and the dimensions of the shape object. These placeholders will be dynamically replaced with the corresponding images, following the display order of list items on the CV. If a specific list item does not have an image uploaded, it will be skipped, meaning the available images will fill the next available placeholders sequentially, regardless of gaps due to missing uploads. The following are the possible images to insert:
| Identifier | Description |
|---|---|
| CandidatePicture | The profile image of the candidate. |
| Projects | |
| ProjectCompanyLogoX | The image of the company logo on the project history. |
| Top Projects | |
| TopProjectCompanyLogoX | The image of the company logo on the top project. |
| Certificates | |
| CertificateLogoX | The image of the certificate. |
Example for the certificate image:

Working with Headers and Footers
When adding a merge field to a header or footer, use the standard merge field format and append the special indicator _headerFooter to the field name. If the merge field does not display correctly, or if merge fields disappear in the exported CV, insert a section break just before the footer.

Working With Ranges
When working with CV information organized in lists, ranges need to be used to define their occurrence. In addition, all CV fields itself are organized in a range called “CV”, as stated above.
To define a range, i.e. a section holding a list of items, you need to define two merge fields. One defines the start of the range and has the merge field name “RangeStart:<range field name>” and the other defines the end of the range “RangeEnd:<range field name>”. Watch out that there are no spaces within the names of the merge fields. Inside the range you define the appearance of one item. You can only use merge field names defined inside the range as well as additional symbols used for formatting (bullet points etc.). The CV generator will automatically concatenate all items of the same range in the same way as defined for the single item.
The following picture shows how this could be done for a professional career section.
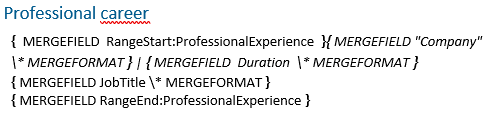
And how it looks in the generated CV.
Working With Skill Level Text
For languages, skills and top skills, you have the opportunity to display text depending on the level the candidate has. To display text depending on the skill or language level, you need to insert a field { IF "{MERGEFIELD <fieldName>}" = "<skillLevelNumber>" "<skillLevelText>" ""} (e.g. { IF "{ MERGEFIELD LevelNumber }" = "1" "Beginner" ""}) for each level behind the LevelNumber merge field. (You only need one LevelNumber merge field but several IF fields).
Note that you can specify text to be displayed if no level is specified by using { IF "{MERGEFIELD <fieldName>}" = "" "<skillLevelText>" ""}. If that is not provided in the template no text will be displayed if the language or skill level is not specified for that candidate.

Working With Level Images
For languages, skills and top skills, you have the opportunity to display an image depending on the level the candidate has. You need to store those images in a local folder, e.g. "C:\\TemplatePic\\Level1.jpg". Don't worry, other people using the template do not need to store the images locally and you can delete them after the upload again.
Valid file formats are .jpg and .png.
To display pictures depending on the skill or language level, you need to insert a field { INCLUDEPICTURE "LocalPath" } (e.g. { INCLUDEPICTURE "C:\\TemplatePic\\Level1.jpg" }) for each level behind the LevelNumber merge field. (You only need one LevelNumber merge field but several INCLUDEPICTURE fields).
Important: Do not insert a linebreak after the LevelNumber merge field. It will not work.
The images displayed need to be stored in a local folder (at the destination of their local paths) at the time of the field insertion to the Word document. After the INCLUDEPICTURE field is inserted, the images and the folder can be deleted. Attention: That especially means that, once you created the field, any changes on the path do no affect the result!
Probably the easiest way to insert the INCLUDEPICTURE field is again by using the Quick Parts from Word (Insert > Quick Parts > Field…):

After selecting "Field…"
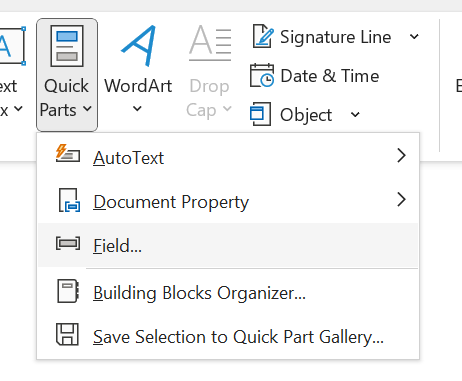
and selecting "IncludePicture" on the left, you can type in the local path of the image:
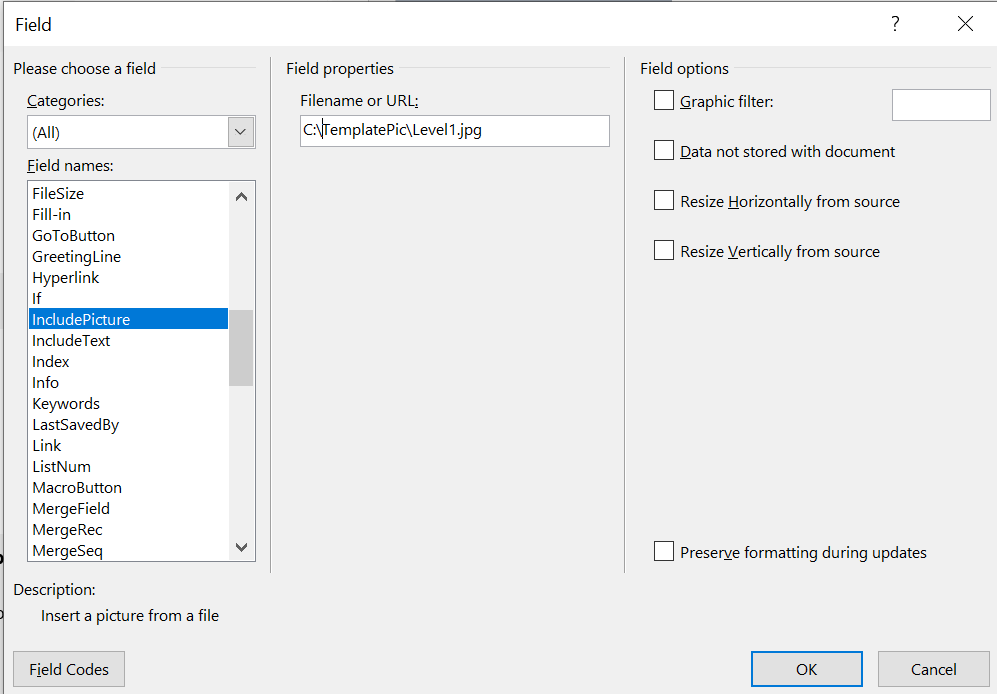
Important: Make sure, the boxes "Data not stored with document" and "Preserve formatting during updates" are not checked (so the data is stored with the document and there is no MERGEFORMAT in the brackets), otherwise the images will not be displayed correctly.
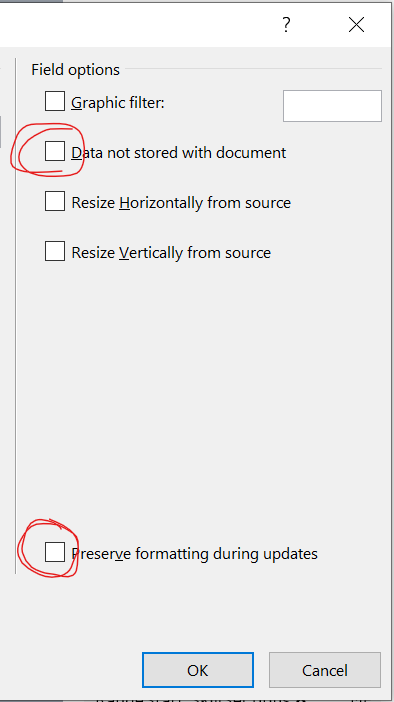
You can check whether the connection to the image was successful by hiding the fields (pressing Alt+F9). At the place of the INCLUDEPICTURE field, it now should display the image(s) you provided.
The connection to the decídalo skill or language level happens automatically and is simple, from top to bottom it will count from 1. So the picture at the destination of the first local path (i.e. in the first INCLUDEPICTURE field) will be displayed for level 1, the second one for level 2, etc. There is no technical limit for how many levels to display. But to get the levels prefilled sensefully, it makes sense to include as many levels as used in the application (i.e. 5 for language proficiency and 3 for skills).
The following picture shows how this could be done for a language section.
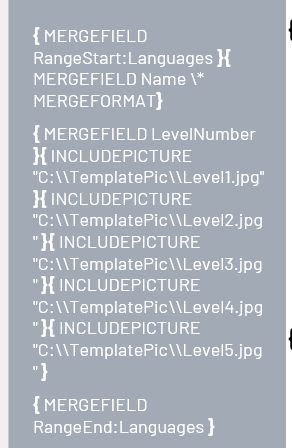
After pressing Alt+F9, you can see the images.

Attention: If you downloaded an existing template and want to change the images displayed, make sure you have your images on a local path and, if needed, adjust the path on the template. You can not "simply" adjust our images since they were only stored (on the local path displayed) at the time of the field insertion.
Merge Field Formatting
To control the font, color, font-size, style, etc. of a merge field, the merge field needs to be given the attribute MERGEFORMAT (preserve formatting option in dialog). If that attribute is set, the font attributes of the merge field itself are preserved. That means by adjusting the font, color, font-size etc. of the merge field itself (the curly brackets and its contents) you will define how the inserted text will look like.
Merge Field Separators
The list separator (e.g., for skills) can be fully customized within the template, supporting any Unicode character or character string. You can define the separator using the \b tag, which inserts the separator before each property, and the \rfb tag, which prevents the separator from being added before the first entry in the list.

Ordered and Unordered Lists
Usually, you have two occasions where you include ordered (numerical, alphabetical) or unordered (bullet point) lists on the CV. You could be listing distinct items like skills or certificates. Or you could have a paragraph text like a summary including individual listed points. In the template, you need to define what list symbols should be used and how they should look like.
The former case can be easily defined by wrapping the intended list symbol together with the listed item's merge field in the same range.

In the latter case, this is not possible as the list itself is defined in the paragraph. For defining the styling of lists inside a paragraph, you need to define a list style in the Word template first. A straight forward way is to first create a list item in the desired look with bullets in the Word template. And then with the Home > Styles toolbar create a new style for the selected list.
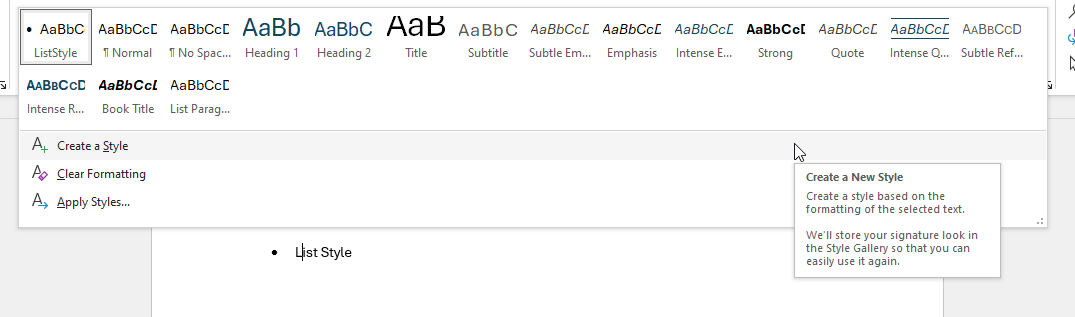
Once the style is defined, you need to add it as attribute to the merge fields where you want to use the style for lists. You can define separate styles for unordered (\bulletListStyle) and ordered (\numberListStyle) lists. The quoted text behind the tag must exactly match a style defined in the template document. It will only be used either for unordered lists used in the paragraph or for ordered lists.

This way you can in particular define customized bullet points or alphanumerical list items to be used in e.g. profile summaries or project descriptions.
Common mistake: empty bullet points for empty fields
If a generated CV shows an empty bullet point (or a stray blank line) where a consultant left a rich-text field empty, for example Contribution or Project description, the template is misconfigured; it is not a data problem.
The cause is that a bullet or numbered list paragraph style has been applied directly to the paragraph that contains the merge field. Word then draws a bullet for that paragraph even when the merged value is empty. The \bulletListStyle / \numberListStyle tag is only meant to style the list generated from the field's content; the field's own paragraph should stay a normal paragraph.
To check: press ALT+F9 to show the merge fields, click into the paragraph that holds the field, and look at the applied paragraph style under Home > Styles. If it is a bullet or numbered list style, that is the cause.
To fix: set the merge-field paragraph back to a normal (non-list) style, and keep only the \bulletListStyle (or \numberListStyle) tag on the field. The standard templates are configured this way.
Empty line below a rich-text field
A rich-text field, for example Project description, Contribution, or the Summary, renders an extra empty line directly below it on the generated CV, even when the content itself is correct.
Removing this empty line can be enabled per organization. Contact decídalo support if you would like it activated. It stays off by default so existing templates that were laid out around the empty line keep rendering exactly as before. When enabled, blank lines a consultant intentionally typed inside the rich-text editor are preserved; only the automatically-added trailing line is removed. There is nothing to configure in the template itself.
Date and Duration Field Options
For projects, trainings, and professional experiences, start and end date fields or the combined duration field can be displayed to show the time span of each entry. By default, these fields are automatically calculated using the start and end date data of the profile. However, you can customize the display using specific tags.
Customizing the Date Format
Using the \dateFormat tag you can customize how the duration is formatted on CV creation. This allows you to control the appearance of the date format according to your preferences.
For example, you might want to display dates in the format yyyy (year) or MM-yyyy (month-year), depending on the context.

Note: The date format for Duration of Projects and TopProjects must be uniform. If for both lists a different format is provided in the template the one from the Projects will be applied on both. If there is no format specified for Projects but there is one for TopProjects, that format will be applied on both.
Ongoing Word (Duration Only)
If the end date is not specified and you want to indicate that it is still ongoing, you can use the \ongoing tag on the duration field. This tag allows you to define a custom word or phrase that will be displayed in place of the missing end date.

Hide Dates in Future (Duration Only)
If the end date is set in the future and you want to indicate that it should not be shown as a date in the duration field, but rather replaced with the ongoing word, you can use the \hideDatesInFuture tag. There is no need to specify additional words, because the end date will be replaced with the word specified in the \ongoing tag. This tag will not work for the section if the \ongoing tag is not specified.

Format issue and expiration months for certificates
By default the issue and expiration months of certificates will be displayed in form of text representing each month ('January', 'February'...) However, you can choose to display them in two digit number format(01 for January, 11 for November...) by using the \displayMonthAsNumber tag. Simply add it as part of the RangeStart:Certificates and it will apply the format for the issue and expiration month of all certificates in the range.

Hide expired certificates
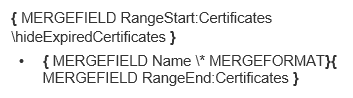
By default, all certificates will be shown on the CV, whether they are expired or not. However, you can choose to only display valid certificates and hide the expired ones. To do this, simply add a new property called \hideExpiredCertificates as a part of the RangeStart for certificates and it will automatically hide expired Certificates on CV creation.
Limit the number of Top Projects
By default, all top projects selected for a CV are included. You can limit the maximum number of top projects shown by adding the \maxItems tag with a numeric value to the RangeStart:TopProjects merge field.
For example, to show at most 5 top projects:
{ MERGEFIELD \maxItems "5" RangeStart:TopProjects }
When this tag is present, only the first N projects (in their original order) will be rendered in the TopProjects range. If the candidate has fewer top projects than the specified limit, all of them are shown.
Empty Fields and the Characters Around Them
A merge field with no value renders as nothing. Any characters typed directly against the field, with no space between them, are removed together with it. This is what lets you wrap a value in brackets or attach a separator to it without an empty () appearing on the CV when a consultant has not filled that field in.
| In the template | Field has a value | Field is empty |
|---|---|---|
English («Level») |
English (C1) |
English |
«IssueMonth».«IssueYear» |
03.2024 |
2024 |
Level: [«Level»] |
Level: [C1] |
Level: |
A character only counts as attached when no space separates it from the field. A space, a line break, a new paragraph and a table cell border all end the removal, and so does a neighbouring merge field. That last point is why «IssueMonth».«IssueYear» keeps the year when only the month is missing: the removal stops at the second field instead of consuming its value.
The same works around a whole list. If you put brackets around a range, they disappear when the list has no entries, and stay when it has at least one.
Note: because a space stops the removal,
( «Level» )keeps its brackets and renders as( )on an empty field. Type the brackets directly against the field.
Be deliberate about labels. Anything glued to the field goes with it, including text you may want to keep: Tel.:«Phone» loses Tel.: when the phone number is empty. If a label should always appear, separate it from the field with a space.
Why the preview still shows the brackets
In the CV editor, an empty field shows a grey Not provided placeholder that you can click to fill the value in. Since the preview does display something there, the characters around the field stay visible in the preview. Only the generated document drops them.
This difference is intentional: the preview shows you where content can still be added, the export shows the finished result. To check what a reader will actually see, export the CV.
The same rules apply to PowerPoint CVs, reference presentations and quotations.
Empty Section Hiding
Sometimes you want to hide whole sections together with a header or other static text if there is no content to display in the section. For example, you only want to show the certificates section if the candidate’s CV includes at least one certificate. Otherwise, you want to hide the section together with the title.
This can be achieved by inserting bookmarks.
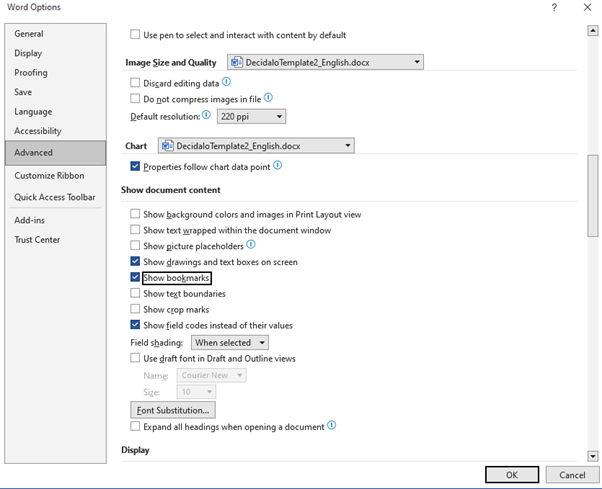
First, if not set up already, bookmarks should be made visible in Word. To achieve this, open File > Options > Advanced and make sure the option to show bookmarks is checked.
Then select the section that should be hidden together and add a bookmark.
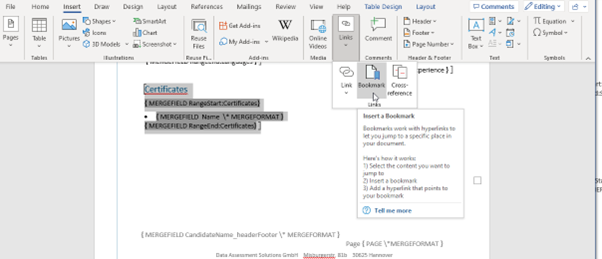
In the opening dialog you need to choose a name for the bookmark. The name has no technical effect, but it is advisable to choose a reasonable name for organization purposes, e.g., “certificates”. When confirming the bookmark insertion, square brackets will appear around the section, indicating that it is bookmarked, i.e. recognized as connected section in the CV generation. When the range inside the bookmark contains no elements, its content is not rendered.
Wrapping a table in a bookmark enables two behaviors during CV generation:
- No data at all: when the range inside the bookmark has no items, the entire bookmark content is not rendered (including any static header or surrounding text).
- Partial data: when the range has items but some rows have no values for any of their fields, those individual empty rows are removed from the table while rows with data are kept.
Grouping Ranges
A range's items can be grouped by including the groupBy property and defining a list of properties (one or more) the items should be grouped by. Properties should be defined as comma-separated values.
The following ranges can be grouped by the following properties:
- SkillSections (Range)
Note: SkillSections themselves cannot be grouped this way. Only the Skills (Range) inside a SkillSection can be grouped.- Skills (Range)
- Name
- LevelNumber
- Skills (Range)
- SkillSection_<Skill_Section_Name> (Range)
- Name
- LevelNumber
- Certificates (Range)
- Name
- IssuingOrganisation
- IssueMonth
- IssueYear
- ExpirationMonth
- ExpirationYear
- CredentialUrl
- TopCertificates (Range)
- Name
- IssuingOrganisation
- IssueMonth
- IssueYear
- ExpirationMonth
- ExpirationYear
- CredentialUrl
- TopProjects (Range)
- ProjectName
- ProjectPosition
- ProjectDescription
- Contribution
- Duration
- StartDate
- EndDate
- Company
- CompanyIndustry
- CompanyRegisteredName
- CompanyAlias
- ProjectLocation
- Projects (Range)
- ProjectName
- ProjectPosition
- ProjectDescription
- Contribution
- Duration
- StartDate
- EndDate
- Company
- CompanyIndustry
- CompanyRegisteredName
- CompanyAlias
- ProjectLocation
- Languages (Range)
- Name
- LevelDescription
- LevelNumber
- ProfessionalExperience (Range)
- Company
- JobTitle
- Description
- Duration
- StartDate
- EndDate
- Trainings (Range)
- Company
- TrainingName
- TrainingDescription
- Duration
- StartDate
- EndDate
- Publications (Range)
- Title
- PublicationType
- PublicationLink
- PublicationDate
- Authors
- Volume
- Pages
- Testimonials (Range)
- Testimonial
- CustomerContact
- ContactRole
- Comment
- ProjectName
How Grouping Works
When a groupBy property is defined, the items in that range are first sorted by the grouping property.
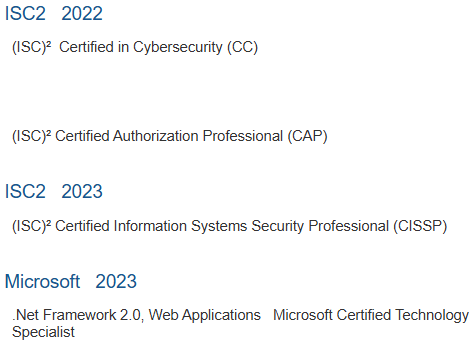
For example, here the Certificates are grouped by Issuing Organisation and IssueYear. Notice how the organizations are sorted alphabetically and after that numerically by year:
When multiple properties are provided, the system performs a hierarchical sort: it sorts by the first property, then uses subsequent properties in the list.
After sorting, items are grouped by adjacency: all consecutive elements with the same grouping value(for all properties)are merged into a group.
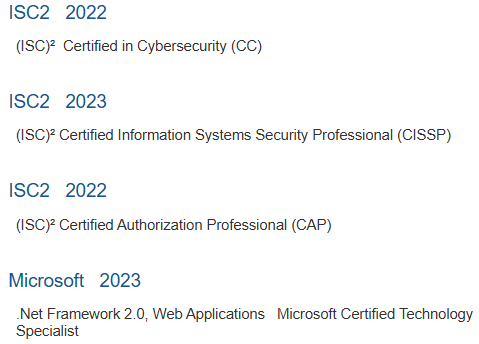
If you manually reorder the items, you can split a group into separate parts:
Once a range is grouped, it cannot also be used ungrouped in the same CV.
Each range can be grouped by one specific set of properties per CV. For example, you can group Certificates by a list containing Issuing Organisation and Issue Year together, but you cannot have one section grouping by Issuing Organisation and another section grouping by Issue Year within the same CV.
Example Configuration
Here’s how Certificates were configured to group by their issuing organization and issue year:
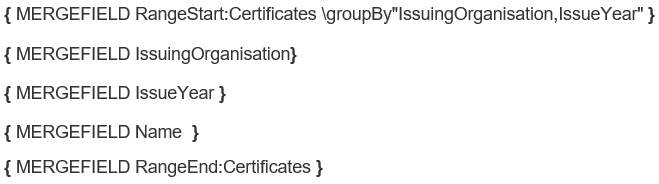
This configuration produces the grouped output shown above.
Skills Example
Skills can also be grouped. Remember: SkillSections themselves cannot be grouped, only the Skills inside them can.
Here’s an example of Skills grouped by LevelNumber. Notice how the skills are visually sorted into groups based on their proficiency level:
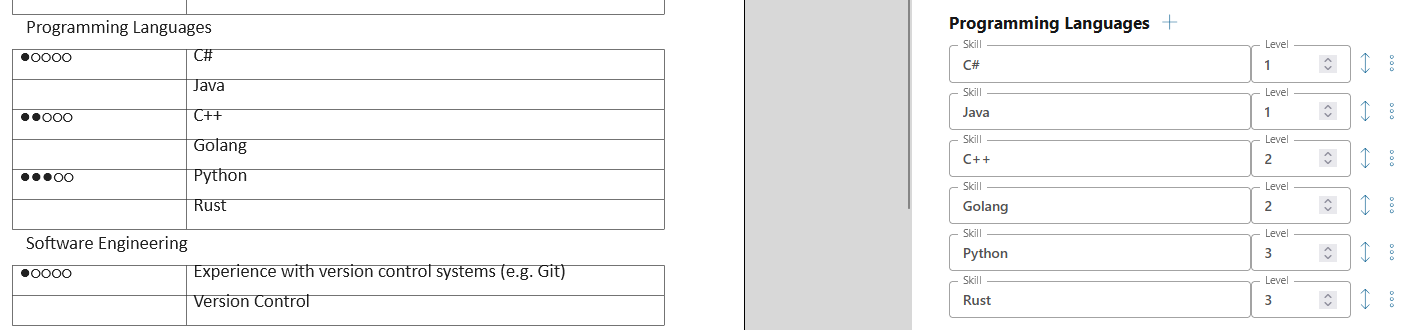
NOTE: Skills that belong to other groups and skills without a level number are displayed identically on the CV.
Example configuration
Here's how Skills in a skill section were grouped by their level number:
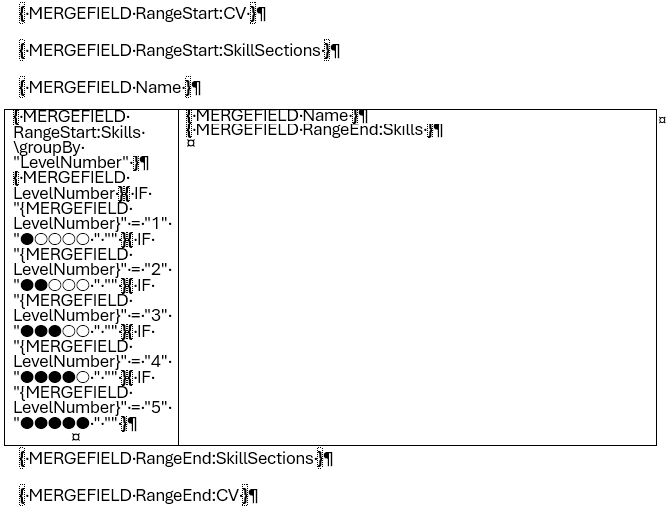
This configuration produces the grouped output shown above.
Standard Skill Sections and Grouping
Standard skill sections, defined using:
MERGEFIELD RangeStart:SkillSections
can include a groupingType property to define how skills should be grouped. The available options are:
- Category: Uses top-level categories from the Skills page. Skills belonging to that category or any of its subcategories will be included in this section.
- Subcategory (default if omitted): Uses subcategories from the Skills page. Skills that belong to a subcategory will be shown in that specific section.
- SingleSection: All skills are placed in a single section.
When using SingleSection, the user should provide a singleSectionName property to define the section name. If omitted, the default name "Skills" will be used.
Example Configuration


This allows for flexible customization of how skills are displayed in exported CVs.
Selecting Specific Standard Skill Sections
To choose specific standard skill sections to display and control their placement, define them using:
MERGEFIELD RangeStart:SkillSection_<Skill_Section_Name>
This searches for the corresponding category or subcategory in the system. If a match is found, the section will be included in the CV. Instead of spaces, the skill sections defined in the merge field need to use “_” instead. Furthermore, avoid special characters, e.g. use "and" instead of "&". Note that the name of the section is case sensitive.
Example Configuration
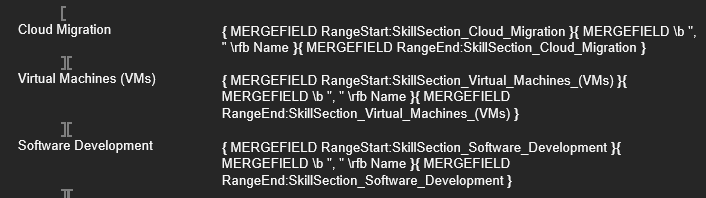
This setup ensures that only the specified skill sections ("Cloud Migration", "Virtual Machines (VMs)" and "Software Development") are included in the CV, provided they exist in the system.
Grouping a Skill Category by Subcategory
To display all skills of a top-level category grouped by its subcategories, define a range using:
MERGEFIELD RangeStart:SkillCategory_<Category_Name>_GroupBySubCategory
This searches for the specified top-level category in the system and automatically creates one section per subcategory, each containing the skills that belong to it. The category name follows the same naming rules as Selecting Specific Standard Skill Sections: use _ instead of spaces and avoid special characters. The name is case sensitive.
Available Fields
Inside the range, the following fields are available:
| Field | Description |
|---|---|
| SubCategoryName | The name of the subcategory. |
| Skills (Range) | The skills belonging to this subcategory. |
| ◦ Name | The skill name. |
| ◦ LevelNumber | The skill level (level images). |
Example
Suppose you have a top-level category called Software Development with subcategories Programming Languages, Frameworks, and Testing and Debugging. To group the skills by these subcategories, add the following range to your template:
{ MERGEFIELD RangeStart:SkillCategory_Software_Development_GroupBySubCategory }
{ MERGEFIELD SubCategoryName }
{ MERGEFIELD RangeStart:Skills }
{ MERGEFIELD Name }
{ MERGEFIELD RangeEnd:Skills }
{ MERGEFIELD RangeEnd:SkillCategory_Software_Development_GroupBySubCategory }
On CV creation, this will produce output similar to:
Programming Languages
C# | JavaScript | PHP | PowerShellFrameworks
ASP.NET | SignalRTesting and Debugging
Testing and Debugging
Skills from the specified top-level category that belong to a subcategory will appear under that subcategory. Skills assigned to other categories are not affected and will still appear in the standard SkillSections range or other placed sections as usual.
Note: When a SkillCategory_*_GroupBySubCategory range is used for a category, that category and all of its subcategories are automatically excluded from the standard SkillSections range and from any SkillSection_* ranges to avoid duplicate display.
We recommend enclosing the range together with its title in a bookmark, so the section is hidden if the category has no skills.
Grouping a Skill Section by Skill Level
To display all skills of a category grouped by their proficiency level, define a range using:
MERGEFIELD RangeStart:SkillSection_<Skill_Section_Name>_GroupByLevelNumber
This searches for the specified category or subcategory by name and collects all skills that belong to it or any of its subcategories. The skills are then automatically grouped by their assigned level number, ordered from highest to lowest. The category name follows the same naming rules as Selecting Specific Standard Skill Sections: use _ instead of spaces, avoid special characters, and the name is case sensitive.
Available Fields
Inside the range, the following fields are available:
| Field | Description |
|---|---|
| LevelNumber | The proficiency level number for this group. Empty for skills without an assigned level (level images). |
| Skills (Range) | The skills belonging to this level group, ordered alphabetically. |
| ◦ Name | The skill name. |
| ◦ LevelNumber | The skill level (level images). |
Example
Suppose you have a category called Software Development and want to group its skills by proficiency level. Add the following range to your template:
{ MERGEFIELD RangeStart:SkillSection_Software_Development_GroupByLevelNumber }
{ MERGEFIELD LevelNumber }
{ MERGEFIELD RangeStart:Skills }
{ MERGEFIELD Name }
{ MERGEFIELD RangeEnd:Skills }
{ MERGEFIELD RangeEnd:SkillSection_Software_Development_GroupByLevelNumber }
On CV creation, this will produce output similar to:
5
C# | TypeScript3
JavaScript | PHP(unrated)
PowerShell
Skills without an assigned level are placed in a group at the end with LevelNumber set to null.
We recommend enclosing the range together with its title in a bookmark, so the section is hidden if the category has no skills.
Note: When any SkillSection_<Skill_Section_Name>_GroupByLevelNumber range is present in a template, SkillSections behaves exactly like it does when regular SkillSection_<Skill_Section_Name> placed ranges are used.
Custom Skill Sections
You can add custom skills sections, by adding a range named "CustomSkillSection_<Name_Of_Your_Section>". The name can’t contain spaces. Use “_” instead. Furthermore, avoid special characters, e.g. use "and" instead of "&". Note that the name of the section is case sensitive.
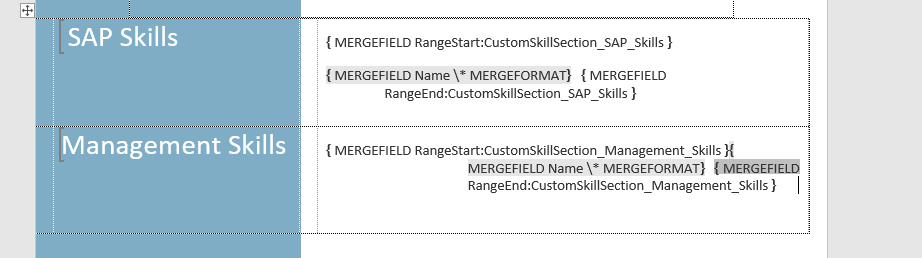
We recommend to enclose the ranges together with their title into a bookmark, so the sections are hidden if they are empty. We also recommend to write the ranges into table cells to preserve formatting when page-breaks are necessary.
After the template has been uploaded, decídalo will perform a mapping from the profile skills to the custom sections, powered by OpenAI's GPT 4. The content of the prefilled sections can be edited following the same process as with other skill sections.
If the newly added custom skill section matches the name of a standard skill section, the custom skill section is automatically prefilled with the profile skills of this standard skill section.

Different templates can use the same custom skill sections. Note that section names are compared on a case-sensitive basis. For example, SAP_skills and SAP_Skills are treated as different sections.
Skill Level Sections
Skill Level Sections are defined similarly to Custom Skill Sections but require an additional naming convention to specify the skill level. The range should be named using the format:
CustomSkillSection_LevelNumber_<LevelNumber>_<Name_Of_Your_Section>
Naming Rules
<LevelNumber>must be a numerical value (e.g.,1,2,3).<Name_Of_Your_Section>follows the same naming rules as Custom Skill Sections (no spaces, case-sensitive, avoid special characters).- Example:
CustomSkillSection_LevelNumber_1_Beginner.
Each skill level section groups skills according to the assigned level. Multiple levels can be defined within the same template. On CV creation, decídalo will automatically map profile skills to the appropriate skill level sections.
If a section is used with LevelNumber -1, it is treated as a special section. This section will automatically include all skills from the profile that do not have a level assigned.
Project Anonymization
It is possible to specify for each project individually in the application if the customer data should be displayed. If you do not wish to display the customer's name on generated CVs where the Company merge field is used, set the 'Display customer data on CV' option to 'No' on the project. The 'Display customer data on CV' option is set only in the application on project level and is not specified in the templates.
In addition to the project-level setting, each customer (company) in the application now has a flag called 'Allow customer data export'. This flag controls whether any project linked to that customer is allowed to export customer-related data (such as company name and logo) on CVs. If 'Allow customer data export' is set to 'No' for a customer, then all projects associated with that customer will be automatically treated as if 'Display customer data on CV' is set to 'No', regardless of the individual project setting. This ensures that customer data is anonymized for all such projects, following the same rules described below.
If the 'Display customer data on CV' option for a project is set to 'No', the system will anonymize the company information as follows:
- If a value is specified in the template with the companyForAnonymizedProjects word, that value will be displayed instead of the company name on the generated CV. More on the companyForAnonymizedProjects word can be found in the next section.
- If the template does not specify such a value but the company has an alias set, the alias will be used instead of the company name on the generated CV.
- If neither is set, nothing will be displayed in place of the Company merge field on the generated CV.
Company Customization For Anonymized Projects
It is also possible to define in individual CV templates a special custom value to be used instead of the company name on projects whose 'Display customer data on CV' is set to 'No'. In that case the company alias will not be used, but instead, the value defined in the template will be used. That is done via the companyForAnonymizedProjects word on the Company merge field in the Projects range. In the example below, the text "Secret company" will be displayed instead of the company name.

Note: The value specified via the companyForAnonymizedProjects for the Company of Projects and TopProjects must be uniform. If for both lists a different value is provided in the template the one from the Projects will be applied on both. If there is no value specified for Projects but there is one for TopProjects, that value will be applied on both. If there is no value specified for TopProjects but there is one for Projects, that value will be applied on both.
Project Name Customization For Anonymized Projects
It is also possible to define in individual CV templates a special custom value to be used instead of the project name on projects whose 'Display customer data on CV' is set to 'No'. That is done via the projectNameForAnonymizedProjects word on the ProjectName merge field in the Projects range. In the example below, the text "Secret project" will be displayed instead of the project name.

If the custom value is not specified in the template, the actual project name will always be displayed on the CV in place of the ProjectName merge field.
Note: The value specified via the projectNameForAnonymizedProjects for the ProjectName of Projects and TopProjects must be uniform. If for both lists a different value is provided in the template the one from the Projects will be applied on both. If there is no value specified for Projects but there is one for TopProjects, that value will be applied on both. If there is no value specified for TopProjects but there is one for Projects, that value will be applied on both.
Graphical Elements
It is possible to include design elements like logos or graphical objects into your template. If you want them to appear on all pages, make sure they are anchored in the header or footer of the page.
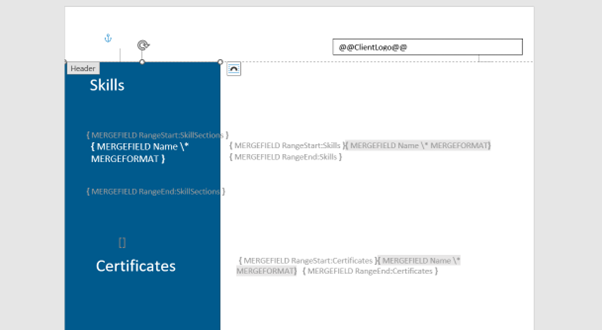
If you only want them to appear on the first page only, anchor them on the page itself.
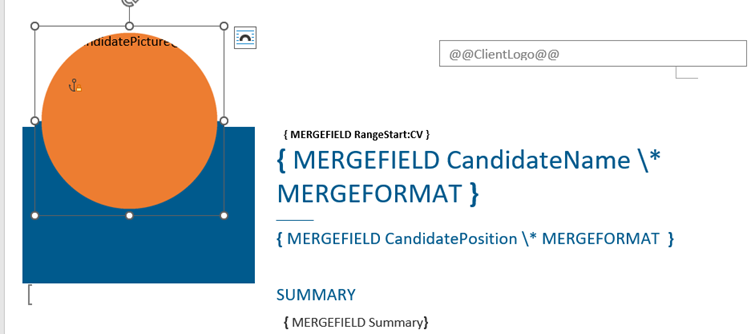
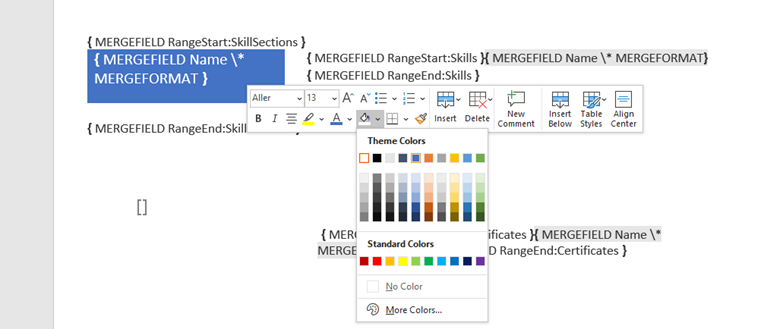
For colored areas that should extend over whole sections, you can also use colored table cells.
Font Embedding
For fonts to render correctly in documents generated from your template, it is crucial that all fonts, including common system fonts like Arial or Calibri, are fully embedded into the template document. Without this, recipients may see a different font depending on what is installed on their system.
To embed a font into a Word document, make sure that the option displayed below is checked in your Word settings for the template document. The settings can be accessed through Word's File tab.
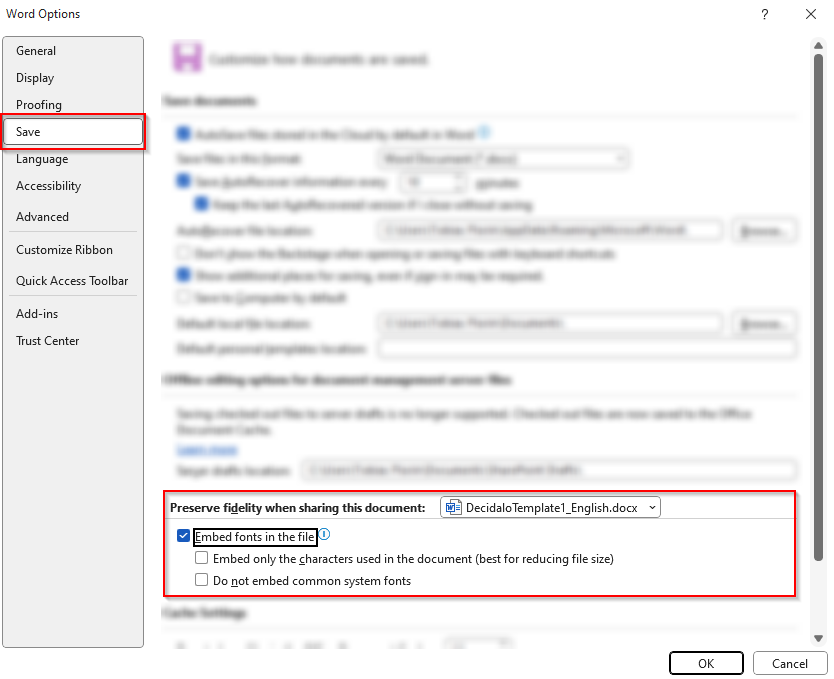
The application enforces these settings at upload time and will reject templates that do not meet them.
Embedded fonts are currently supported for the exported Word and PDF CVs that you will send out to your customers. The preview shown in the application itself may show a different font depending on whether the used font is available to your browser, i.e. installed on your system.
Template Upload
You can now finish the process of adjusting/creating with uploading the template. To read the documentation about it, go back here.