Quotation Generation
Editing and Uploading a Template
decídalo offers the possibility to upload and use your own quotation template. A quotation template is a Microsoft Word file. You can adjust an existing template by downloading it and opening it in Microsoft Word. When you have customized the template according to your requirements, it can be uploaded again as a new custom template. The following video summarizes the process:
How Does the Template Work
The template uses the Word Mail Merge feature. Your quotation template will consist of several fields and sections where placeholder content should be replaced by the real content of the quotation. Those fields and sections need to be identified and replaced by the appropriate merge fields, which are in fact technical placeholders. This requires specific syntax to work. In the following, we will provide a step-by-step introduction to the mechanism to prepare your templates for decídalo.
How to Adjust/Create the Template
Before actually starting, please make yourself familiar with the best practices in template creation. This will make things way easier and avoids lacks of clarity.
Step 1: Start
The content of every template (except for header and footer) needs to lie in between "{ MERGEFIELD RangeStart:Quotation }" and "{ MERGEFIELD RangeEnd:Quotation }". So best, you start with creating the raw structure of your template (e.g. headers, footers, icons, tables, etc.) and those two merge fields.
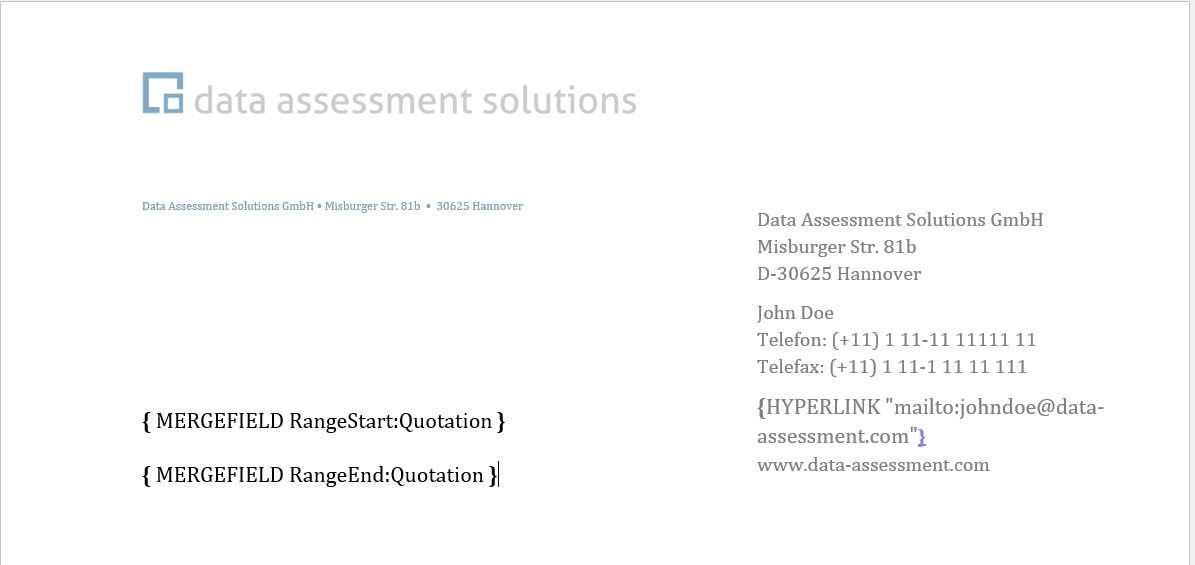
If you started by downloading and adjusting an existing template from decídalo, this step is redundant.
Step 2: Data Fields
Next, you add all the merge fields (for a list of available data fields, see Merge Fields) for the data you want to be displayed on your quotation. There are some exceptions: The positions of the candidates, dates, and prices are handled a bit different, we will take care about them in Step 3, Step 4 and Step 5. Important: The syntax for those merge fields is very specific: To correctly display the data on the quotation later, please provide the field like this: { MERGEFIELD MergefieldName }. You can also add a MERGEFORMAT. This ensures, that the formatting of the displayed field is equal to the format of the merge field (e.g. bold or colored text). In that case, please provide { MERGEFIELD MergefieldName \* MERGEFORMAT} in the format you want it to be displayed.
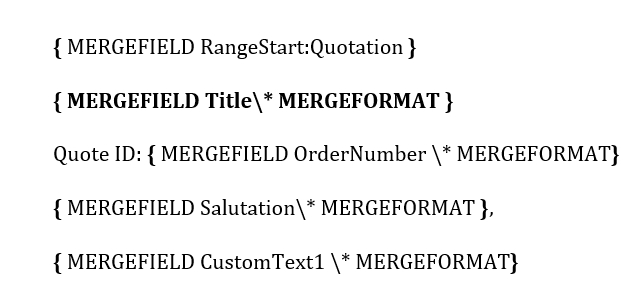
Also important: Only the available data fields (see Merge Fields) can be displayed. If you replace the merge field name by something different, it will not work as intended.
Step 3: Positions
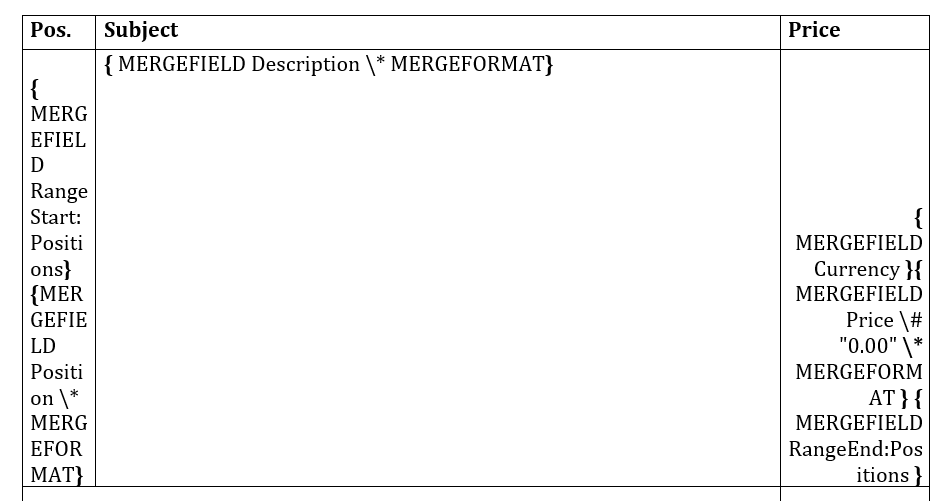
If you want to add positions, the syntax is slightly different. Similar to RangeStart:Quotation, you need a range for the positions here. So content which should contain the information about the positions needs to be between "{ MERGEFIELD RangeStart:Positions }" and "{ MERGEFIELD RangeEnd:Positions }".
Attention: If you use table cells for the positions, do not place the RangeStart outside the cells and the RangeEnd inside the cells or vice versa, that could lead to system errors in the further process.
Inside that range you can provide the merge fields (related to positions) with the syntax as shown in step 2. A list of available fields inside the range is provided at the end of this page. You will define the appearance of one position, you can also use additional symbols for formatting (e.g. bullet points). The quotation generator will automatically concatenate all positions of the same range in the same way as defined for the single one.
An example of how positions can be displayed in a table is shown in the following picture:
Step 4: Dates
You can also add dates. The syntax differs a bit: You can use "{ DATE \@ "DateFormat" \* MERGEFORMAT } (the MERGEFORMAT is optional again). The DateFormat is a composition of "d", "M" and "y", e.g. "d MMMM yyyy":
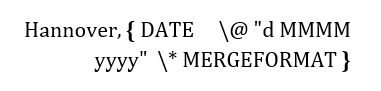
There are multiple options for formatting:
For the Day: A lowercase "d" is used, a single one displays the day of the month as a number, without a leading 0 for single-digit-days, e.g. the 6th day displays as "6". "dd" displays the day of the month as a number with a leading 0 for single-digit-days, e.g. the 6th day displays as "06". "ddd" displays the day of the week as a three-letter abbreviation, e.g. Monday displays as "Mon". "dddd" displays the day of the week with its full name.
For the Month: An uppercase "M" is used (Attention: lowercase "m" would be converted to minutes). Analogous to the days, a single one displays a number without leading 0, etc. up to four "M"s.
For the year: A lowercase "y" is used, you can only use double or quadruple ones. "yy" displays the year as two digits (with a leading 0 for years 01 to 09), e.g. 2006 displays as "06". "yyyy" displays the year as four digits.
You can composite the number as you like, e.g. you can use { DATE \@ "dddd, MMMM d, yyyy * MERGEFORMAT } it will display Monday, January 3, 2022 (for the third of January in 2022).
Step 5: Price and Sum
To display the price (of a position) or the sum (of prices), you need to apply a slightly different syntax: You can use "{ MERGEFIELD Price \# "NumberFormat" \* MERGEFORMAT }" (the MERGEFORMAT is optional again). The NumberFormat is a composition of "0", "#" and separators ("," and "."):
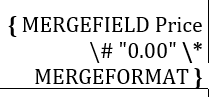
There are multiple options for formatting:
A "0" specifies a numeric place to display a digit. If the result does not include a digit in that place, a 0 will be displayed, e.g. { =6 \# 00.00 } displays as "06.00". If the result contains more digits than 0's in the number field, the additional digits will also be displayed.
A "#" also specifies a numeric place to display a digit. If the result does not include a digit in that place, a space will be displayed, e.g. { =6 \# ## } displays as " 6". If the result contains more digits than 0's in the number field, the additional digits will also be displayed.
Separators ("," and ".") can for example be used to determine decimal point positions, or to format bigger numbers, e.g. 1000€ to 1.000€.
Available Merge Fields
Every data field that can be displayed on the quotation is represented by a merge field name. You can only use the available field names, listed below:
| Field | Description |
|---|---|
| CompanyName | The name of the client company. |
| ContactPerson | The name of the contact person from the client company. |
| AdressLine1 | Part of the address, e.g. house number and street. |
| AdressLine2 | Part of th address, e.g. zip code and location. |
| Title | The name of the quotation. |
| OrderNumber | The order number. |
| Salutation | The full salutation, e.g. "Dear Lady or Gentleman". |
| CustomText1 | Any text. |
| CustomText2 | Any text. |
| Sum | The summed up price. |
| Currency | The currency of the price. |
| DueDate | The date until the offer is valid. |
| PayTermDays | The term of payment in days. |
| SenderName | The name of the person sending the quotation. |
| Positions (Range) | The requested position with its data. |
| • Position | The name of the requested position. |
| • Description | The description of the requested position. |
| • PersonDays | The number of requested person days. |
| • DailyRate | The daily working rate. |
| • Price | The price of the position. |
| • Comment | Any comment on the position. |
Empty Fields and the Characters Around Them
A merge field with no value renders as nothing, and any characters typed directly against it, with no space between them, are removed together with it. A field wrapped tightly in brackets therefore leaves no empty () behind, and a separator attached to a field disappears with it.
A space stops the removal, so ( «Field» ) keeps its brackets. Anything glued to the field goes with it, including a label you may want to keep, so separate a label from the field with a space if it should always appear.
The rule and its edge cases are described in full under CV Word Generation.
Uploading The Quotation Template
To upload the template document, go to decídalo and navigate to the pricing tab on a proposal page. On the right side of the page, there is a button "Create Quotation". In the popup that appears, click "Change template". Now you can drop your template file or select it in a file browser by pressing the upload button.
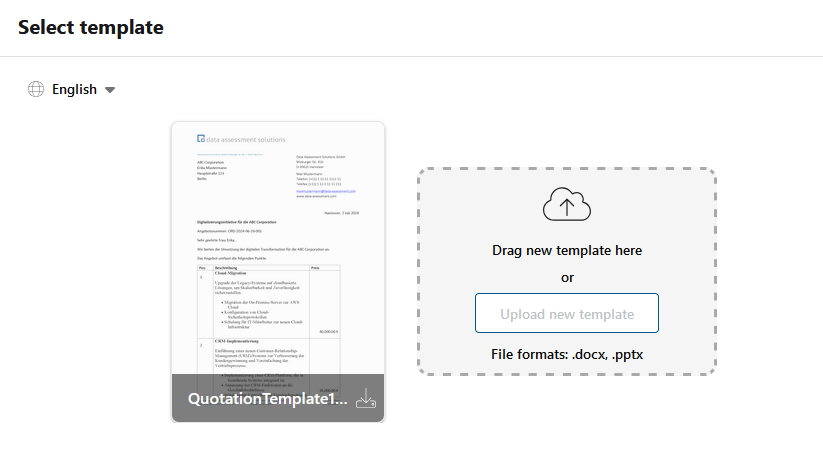
After choosing a display name for the template inside the application, the template will appear in the list of templates. It will show a valid preview if the uploaded document includes no errors. You can now edit the content in the edit section inside decídalo.