Resource Plan
The Resource Plan helps prepare project staffing, monitor ongoing project assignments, and plan future capacity. It supports both operational planning for project managers and higher-level oversight for executives and resource managers.
In detail, the Resource Plan provides a clear, reliable overview of resource planning. It is designed to support both daily scheduling and long-term capacity decisions, helping balance workloads, avoid overbookings, and quickly identify available resources.
By combining bookings and availability in a visual timeline, the Resource Plan enables an overview of who is working on which tasks, when, and to what extent, all in one place.
The page is divided into two main areas. On the left is a filterable list of all company resources (people) as well as a pie chart showing utilization over the selected period. On the right, a time‑based grid shows how each resource is booked (aggregated) during the selected period. Color indicators make it possible to grasp the strength of utilization at a glance.
Additionally, each resource has a drilldown for the entire table area. When expanded using the arrow in the middle of each resource row, all bookings assigned to the resource within the displayed period are also shown. The aggregated resource row is broken down into individual bookings and/or absences in the rows below.
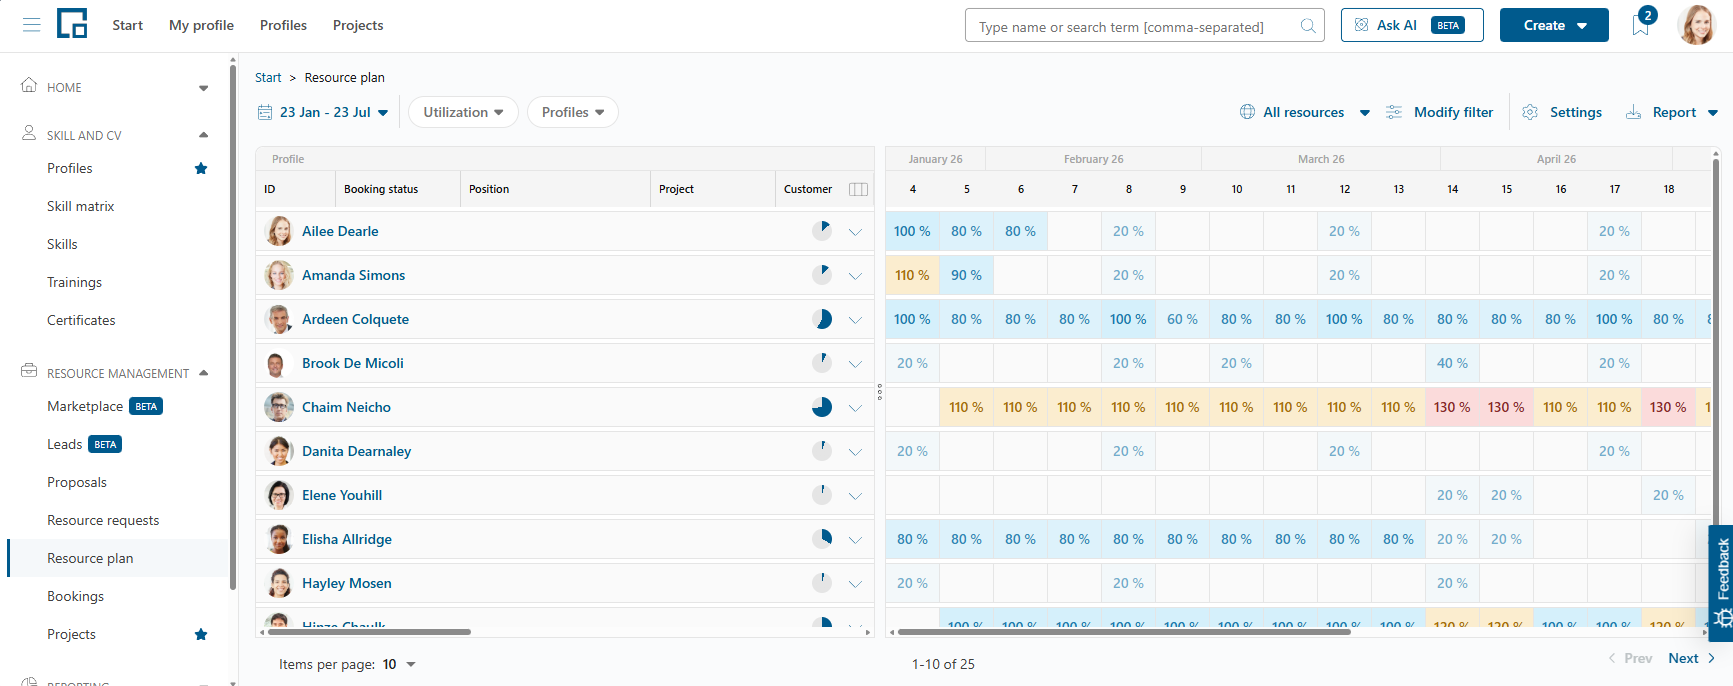
Explanation of the View

- Resource (profile picture and name)
- Pie chart of the resource’s utilization in the selected period
- Aggregated utilization of the resource per time unit (here: week)
- Absences of the resource in the selected period (Todo: link to Working Time Patterns and Absences)
- Booking of a resource
- Time planning of a booking
- Button to add a booking
Viewing a Resource's Profile Details
Clicking a resource's name opens a side drawer on the right with that person's core data, so you can check who someone is without leaving the plan you are working in. Which fields appear, what they are called, and the order they appear in follow the profile core-data configuration in the administration: a field hidden there is not shown here either. Fields without a value are shown with a placeholder.
The reference at the top of the drawer (for example #Profile-42) links to the full profile and opens it in a new tab, so the Resource Plan stays open behind it. Close the drawer with the X in its top right corner, or by clicking outside it.
Opening the name in a new tab still works as before: hold Ctrl (or Cmd) while clicking, or use the middle mouse button, to go straight to the profile instead of opening the drawer.
Customizing the View
To support focused and user-friendly planning, the Resource Plan includes filter and display options. The view can be narrowed down by profiles, teams, and projects (main filters) or by date and utilization range (quick filters), enabling users to focus on the resources and project periods relevant to their current planning task. Additionally, the display format of utilization can be adjusted depending on preference: on the weekly and monthly views between percentage, person‑days, and hours (hh:mm); the daily view always shows hours (hh:mm).
Managing the Main Filters
To edit the main filter, click the “Change filter” button. This opens a sidebar on the right with the current filter values. The values for profiles, teams, or projects can be modified by clicking the dropdown menu. In decídalo, two global filters are defined: “All Resources” and “My Teams.”
The project dropdown lists every project you are permitted to view, plus any project where you are listed as a contact (for example project manager or resource manager), including one you can only reach because you are currently acting as someone's substitute (see Delegations).
Filter values can also be saved as personal filters. After selecting the values, click “Save changes” and “Save as new filter” to apply and store the current filter.
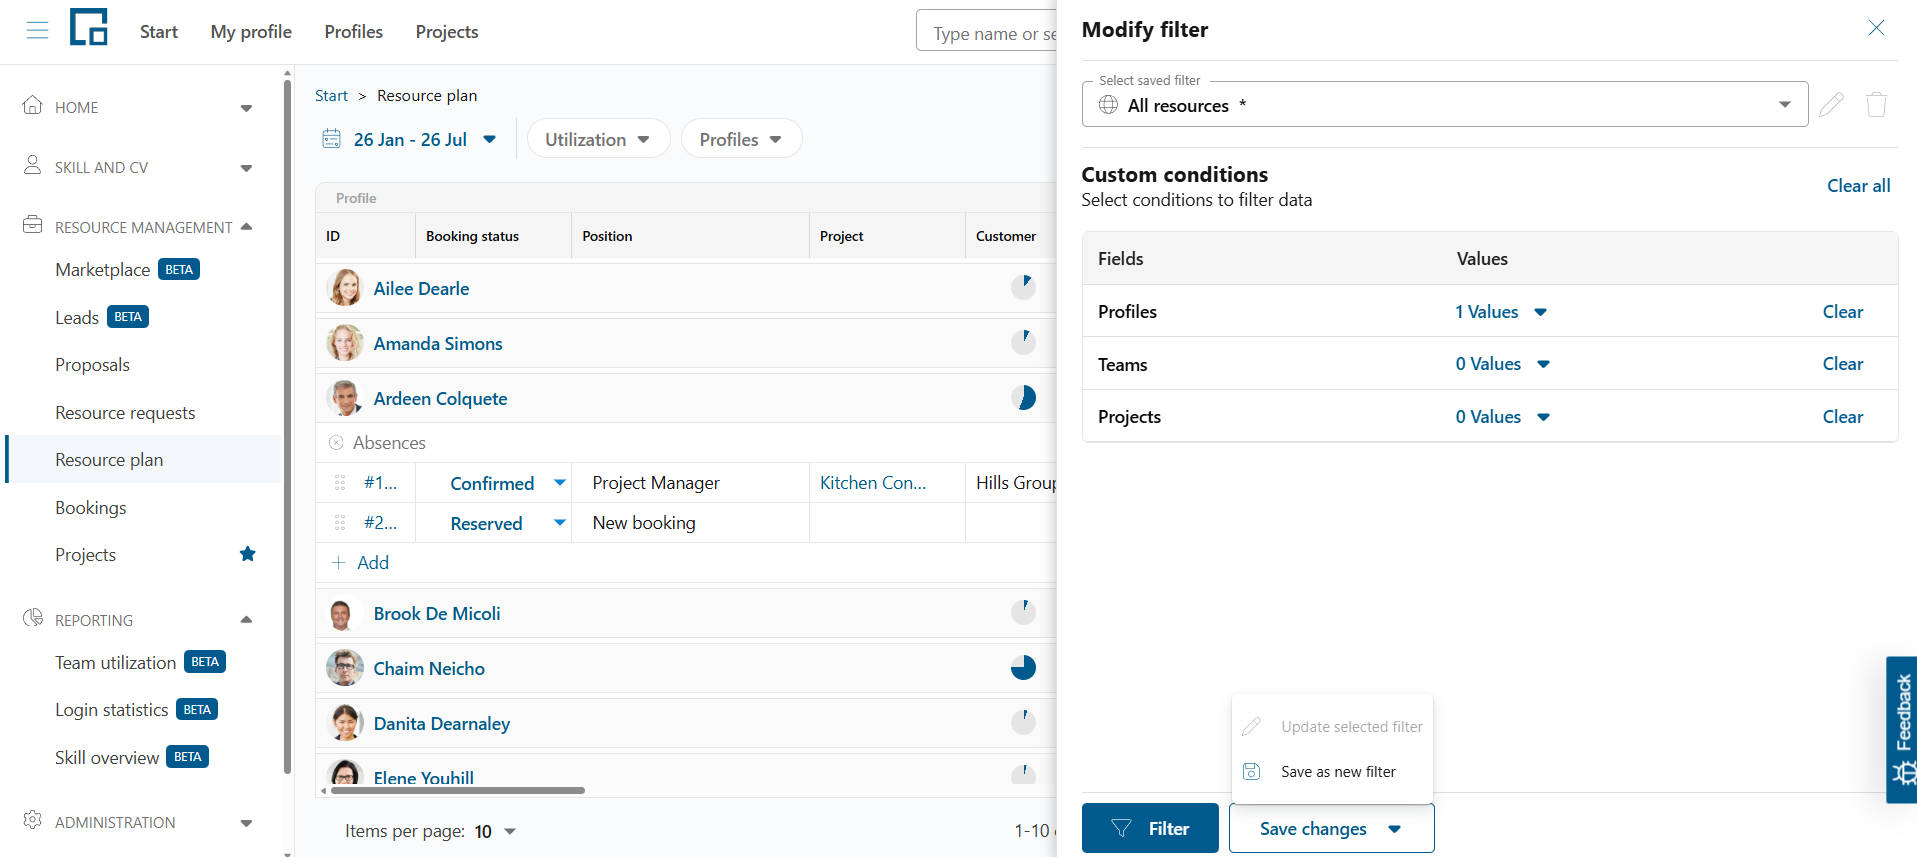
Saved filters can be selected at the top of the Resource Plan to quickly adjust the view. To delete saved filters, select the filter at the top of the sidebar and click the trash icon. Global filters cannot be deleted.
Managing the Quick Filters
Quick filters for the date and utilization range are located at the top left of the Resource Plan. Click them to adjust their values. The date range picker also offers quick duration presets (for example 2 weeks, 1 month, 3 months).
The duration of the selected date range is remembered per user: the next time you open the Resource Plan yourself, it reopens with your last-used duration, starting from today (the exact previous dates are not stored). The utilization/availability filter is likewise remembered. When you jump to the Resource Plan from another page (for example from a profile, project, or search result), it opens with no utilization/availability filter applied.
The additional “Profiles” filter adjusts the profile filter of the main filter. Currently, there are issues when navigating to the Resource Plan from other decídalo pages.
Adjusting the Utilization Display
By default, the timeline displays weeks and utilization in percentage. Both units can be adjusted via the “Settings” button at the top right of the Resource Plan. The available utilization-unit options depend on the selected time unit. The following displays are possible:
| Timeline in | Utilization in |
|---|---|
| Months | Percent |
| Months | Person‑Days (PT) |
| Months | Hours and minutes (hh:mm) |
| Weeks | Percent |
| Weeks | Person‑Days (PT) |
| Weeks | Hours and minutes (hh:mm) |
| Days | Hours and minutes (hh:mm) |
Soft and rejected bookings can optionally be displayed.
Hide Unbooked Project Members
The Hide unbooked project members toggle in the settings hides members who do not have a booking on at least one of the selected projects within the chosen period. Because it depends on the project selection, it only takes effect when at least one project is selected in the filters, and, like the other toggles, your choice is remembered per user.
Show Free Time
The Show free time toggle in the settings switches the aggregated user rows from utilization to remaining capacity. Each cell then shows how much time is still available in the period rather than how much is already booked.
When the toggle is active, an info banner appears above the timeline: "The user rows are showing free time instead of utilization."
Non-revenue bookings in the totals
Some bookings describe internal filler work rather than revenue-related delivery — an internal project, administrative tasks, a certification. Your administrator can mark the corresponding booking accounting types as not revenue related under Booking accounting types. A consultant booked entirely on such work then shows as available, because a resource manager would pull them off it for a revenue-related request.
The Include non-revenue bookings in totals toggle in the settings decides how the Resource Plan shows this, in the same way as Include soft bookings in totals. With it switched off:
- Bookings that are not revenue related are shown hatched, so you can tell at a glance which planned work is displaceable — the same hatching soft bookings get while they are left out of the totals.
- The aggregated resource row counts only revenue-related work, so it matches the availability shown beside it instead of contradicting it.
- The utilization pie chart splits: the blue segment is revenue-related work, the amber segment is work that is not revenue related, and the remainder is free capacity. Hovering it names both shares plus the resulting availability. The first figure reads Revenue related rather than Utilization, because it no longer covers every booking.
The toggle changes the Resource Plan's displayed totals and the basis of its utilization filter. Switching it while a filter is active reloads the plan and shows the people who match the figures you now see. It does not move any booking. The Excel exports of this page follow the toggle as well: they keep the same rows, and the availability columns of the staffing report use the same calculation. In resource requests, booking dialogs and the internal marketplace, non-revenue bookings continue to reduce availability. Global search has its own Revenue related availability toggle for explicitly selecting that calculation.
Like the other toggles, your choice is remembered per user, and it is part of the link you share, so a colleague opens the same view.
Note: The toggle is only shown when the ‘Bench management’ client setting is switched on for your company.
Managing Bookings
The Resource Plan allows users to create and manage bookings directly in the timeline. Resources can be assigned to projects, their role or position can be defined, and the assigned time can be set.
All changes are immediately shown in the availability view, making the impact of a booking on total capacity visible at all times.
Creating Bookings
To create a new booking for a user, expand the user’s rows on the left side of the table and click “Add.” A new row appears at the bottom of the user section. To assign the booking to a project, click the corresponding cell and select the desired project. If the project already has a customer assigned, this field is filled automatically and becomes read‑only.
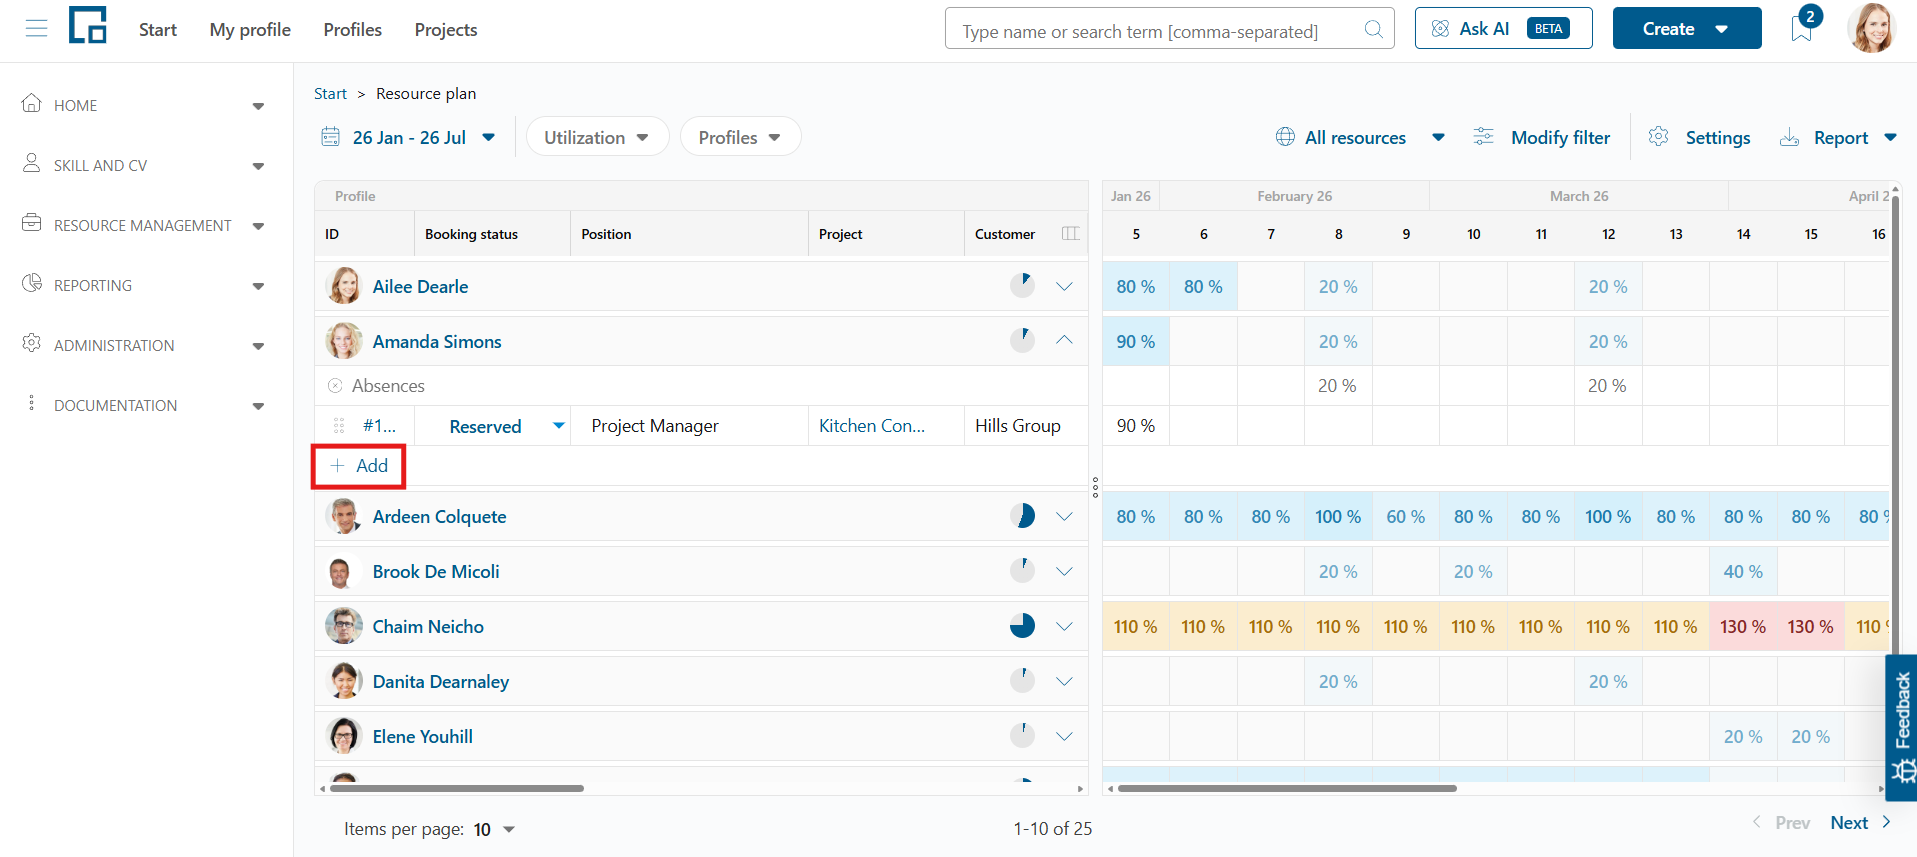
A booking can be scheduled immediately after creation because no required fields must be filled beforehand.
Editing Bookings
The properties of each booking can be edited inline in the table on the left of the Resource Plan. Clicking a cell opens an inline-editable component. Depending on the property, this may be a text field or a selection component. Text values are confirmed by clicking outside the field; selection values are confirmed by choosing an option. A selectable field can be cleared via the small “X” button at the end of the cell.
Assigning Bookings to Another Resource
The resource assigned to a booking can be changed via drag and drop. When hovering over a booking row, an icon appears indicating the row can be grabbed. Click and hold, drag it onto another resource’s row, and release. The booking appears immediately in the new resource's drilldown.
Deleting Bookings
To delete a booking, click the three dots at the end of a booking row and select “Delete.” After confirmation, the booking is deleted immediately and permanently.
Managing Utilization / Time Planning
The timeline on the right side of the Resource Plan shows how each resource is utilized. It also allows adjusting the scheduling of different bookings.
Absences cannot be modified in the Resource Plan (see Todo link for Working Time Patterns and Absences).
Utilization values show how much of a resource’s capacity is assigned in a given period. Lower values indicate available capacity, while higher values indicate full or excessive allocation.
This visual approach enables users to identify underutilized resources, balance workloads, and detect potential risks early. Each user row aggregates all planned bookings or absences belonging to that user.
The timeline can be used similarly to Excel. The following sections explain how planning can be created or modified.
Adjusting Time Planning
The simplest way to adjust time planning is to click a cell and enter or modify a value. Since this can be cumbersome for large periods or multiple bookings, decídalo includes several features to make input easier and faster.
Editing Multiple Cells
To adjust multiple cells at once, select them with the cursor. Typing a value applies it to all selected cells.
This is a simple way to distribute planning consistently over a known period.
Copying Existing Values
If a value already exists in a cell, it can be extended to other cells by dragging the lower right corner of the selected cell (blue square).
This makes it easy to extend existing planning or delete planning quickly by dragging from an empty cell.
Shifting Planning
To shift planning to a new period, select the relevant cells and drag them to the new location. decídalo highlights the target area with dashed blue lines.
This allows quickly moving project bookings earlier or later without changing the planned amount of time.
Redistributing Planning in a Period
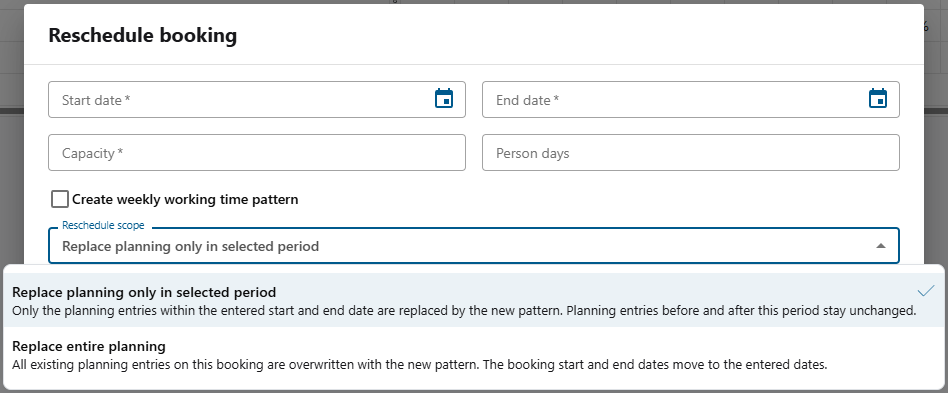
To distribute planning evenly within a specific period, use the “Reschedule” dialog. Access it by clicking the three dots at the end of a booking row and selecting “Reschedule.” The dialog allows selecting start date, end date, and capacity or person‑days.
Additionally, the Scope dropdown controls how existing planning outside the selected period is handled:
| Option | Behavior |
|---|---|
| Replace planning only in selected period | Only planning entries within the selected start/end date range are replaced by the new pattern. Planning entries before and after this period stay unchanged. Use this when you want to adjust part of a booking without affecting the rest. |
| Replace entire planning | All existing planning entries on the booking are overwritten with the new pattern. The booking start and end dates move to the entered dates. Use this when you want to start fresh. |
By default, “Replace planning only in selected period” is pre-selected, the safer option for partial adjustments.
Clicking “Reschedule” applies the new planning.
Moving Planning to Another Resource
To move planning to another resource, select all or part of the cells and drag them to the aggregated row of the new resource. decídalo marks the target area with dashed blue lines.
This creates a copy of the booking for the new resource and transfers the planning for the selected period.
This is a fast way to move bookings from overloaded resources to available ones.
Synchronizing Booking Dates with Planning
A booking's start and end dates can be kept in sync with its planning automatically, so the booking period always reflects when the resource is actually planned.
This behavior is controlled by the Synchronize booking dates with planning setting in the administration configuration. It is disabled by default and can be enabled by an administrator for the whole company.
When the setting is enabled:
- Whenever you change a booking's planning in the timeline (adding, extending, shifting, or removing planned time), the booking's start date and end date are adjusted automatically to match the actual planned days. The start date moves to the first planned day and the end date to the last planned day, regardless of whether you plan in the daily, weekly, or monthly view.
- If you remove all planning from a booking, its start and end dates are cleared, because the booking no longer covers any planned period.
Note: You do not need to adjust the booking dates manually while this setting is active, because editing the planning is enough. With the setting disabled, booking dates stay as they are and are only changed when you edit them yourself (for example through the Reschedule dialog).
Reporting
The integrated reporting functions allow generating utilization and booking reports directly from the Resource Plan. These reports support strategic capacity planning, internal reviews, and communication with stakeholders and can be exported for further analysis. The desired report can be selected via the “Report” button in the top right corner.
Daily base, Weekly base, Monthly base
The “Daily base,” “Weekly base,” and “Monthly base” reports export the current view of the Resource Plan into an Excel file. The export honours the filters and settings you have applied (profiles, teams, projects, the utilization/availability range, and the display toggles), so the exported numbers match what is shown on screen. The three reports differ only in the aggregation level of the utilization data (day, week, or month).
The Weekly base and Monthly base reports export the values in the display unit selected on screen (capacity, person days, or hours); the Daily base report is always in hours. To make a downloaded file unambiguous, the unit is shown in each period column header as [%], [PD], or [h].
The “Weekly by team” report has moved: it is now available directly on the Team Timeline page, via its own export button.