My Timesheet
Note: Time recording is currently a beta feature and is being rolled out with pilot customers. If you would like to take part, please get in touch with us.
My timesheet is where you record your own working and project times. If the terms used here are new to you (working time versus recorded time, subjects, statuses), start with the Time recording concept.
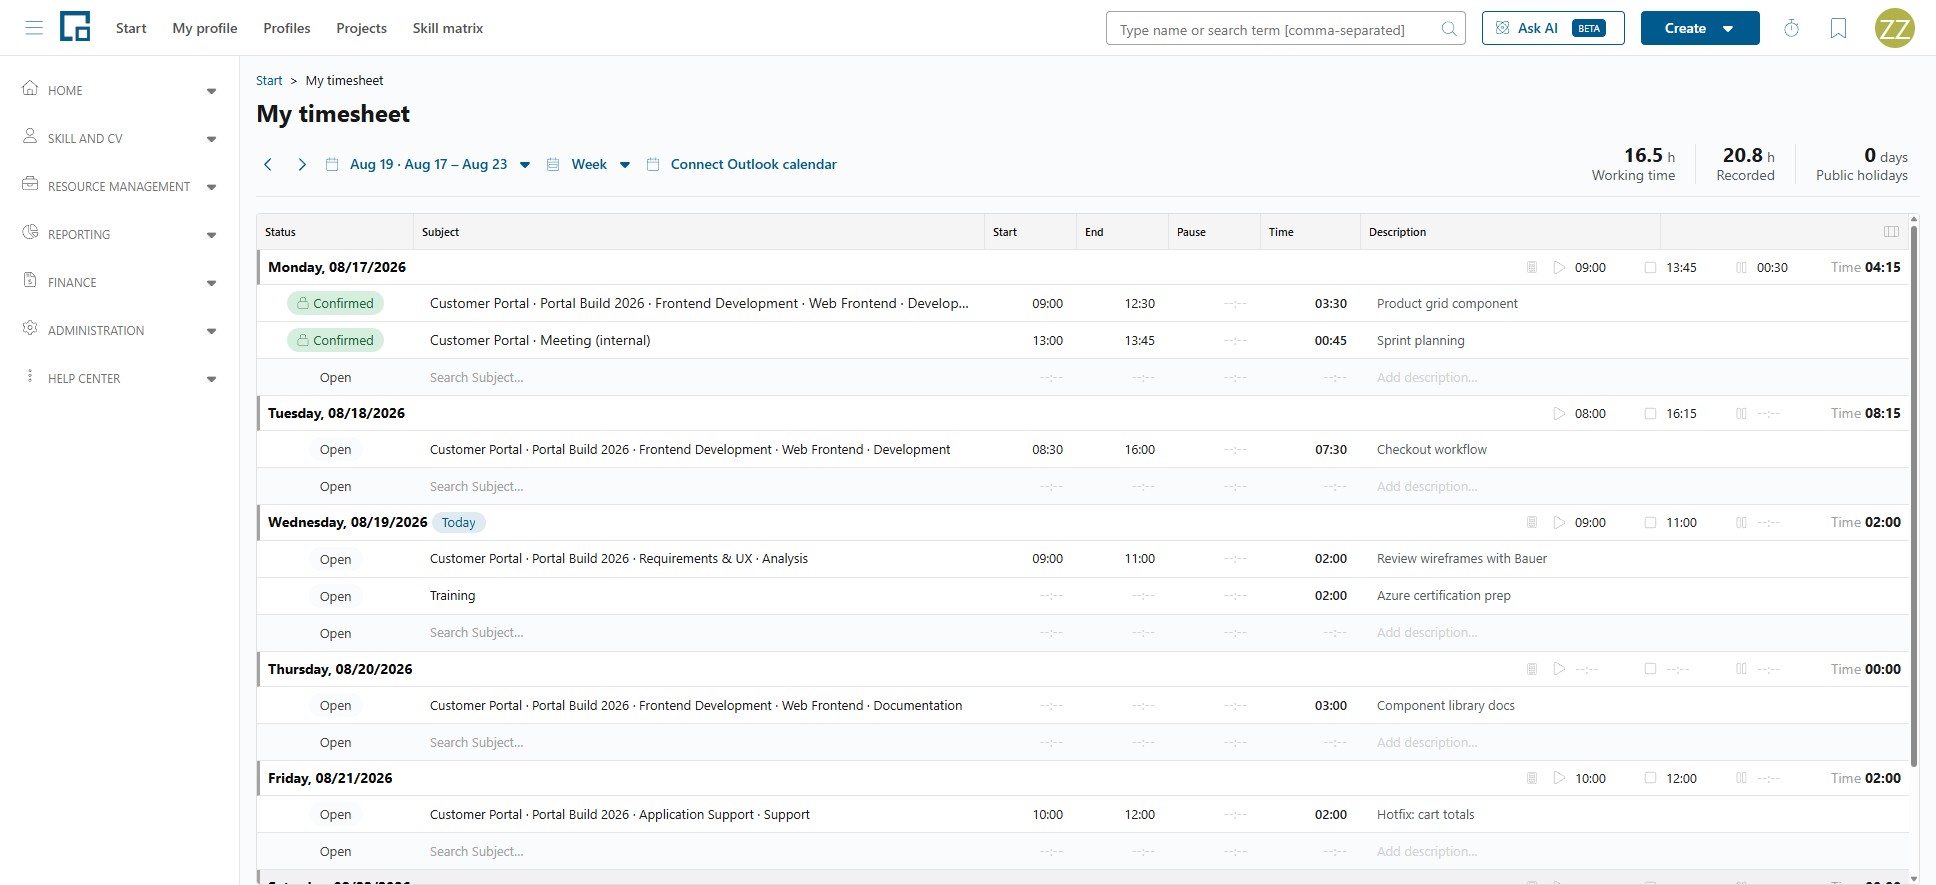
Opening your timesheet
Select My timesheet in the Home area of the menu.
If the entry is not there, either time recording is not enabled for your company, you do not have the beta features permission, or your Timesheet view permission is set to None. That value normally hides your own timesheet as well as everyone else's, unless you stand in for someone whose reach covers you.
Choosing a period
The toolbar controls which period you are looking at:
- Day, Week and Month switch the view. Your choice is remembered, so the timesheet opens the same way next time.
- Previous and Next step forward and backward by one day, week or month, depending on the current view.
- Clicking the date opens a calendar, with Today to jump back to the current date and Done to close it.
Non-working days, as defined by your working time pattern, are greyed out. Public holidays of your holiday calendar are greyed the same way and carry a Public holiday label next to the date. You can still record on all of them; the shading is only a hint. See Working Time Patterns, Absences & Availability.
The summary tiles
Three figures are shown for the selected period:
| Tile | What it counts |
|---|---|
| Working time | "Net attendance (start to end minus pause) across the selected period." |
| Recorded | "Total time recorded on entries in the selected period." |
| Public holidays | "Public holidays of the user's holiday calendar in the selected period." |
They are deliberately independent of each other (see Working time and recorded time).
Exporting a work time report
The Report button in the toolbar collects the reports you can download from the timesheet. Today it offers one, Work time report: an Excel file with one row per day that sets your attendance against the time you are expected to work and keeps a running balance of the difference.
Choosing it opens a dialog with the period prefilled from the view you are looking at (the day, week or month currently shown). Change the period if you like, then click Export. The file is named after the period, for example work_time_report_2026-06-01_2026-06-30.xlsx.
Each row carries these columns:
| Column | What it shows |
|---|---|
| Date, Weekday | The day. Every day of the period is listed, including weekends and holidays. |
| Start, End | Your attendance window for the day, the same start and end the day header shows. Empty on a day without one. |
| Break | The pause inside that window. |
| Actual working time | Start to end minus the break, the figure the Working time tile adds up. |
| Target working time | What you are expected to work that day according to your working time pattern. It is 0 on non-working days and on public holidays, and an absence (vacation, sick leave, a half day) reduces it by the absent time, down to 0 at the lowest. |
| Overtime | Actual minus target. Negative when you worked less than expected, including a day you did not record at all. |
| Balance | The overtime added up from the first day of the exported period to this one. The last row is the period's total. |
Durations are written as hh:mm, with a minus sign where the value is negative.
A few things worth knowing:
- The balance starts at zero on the first exported day. It does not carry anything over from before the period, so choose the period you want to account for (a quarter, a year) rather than the week you happen to be looking at.
- Only attendance counts as actual working time. An entry with just a duration in Time and no start and end does not contribute. See Working time and recorded time.
- Where your working time pattern, holiday calendar and absences come from is described in Working Time Patterns, Absences & Availability.
Recording time in the grid
In the week and month views the timesheet is a grid, one block per day. Each day header shows the date, a Today marker on the current day, and that day's working time.
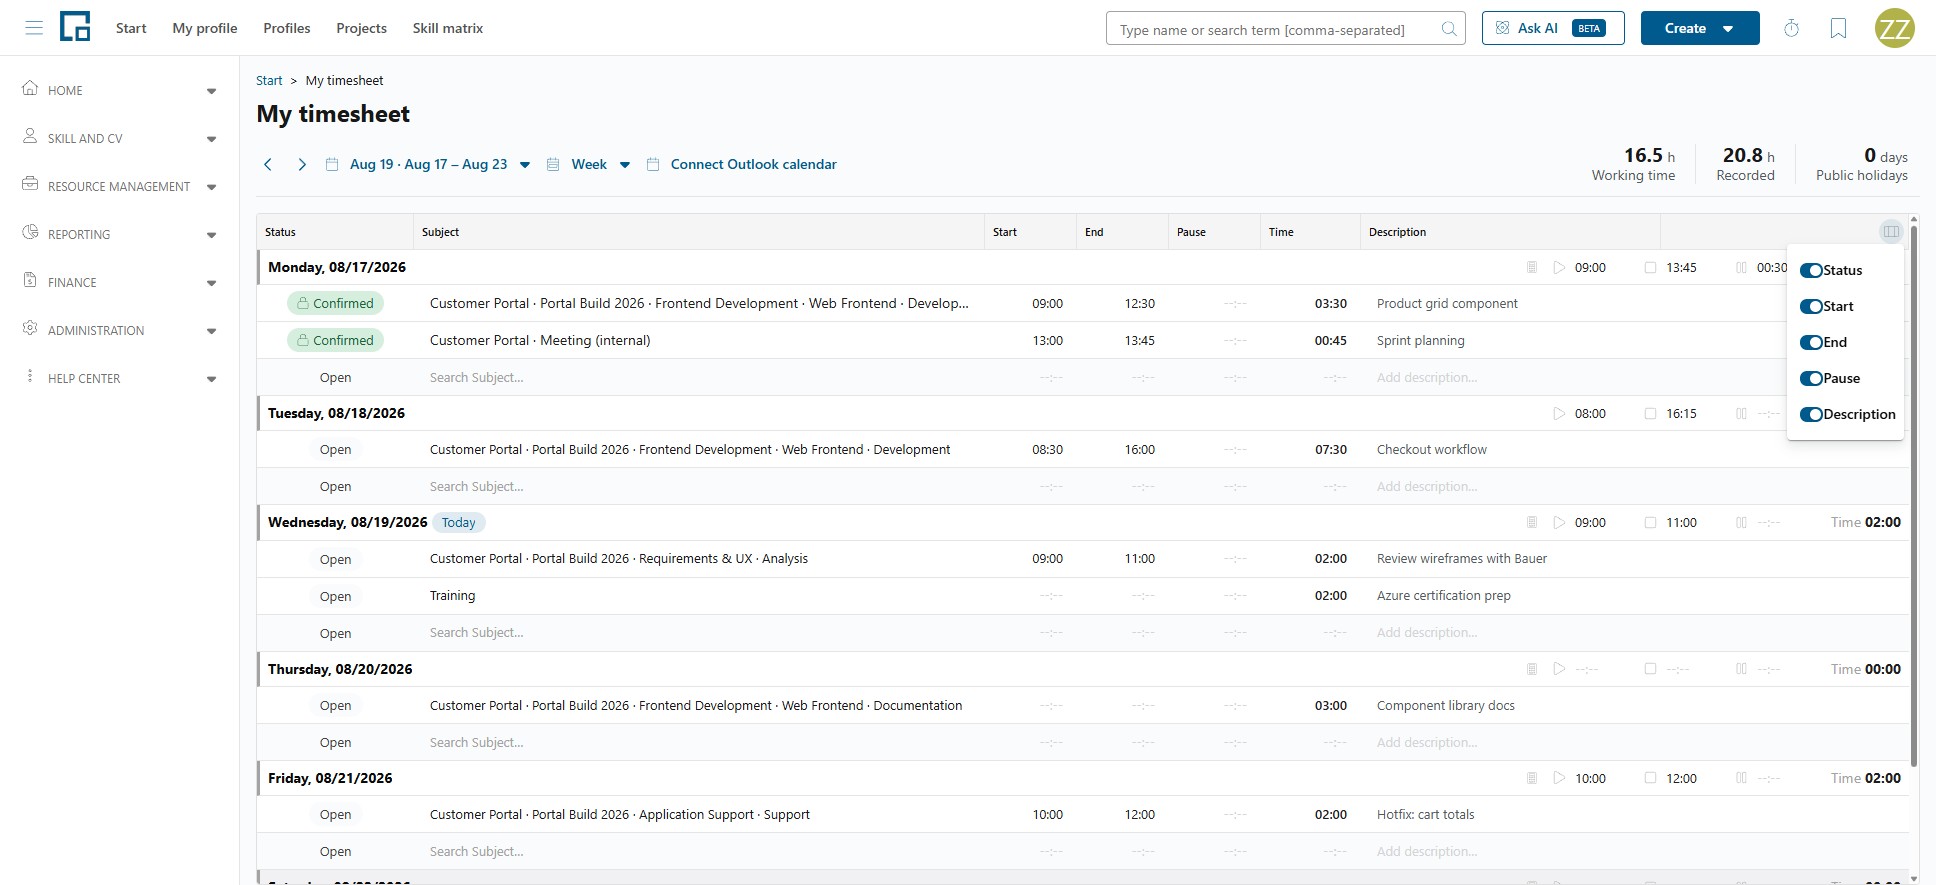
The columns are Status, Subject, Start, End, Pause, Time and Description. Subject and Time are always shown; the others can be hidden. Use the menu in the last header cell to switch columns on and off. Your choice, and the column widths, are remembered.
There is no "add" button. The bottom row of every day is an empty placeholder row: start typing in it and the entry is created when you leave the row. Cells are edited directly in the grid and saved as you go, and a row being saved shows a spinner with Saving…. Use Tab and Enter to move between cells.
Times are entered as hh:mm. Two rules are enforced:
- "End must be at or after start (the same time is allowed)."
- "Pause cannot be longer than the time between start and end."
You do not have to give a start and end time at all. An entry with only a duration in Time is perfectly valid. That is the normal case when you know you spent two hours on something but not exactly when.
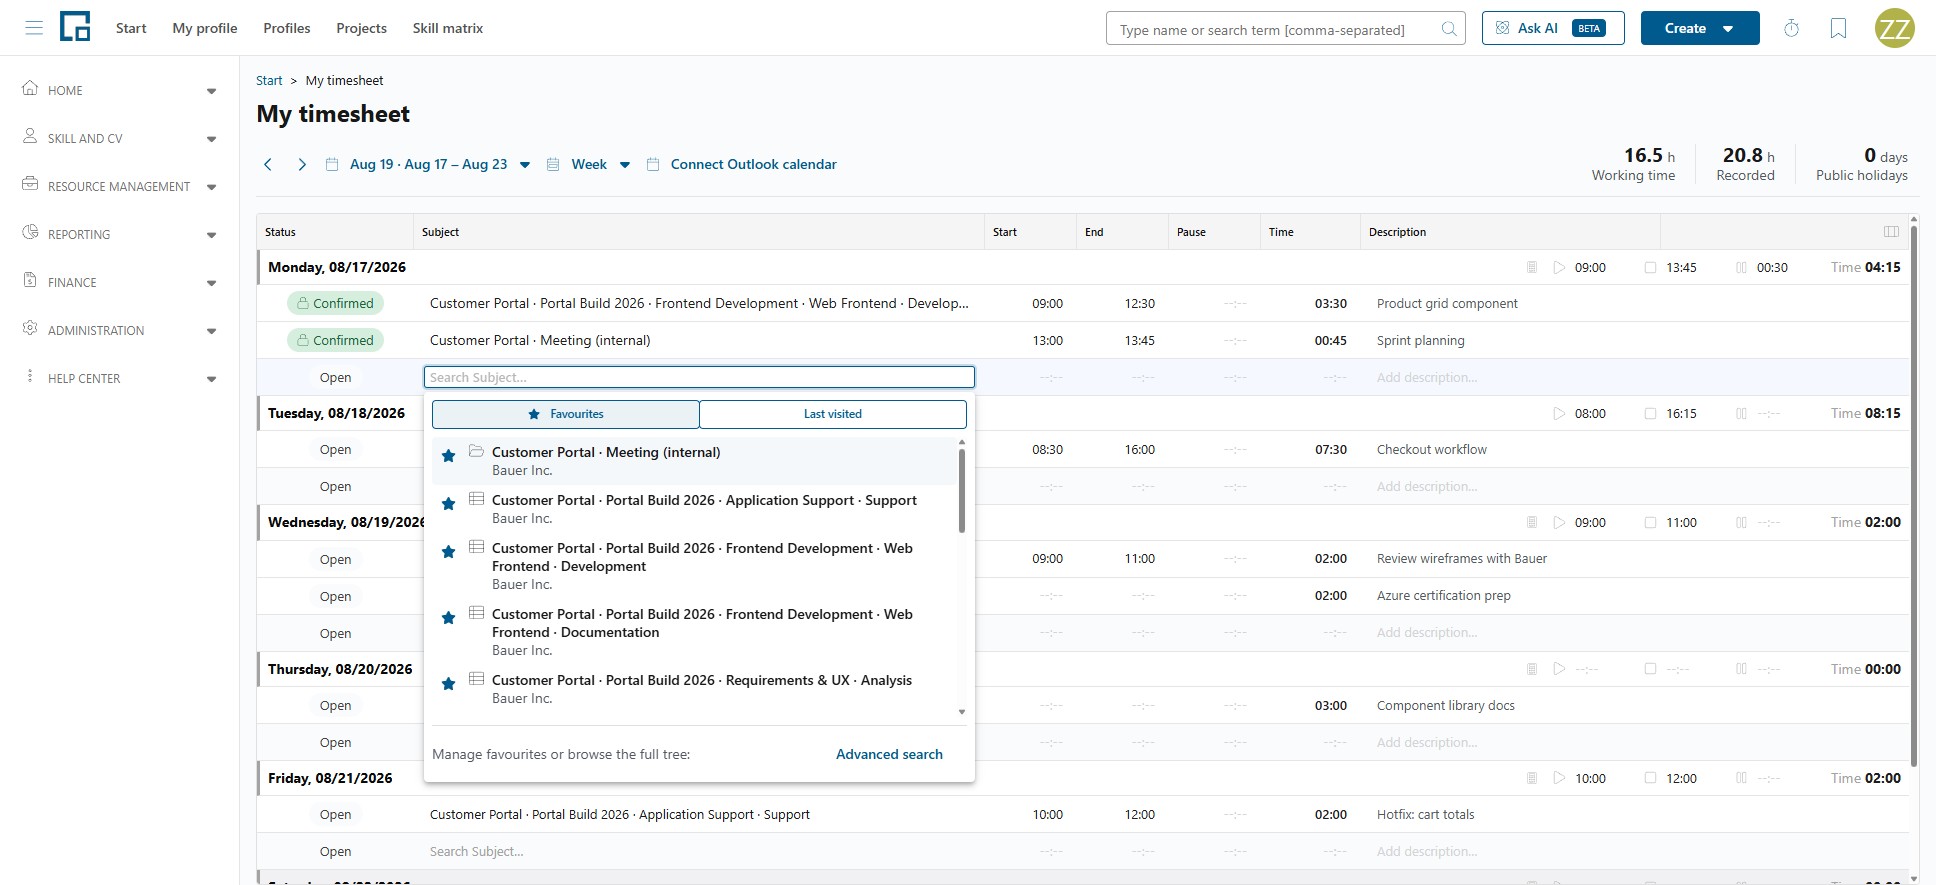
Choosing a subject
The Subject cell is where you say what the time was for. Clicking it opens a picker with two tabs:
- Favourites: the subjects you have starred.
- Last visited: the subjects you used most recently.
Use Mark favourite and Remove favourite on the star to manage the first list.
Typing straight into the picker searches the subject names as they are displayed: the path you see in the list, nothing more.
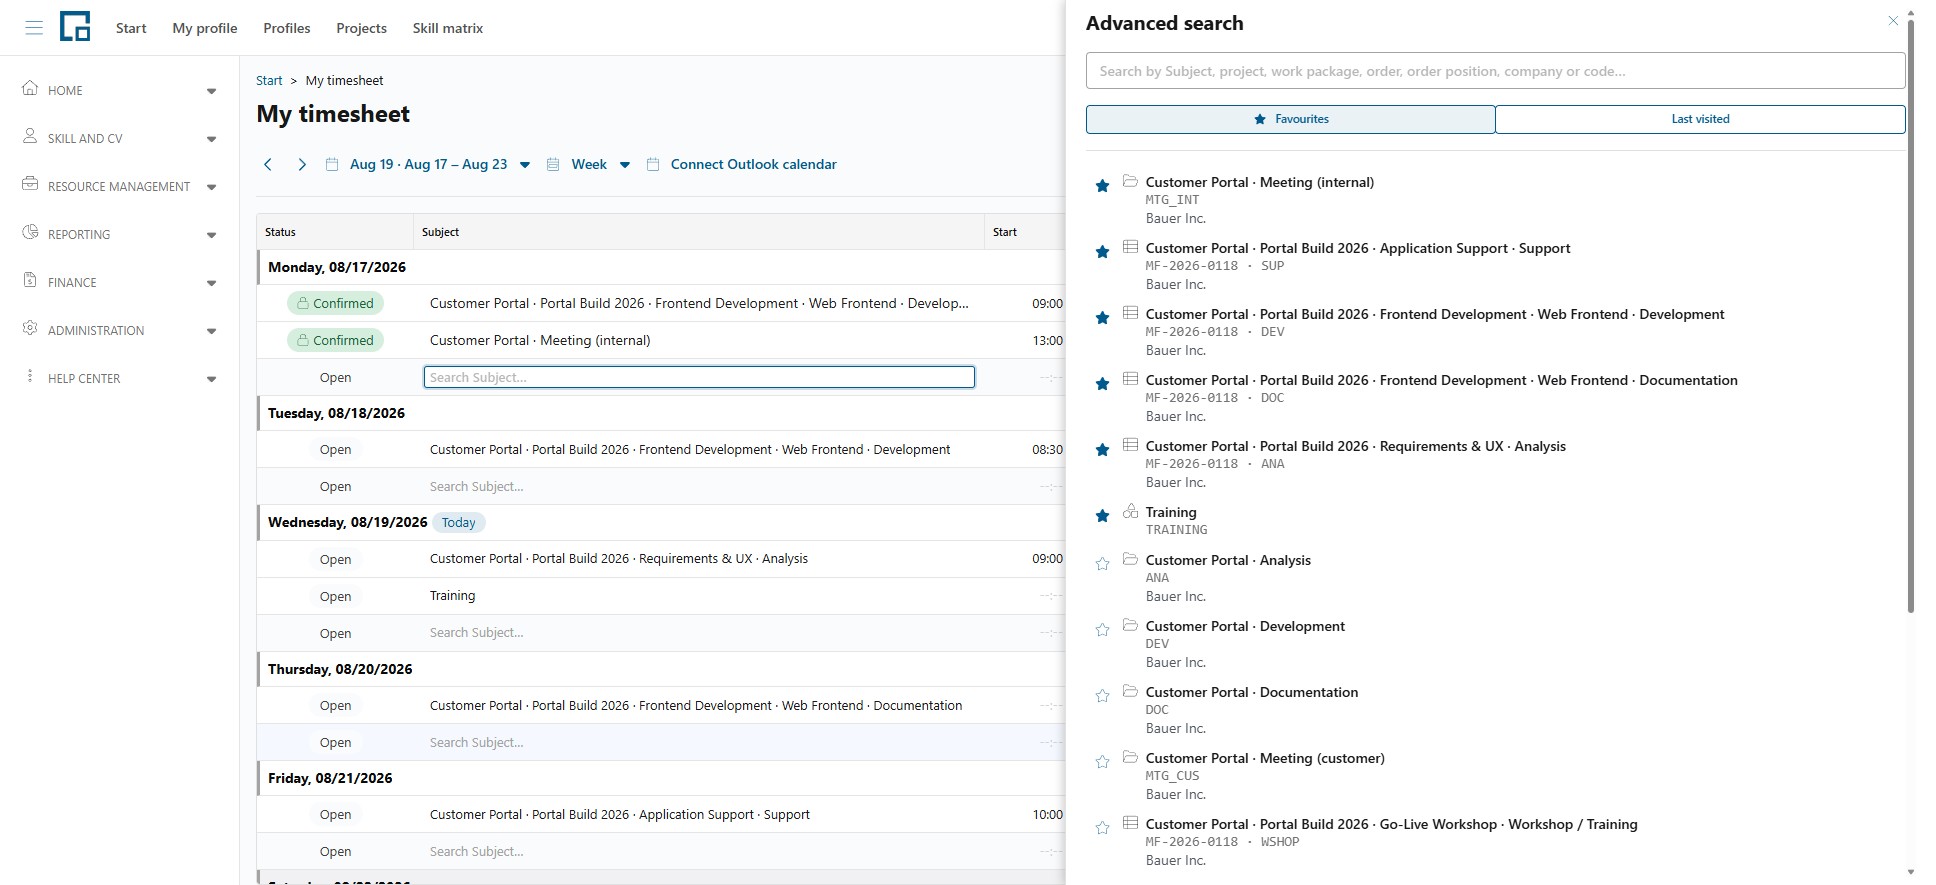
Below the tabs, "Manage favourites or browse the full tree:" leads to Advanced search, which opens a drawer over every subject you may record on. It searches wider than the picker does, which is what makes it worth opening:
- the subject name, as in the picker
- the customer the project belongs to
- the external codes of everything in the path: project, work package, order, order position and activity type
So if your organization identifies projects or orders by a number rather than a name, the advanced search is where that number will find them.
If a list is empty you see "Nothing in this list. Try another tab or search.", and a search with no result gives "No subject matches. Try another name." In both cases the subject you want may simply not be available to you: which subjects you can choose is decided per project, see Setting Up Time Recording on a Project.
Recording types beside the time
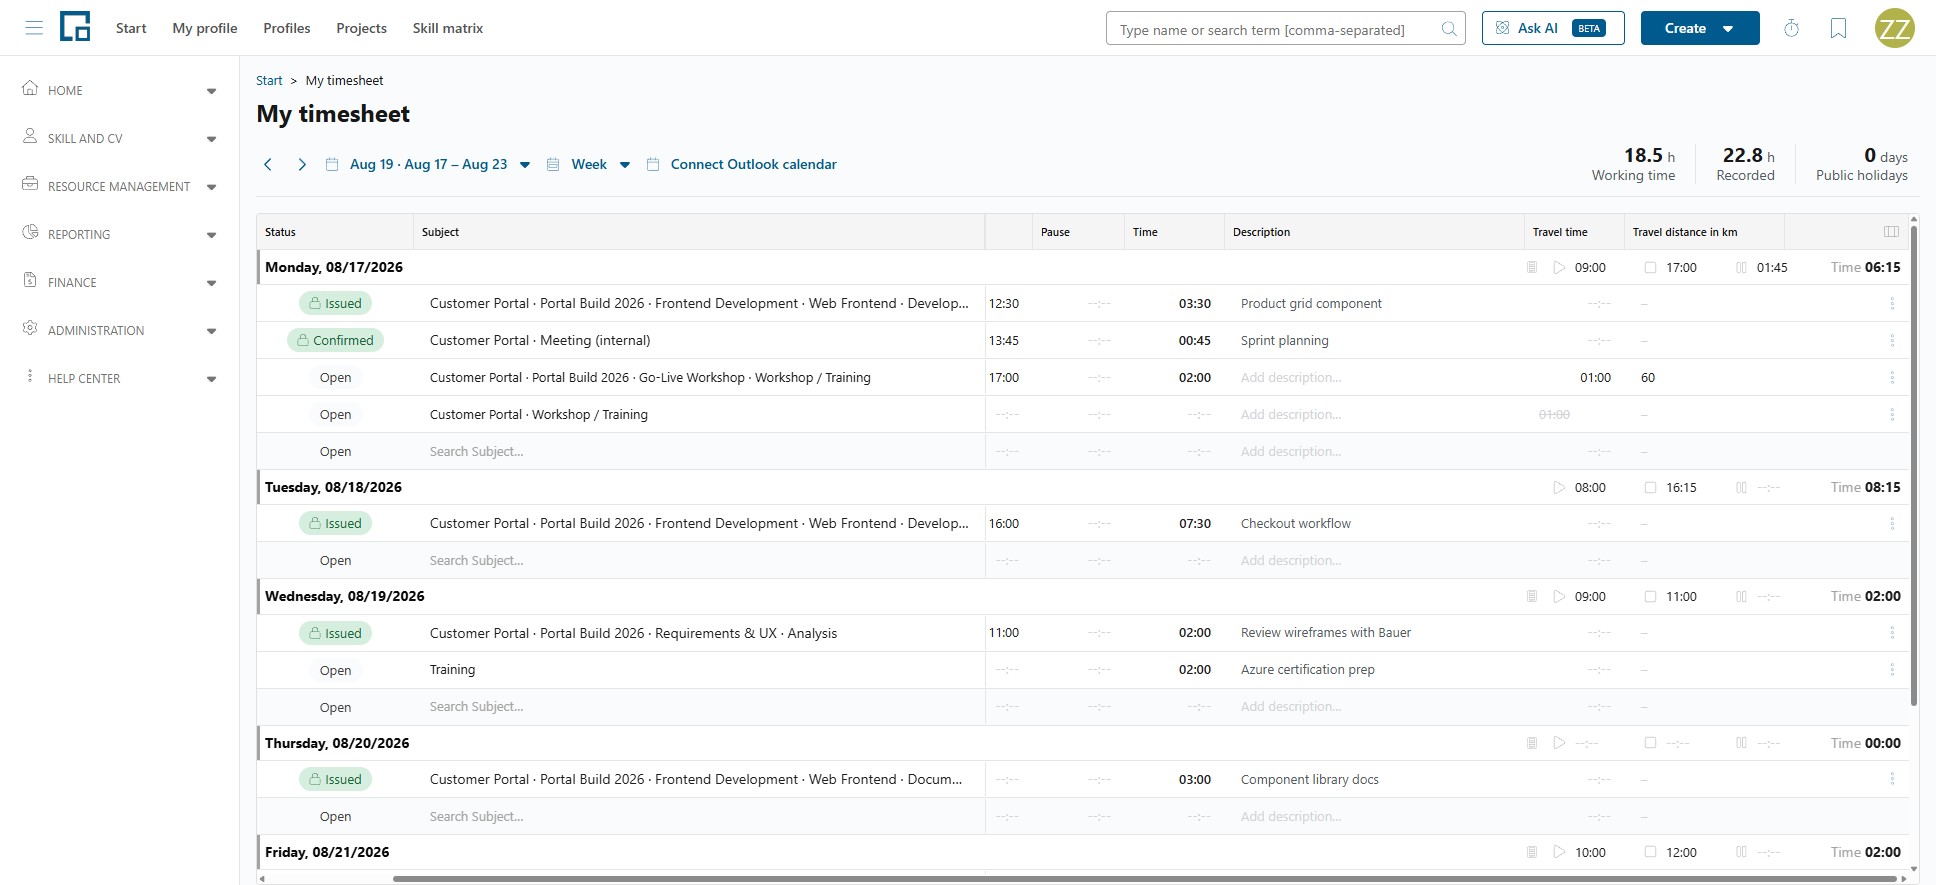
Where a subject records more than time, each further value has its own column: Travel time, Travel distance, whatever your administrator called it. See What an entry records.
They behave like the columns you already know:
- A time column (travel time) is typed as hh:mm, with the same shortcuts as Start and End: type
130or1.5for an hour and a half,Delclears the cell. - A distance column is typed as a plain number in your locale's format.
- Tab walks into them in the order the columns are shown, and skips any the row cannot fill.
Status and Subject stay in place when you scroll the sheet sideways, so a row never loses the two things that say what it is. The day's own line (its date and your working time) does not scroll with the entries either. The row's actions at the far end are always visible, and simply grow stronger under the pointer; while a row is saving they are replaced by a spinner.
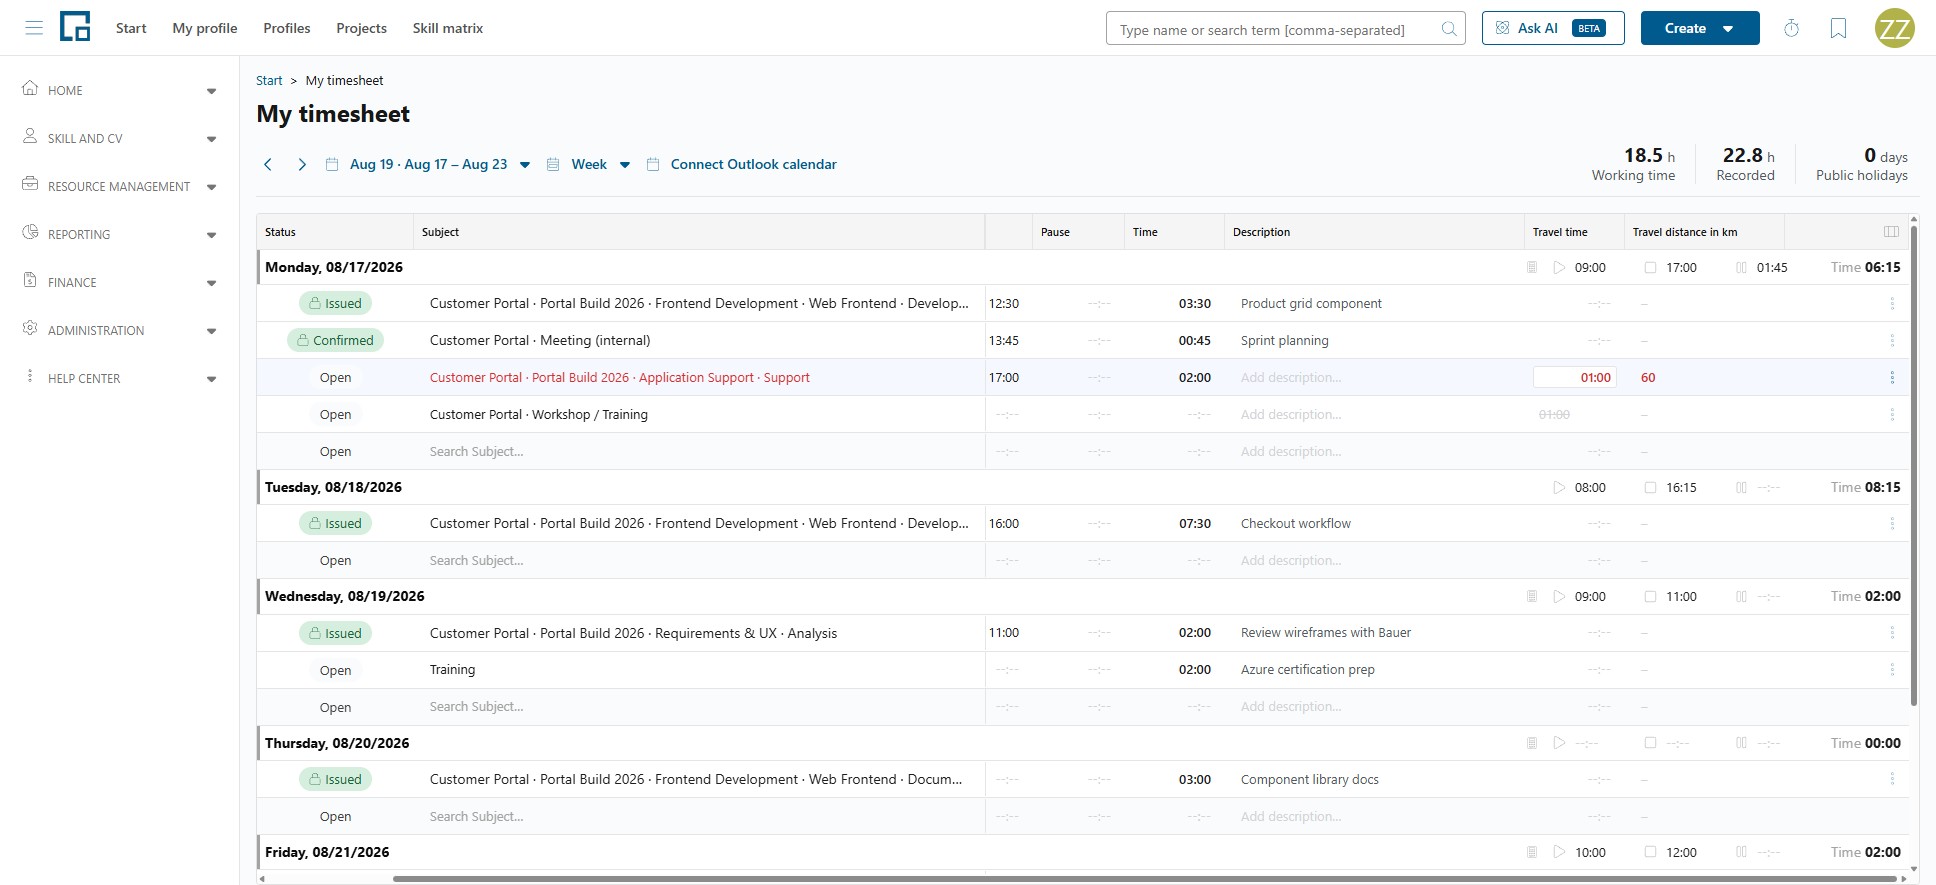
A cell you cannot type into is telling you something, and there are two different messages:
| What you see | What it means |
|---|---|
| An empty, greyed cell | This subject does not record that type. Hovering says so; switch it on for the subject to use it. |
| A struck-through value | Something was recorded here, and the type no longer applies, because the type was switched off for the subject since. The value is kept, still counts for billing, and can no longer be changed. |
| A red value and a red subject | You changed the subject to one that does not record that type, and the change has not been applied yet. Nothing is lost: clear the value, or pick a different subject, and the change goes through. Every red field says which. |
A duration you type (travel time, or any other timed type your administrator has added) cannot exceed 24 hours: a day holds no more. Typing a plain number means hours, so "30" comes back as 24:00.
Use Columns to hide the ones you do not need. A type your administrator has deactivated is not in that menu at all, because its column is gone everywhere.
The working time for a day
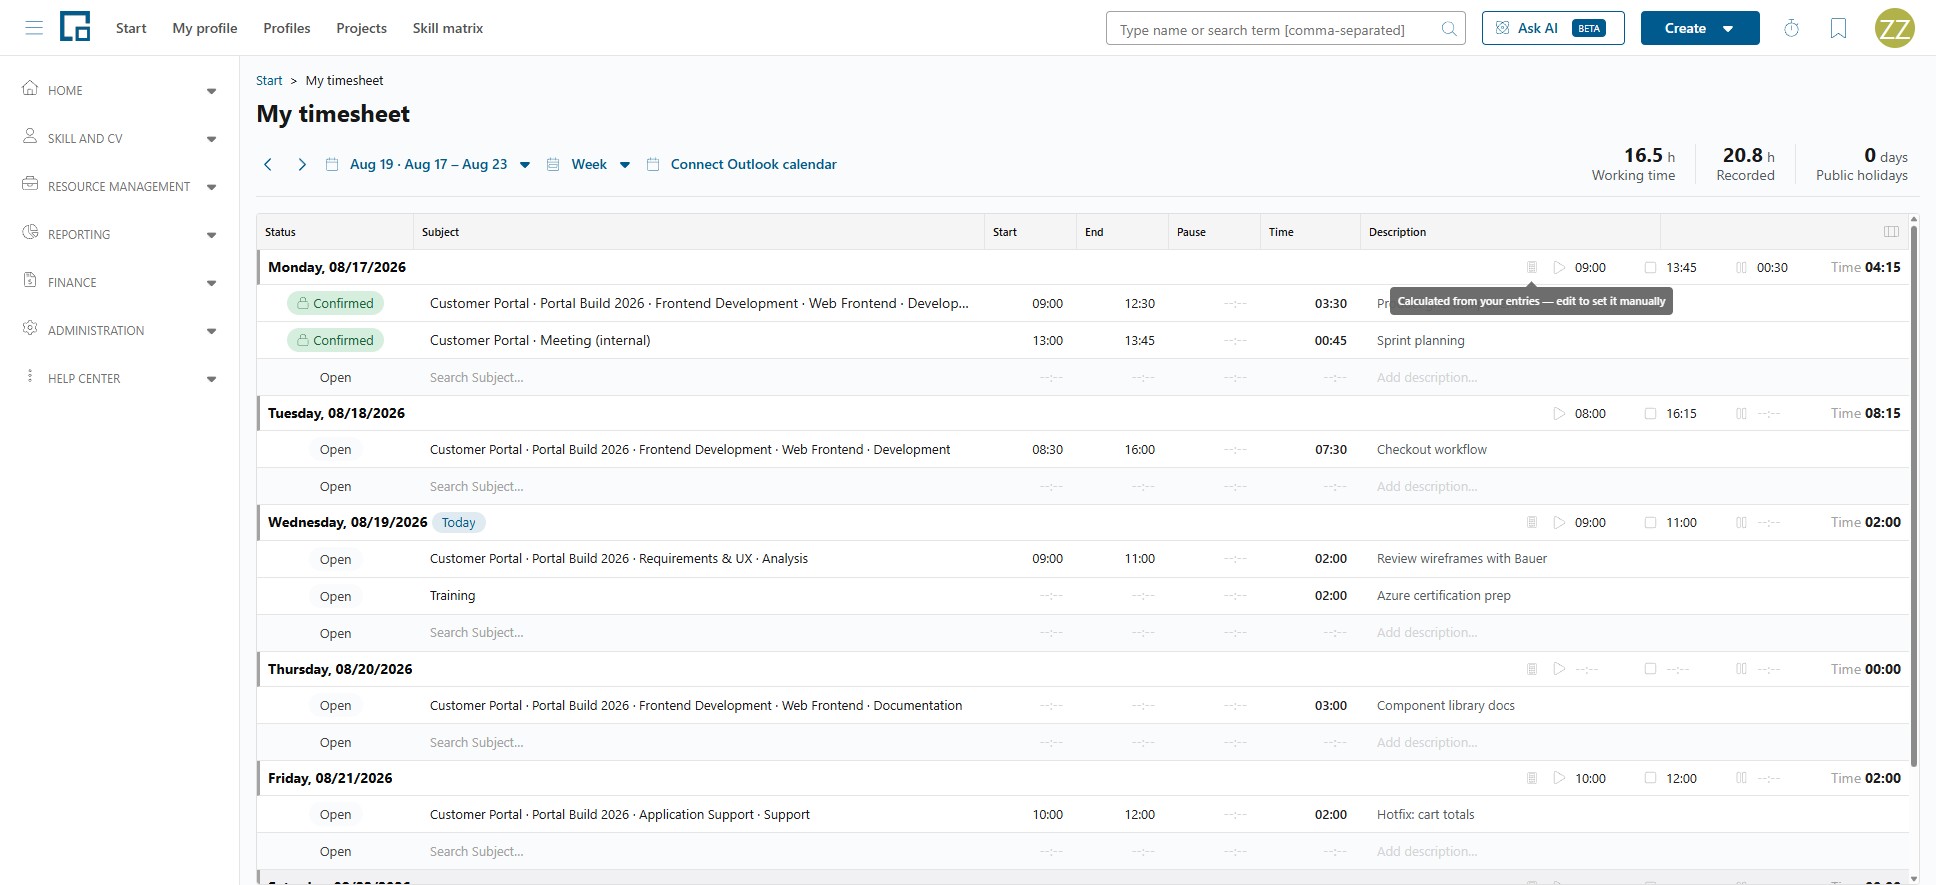
Each day has its own Start, End and Pause, shown in the day header and in the Working time section of the day view.
Whether you can edit these depends on a company setting:
- Manual working-time recording off: the value is read-only and carries "Calculated from your entries. Manual working time recording is turned off." It adds up from the entries that have a start and end time.
- Manual working-time recording on: the value is editable and marked "Calculated from your entries. Edit to set it manually". Anything you type takes precedence over the calculated value.
Changes are saved as you make them, indicated by Saved automatically.
Copying and deleting entries
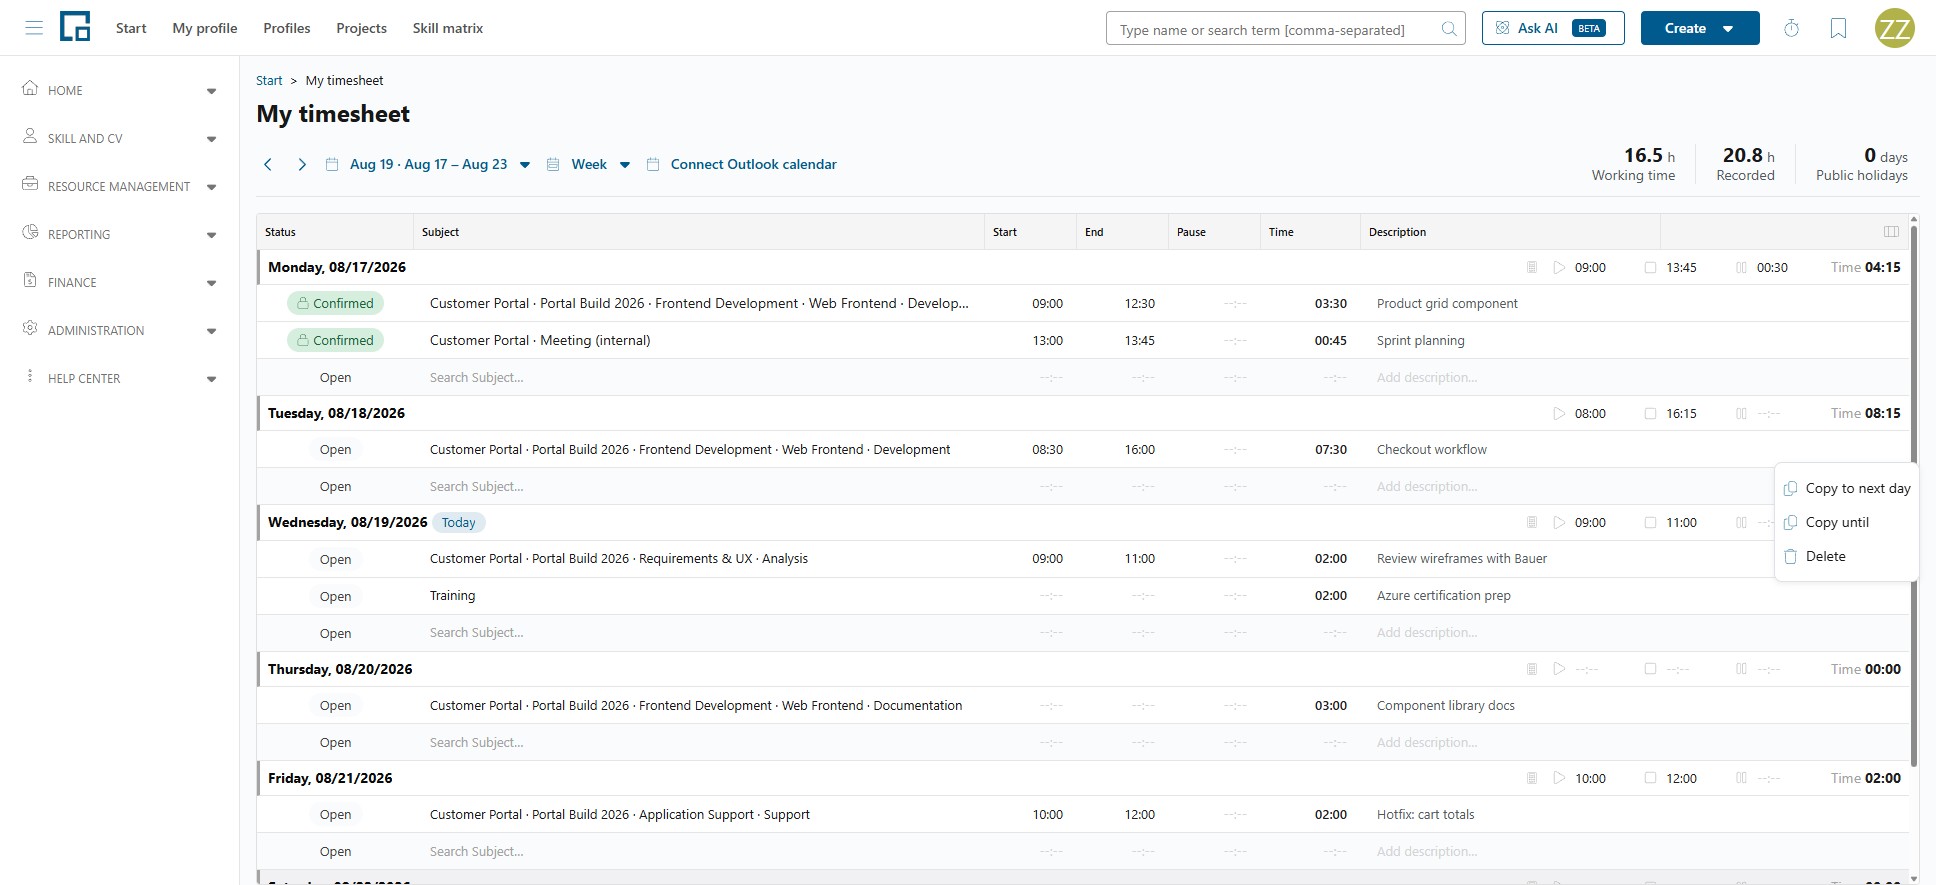
Each row has a More actions menu:
- Copy to next day: duplicates the entry onto the next calendar day. That is literally the day after, so on a Friday the copy lands on the Saturday, even though it is not a working day.
- Copy until: duplicates it onto every day from the day after the original up to and including the date you choose, but only onto working days. The days greyed out in your timesheet are skipped, both non-working days and public holidays, so copying a Monday entry until the end of the following week gives you nine copies, not thirteen. The dialog has a Date field and a Copy button; picking a day that is not after the original gives "Pick a day after the source day."
- Delete: removes the entry.
Delete is unavailable on entries that are locked, and copying fails when the subject is no longer available: "This subject isn't available to record against, so the entry can't be copied." That happens when a project has since stopped allowing that activity type.
Warnings about project dates
If an entry falls outside the dates of its project or work package, a note appears on the row:
- "Before the project's start date (…)."
- "After the project's end date (…)."
- "Before the work package's start date (…)."
- "After the work package's end date (…)."
These are messages only. The entry still saves, and nothing is blocked. They are there to catch the case where you picked the wrong subject or the wrong week.
Suggested entries
A Suggested entry is one that has been proposed rather than recorded. It counts towards nothing until you act on it, and you either take it or leave it:
- Accept turns it into a normal Open entry, which you can then edit like any other.
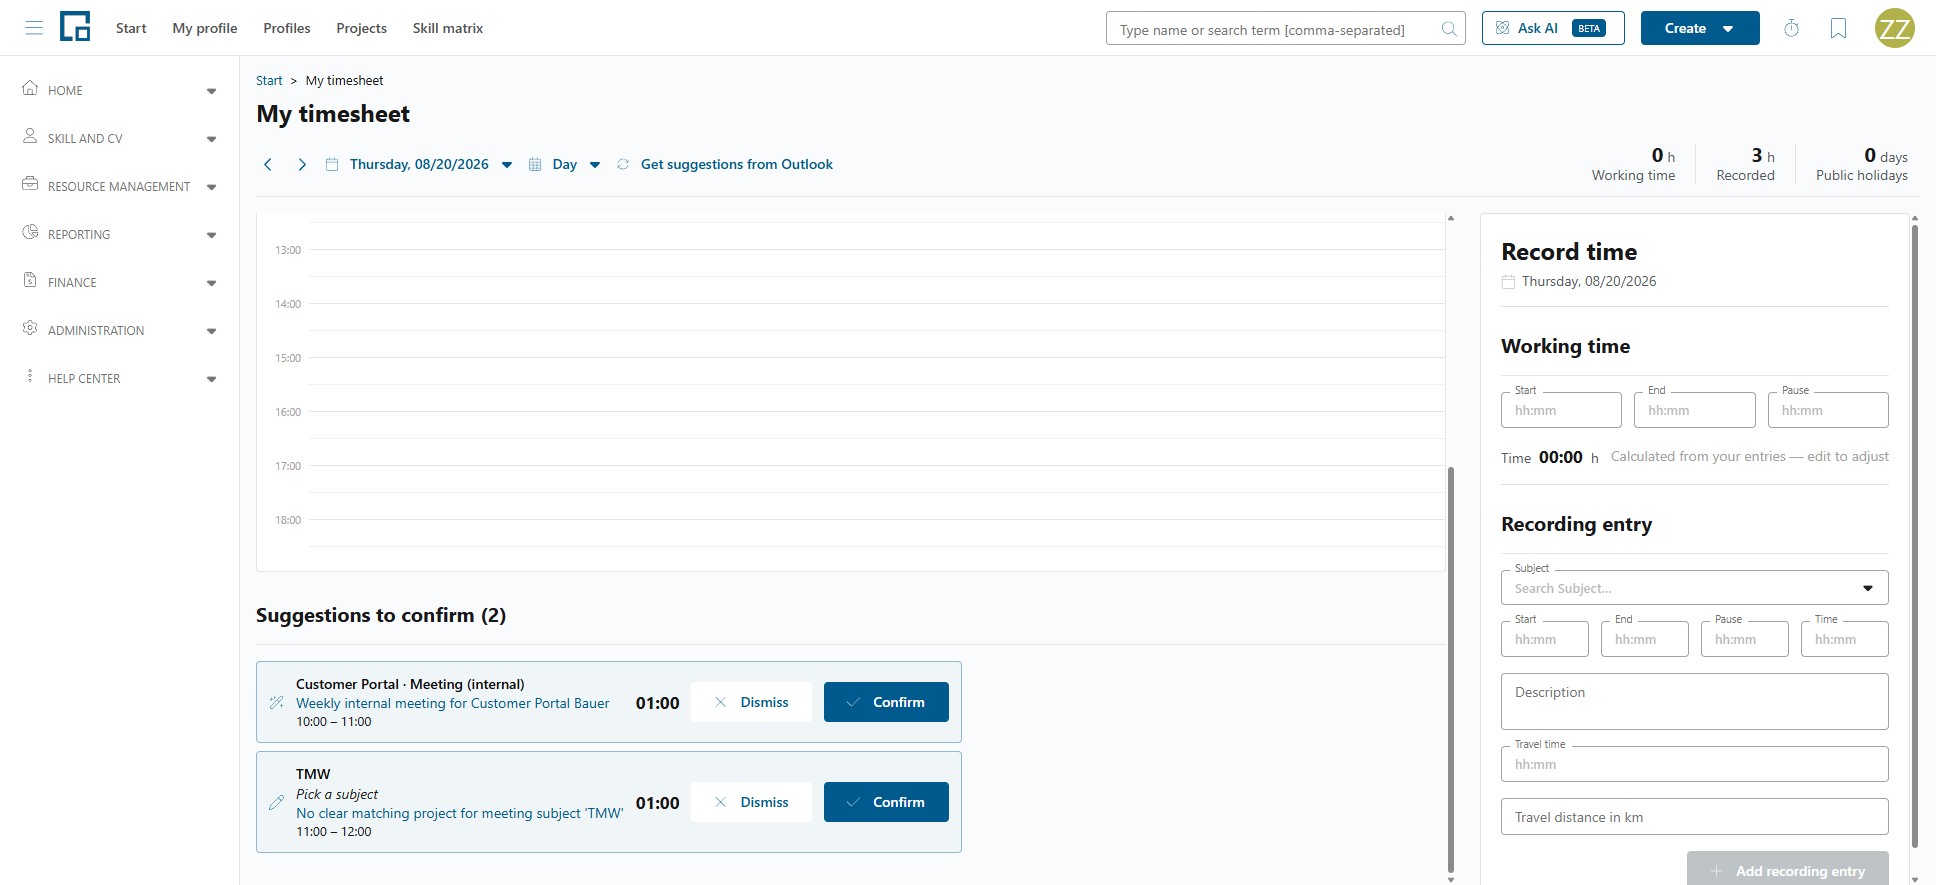
- Edit (day view) loads the suggestion into the record panel on the right, where you can change the subject, times and description. Save there accepts it with your changes.
- Dismiss discards it.
In the week view you can change a suggestion's subject directly in its cell; the other fields become editable once it is accepted.
In the day view they are collected under a heading that counts them, for example Suggestions to confirm (3).
Suggestions from your Outlook calendar
Rather than typing everything from scratch, you can have decídalo propose entries from your Outlook calendar.
The button above the timesheet reads Connect Outlook calendar the first time. Connecting signs you in to your Microsoft account and asks for permission to read your calendar. Afterwards the button becomes Get suggestions from Outlook, and each click pulls the meetings in the period you are looking at and turns them into suggestions.
A few things worth knowing:
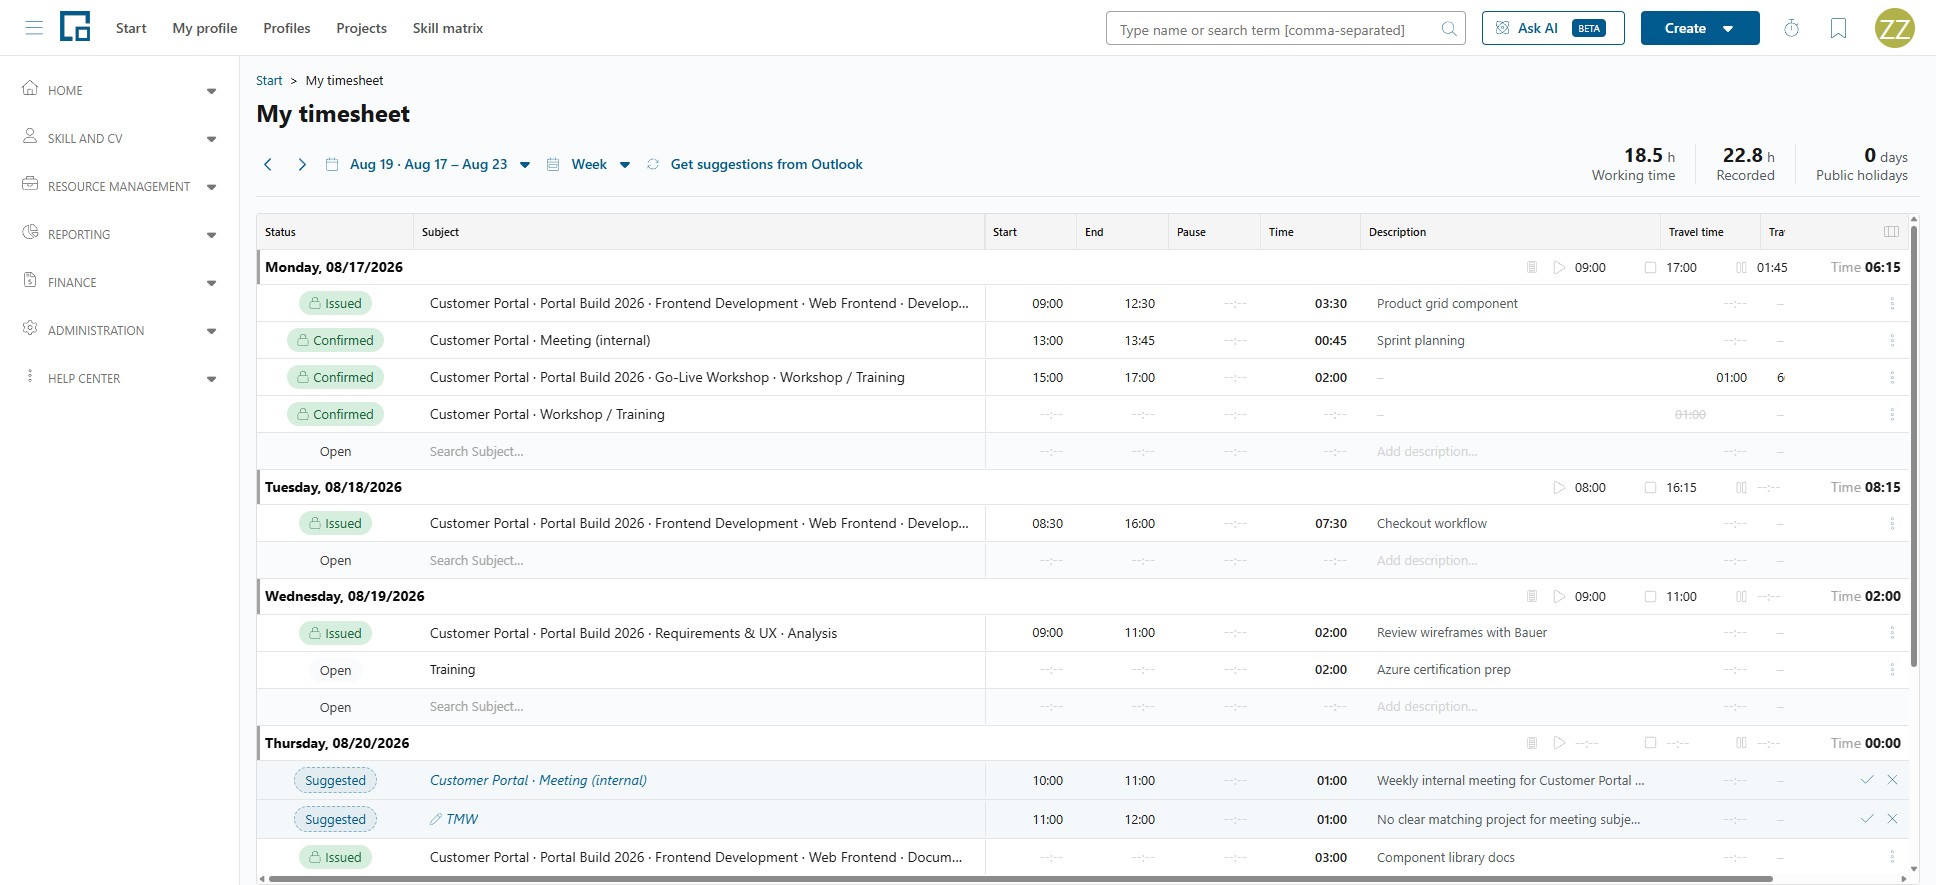
- decídalo tries to work out the subject for you by matching the meeting against the projects and work packages you may record on. When it finds a match, the suggestion arrives with the subject already filled in.
- The meeting title becomes the description, so you can find the meeting again on the timesheet.
- When no match is found, the suggestion shows Pick a subject where the subject would be. Pick one before you accept it, because a suggestion cannot be accepted without one.
- Meetings without a title are skipped, as are out-of-office blocks and items decídalo recognises as personal rather than work (an end-of-day blocker, lunch, a private appointment). Those are not suggested again on the next sync.
- All-day and multi-day events become one suggestion per day rather than a single long block.
- The result is reported back, for example "3 suggestions created, 2 skipped." If nothing new was found you see "No new calendar events to suggest."
Suggestions are proposals only, and nothing is recorded until you accept it. The button is available on your own timesheet.
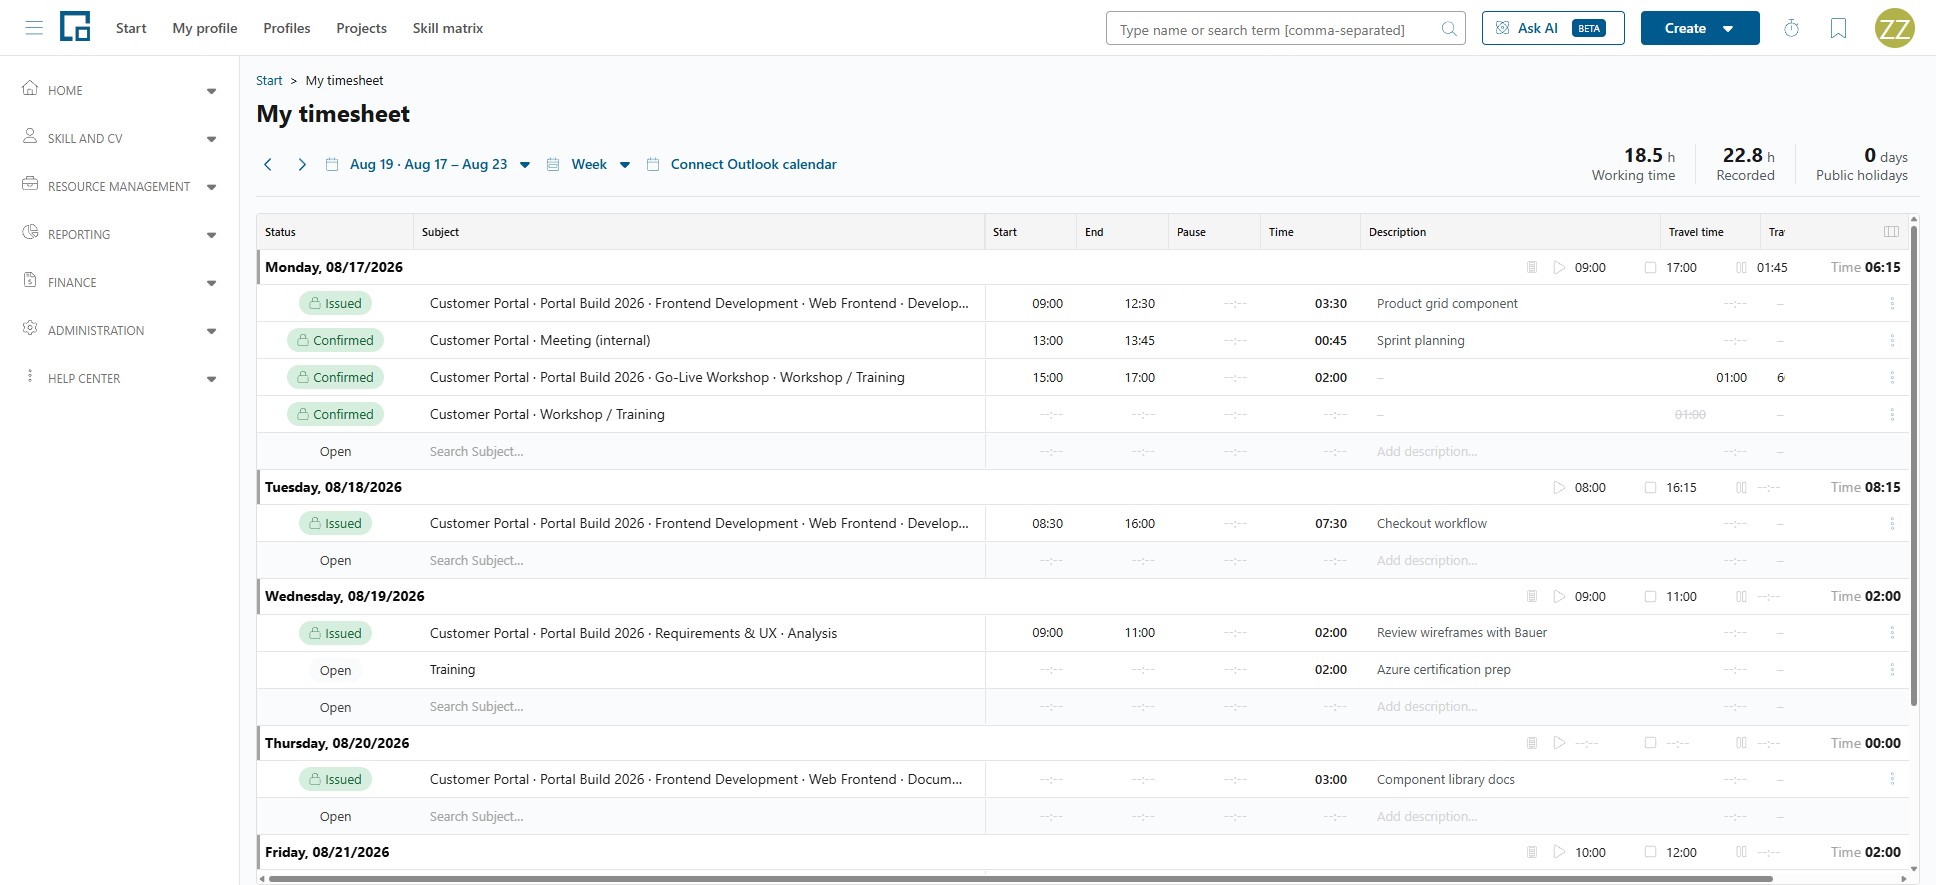
Before the calendar is connected, the toolbar offers Connect Outlook calendar:
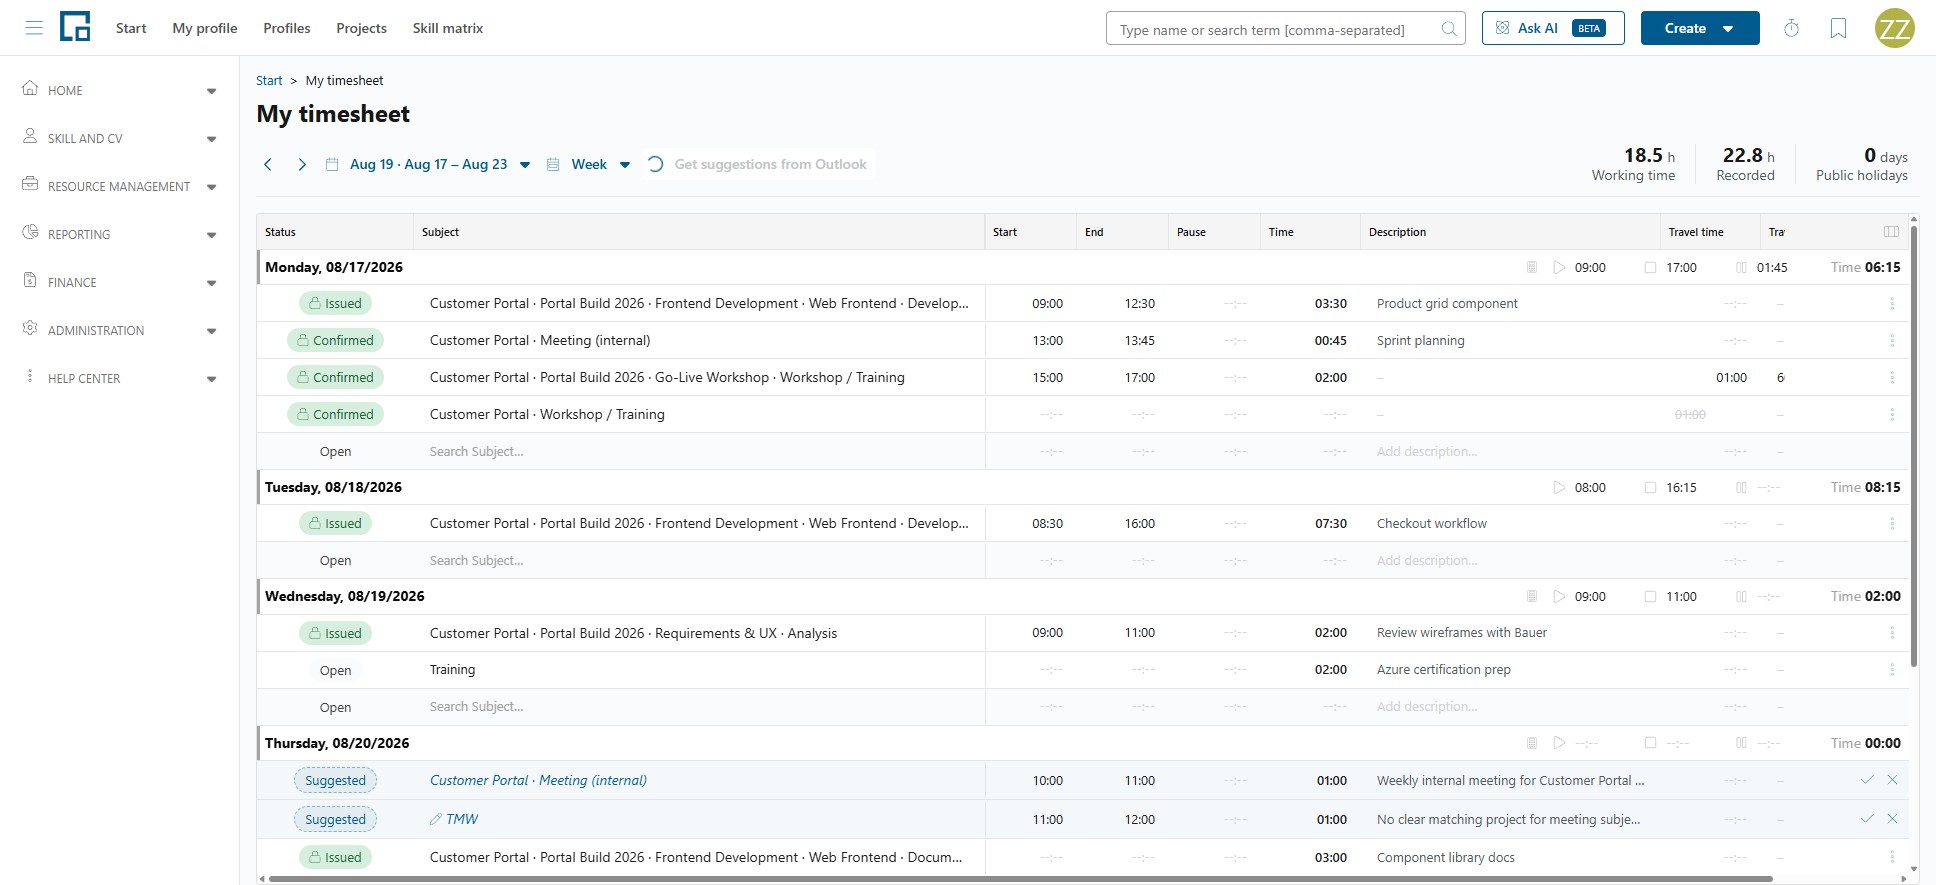
While a sync runs, the button is disabled and shows a spinner:
The suggestions then arrive in the grid, the first with its subject already worked out, the second showing the meeting title because nothing matched:
The day view
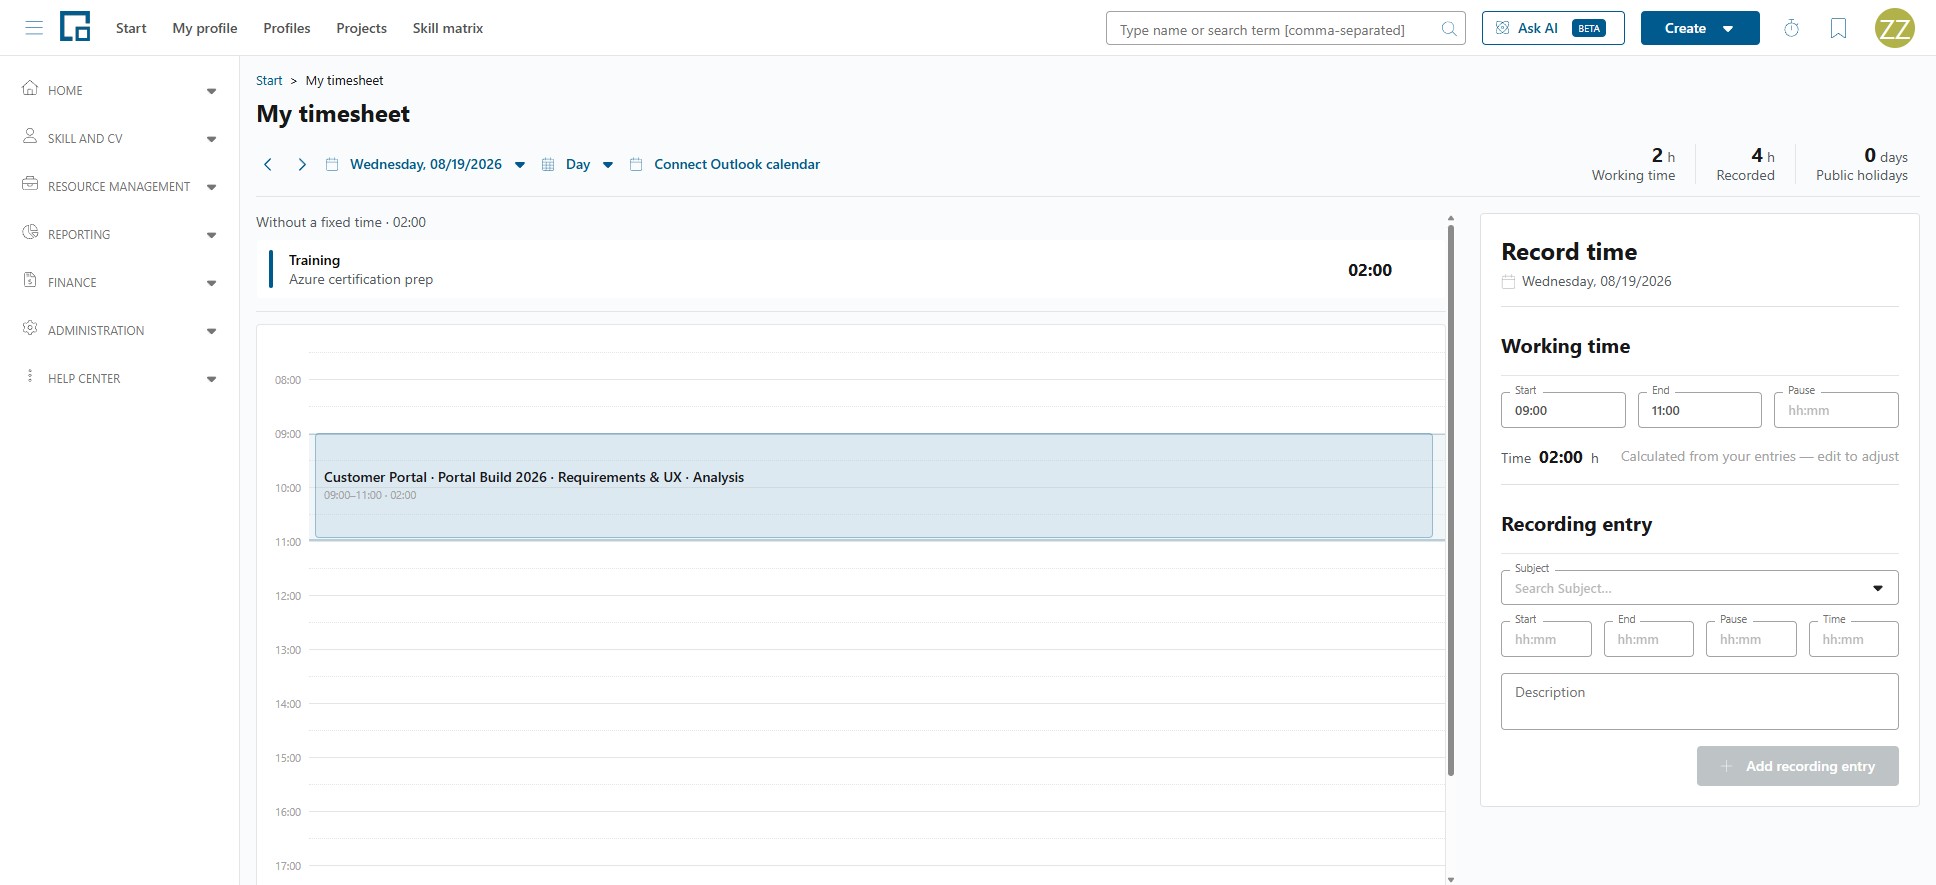
The Day view shows the day as a timeline rather than a list, which makes it easier to see gaps and overlaps.
- Entries with a start and end time appear as blocks. Drag a block to move it, and drag its edge to change its length.
- Clicking an empty slot starts a new entry of one hour, which you then fill in.
- Entries without a start and end time sit in a separate Without a fixed time lane. Dragging a block into that lane keeps its duration but removes the time window, and the lane shows "Drop here to clear the time" while you drag.
- The attendance window is shown as a band behind the entries, labelled with the day's start and end.
- On the right, a docked Record time panel has a Working time section and a Recording entry section for adding an entry without touching the timeline.
Recording time from the top bar
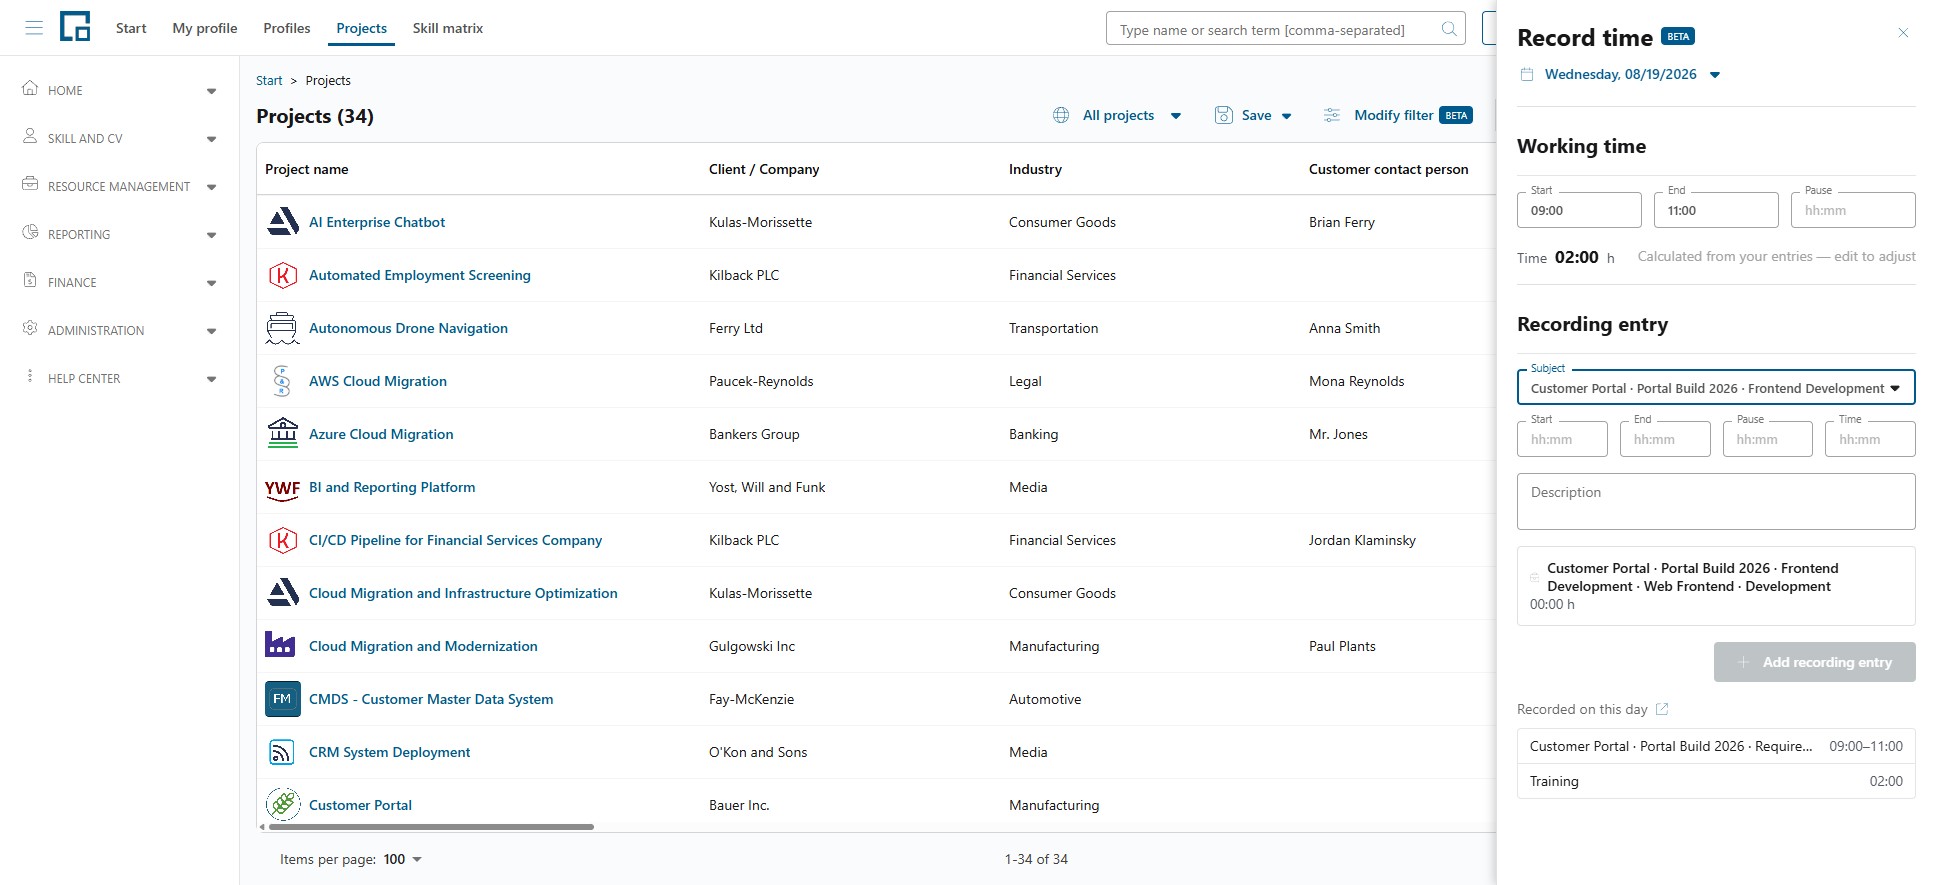
You do not have to open the timesheet to record something. The stopwatch button in the top bar opens a Record time drawer from anywhere in decídalo.
The drawer has a date selector that starts on today, a Working time section, and a Recording entry section where you pick a subject, enter the times and a description, and confirm with Add recording entry. A saved entry is acknowledged with "Recording entry created."
At the bottom, Recorded on this day lists what you have already booked for that date ("No entries recorded for this day yet." if nothing is there), and Open in my timesheet takes you to the full timesheet on the same date.
Locked entries
Some entries can no longer be changed or deleted. The Status column says why:
| Status | Why it is locked | What to do |
|---|---|---|
| Confirmed | "Confirmed (locked)": an approver has confirmed the entry for billing. | Ask whoever approves time on that project. |
| Issued | "On a servicesheet (locked)": the entry has been put on a servicesheet. | Ask whoever manages billing; withdrawing the servicesheet releases the entry. |
| Imported | "Maintained through the import and locked for editing": the entry is owned by another system. | Correct it in that system. |
Note: Issued appears as soon as the entry is put on a servicesheet, including a draft one that has not been accepted by anyone yet. A servicesheet records the times it contains as they were at that moment, so they cannot move underneath it.
Note: Confirmed does not always mean locked. On a project that confirms recorded time automatically, your entries are Confirmed the moment you enter them, and because nobody approved them, you can still correct or delete your own. What locks such an entry is the same as anywhere else: being put on a servicesheet, or being owned by another system. See When confirmation is needed.
In the day view a locked entry carries the hint "This entry is locked and cannot be edited." A suggested entry is also shown as locked. Accept it first, then it becomes editable.
If you are looking at someone else's timesheet without editing rights, the whole timesheet is read-only and shows "You can view this timesheet but not edit it." See Timesheets & Approval.
Time recorded through the import
If your organization keeps working times in another system, they can be transferred into decídalo through the import interface instead of being typed in. Those entries appear with the status Imported and cannot be edited in decídalo, because the other system stays the single source. The interface is documented at https://import.decidalo.app/index.html.