Permission concept in decídalo
In decídalo, there are many different permissions to control the access of users to functionality and data in the application. It is advised that only users with extensive knowledge of the application (typically admins, although one can adjust that) are enabled to configure permissions.
This page covers the permission profiles admins configure for users. For one user temporarily acting on another's behalf (e.g. during vacation or illness), see Delegations.
Permission profiles
To simplify the assignment and maintainability of the permissions, they are combined in a permission profile. A permission profile is a set of all permissions assigned with a value (e.g. “Yes”, “No”, ...). This structure makes it easy to put users into certain permission ‘groups’. All users have exactly one permission profile in decídalo.
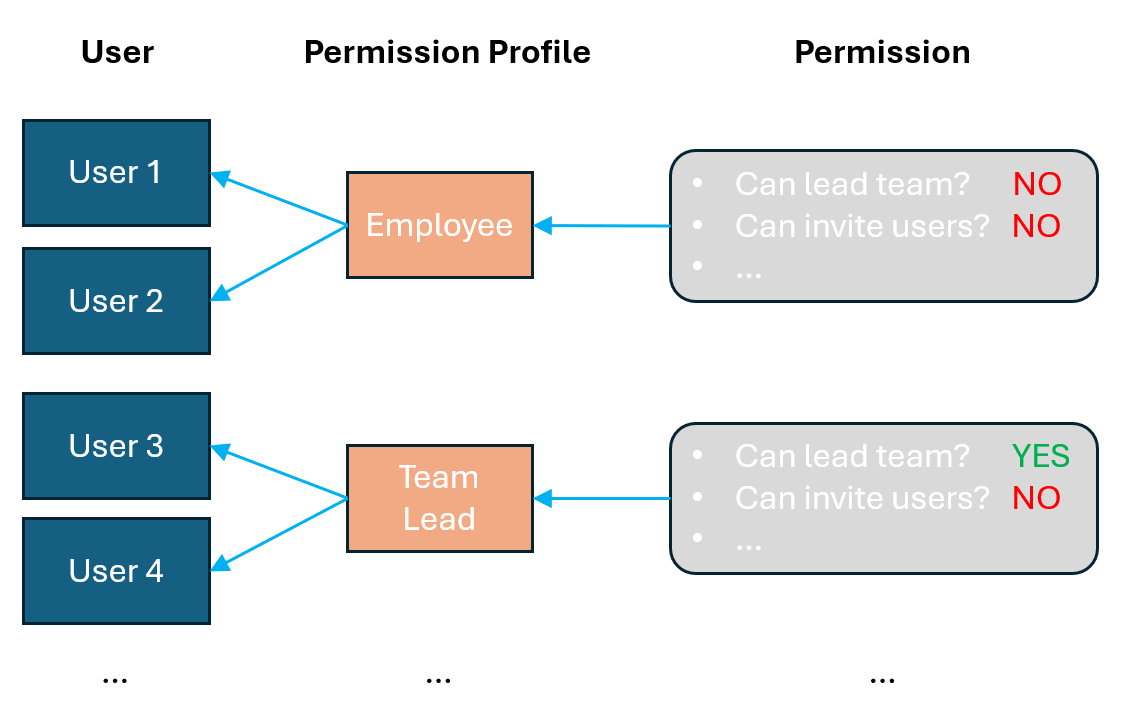
For instance, users 1 and 2 have the permission profile ‘Employee’, which prevents the users from leading a team or inviting other users to the application, whereas users 3 and 4 have the permission profile ‘Team Lead’, where they are allowed to lead a team, but can’t invite users either.
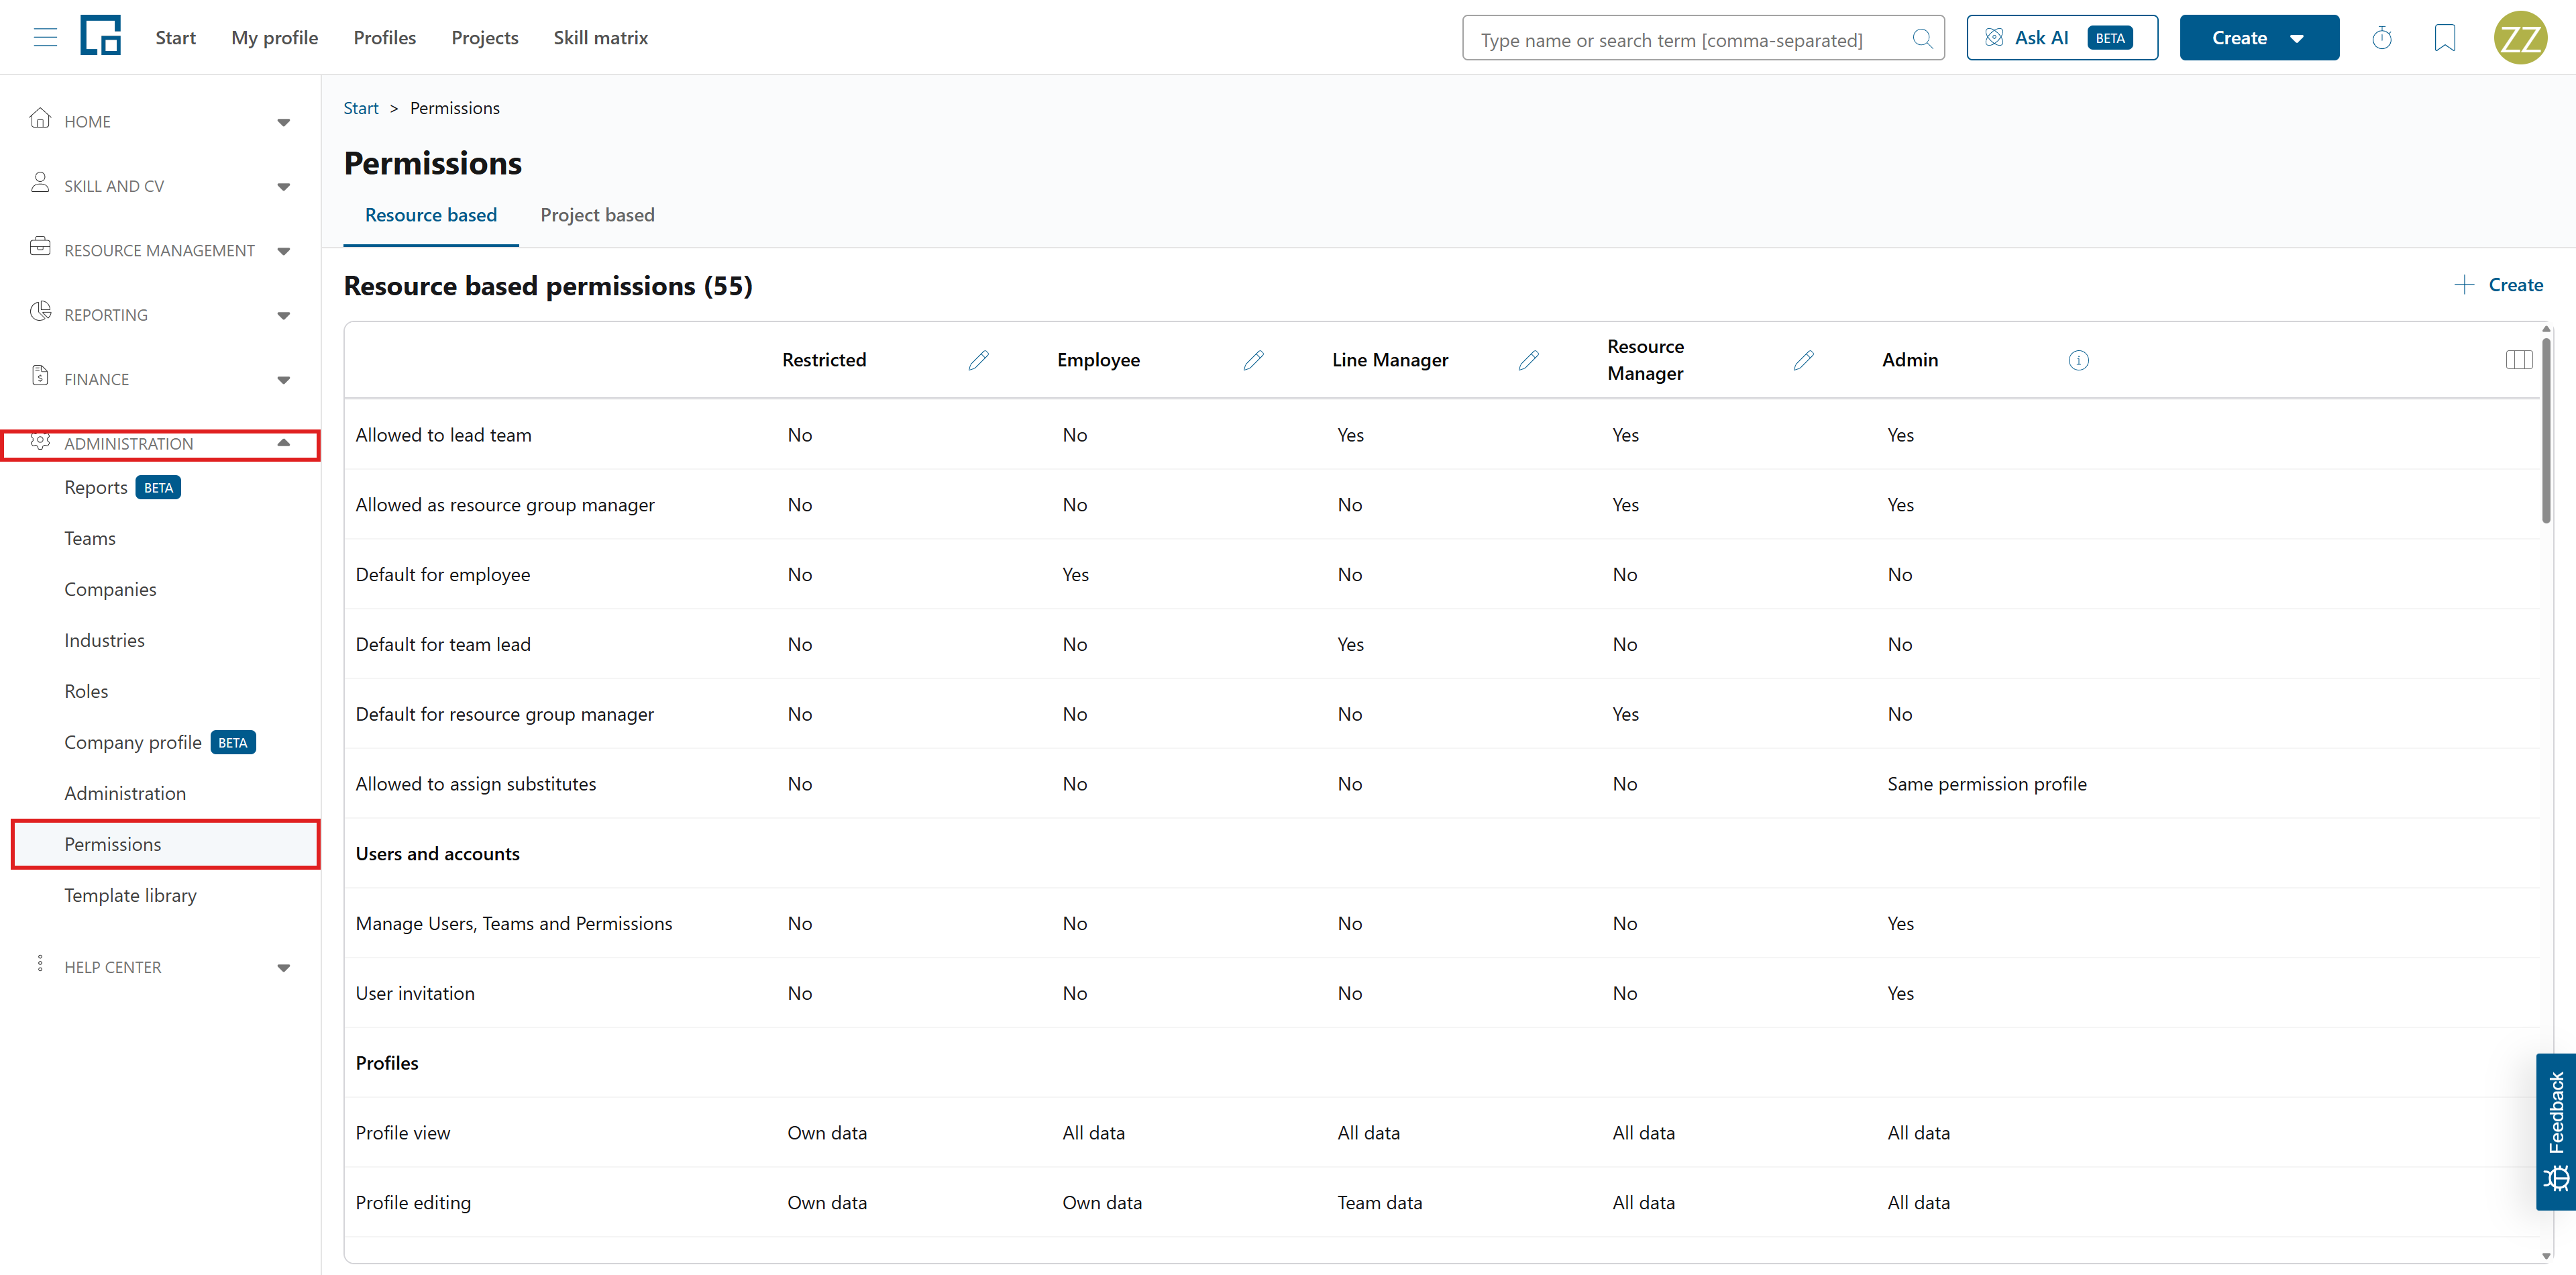
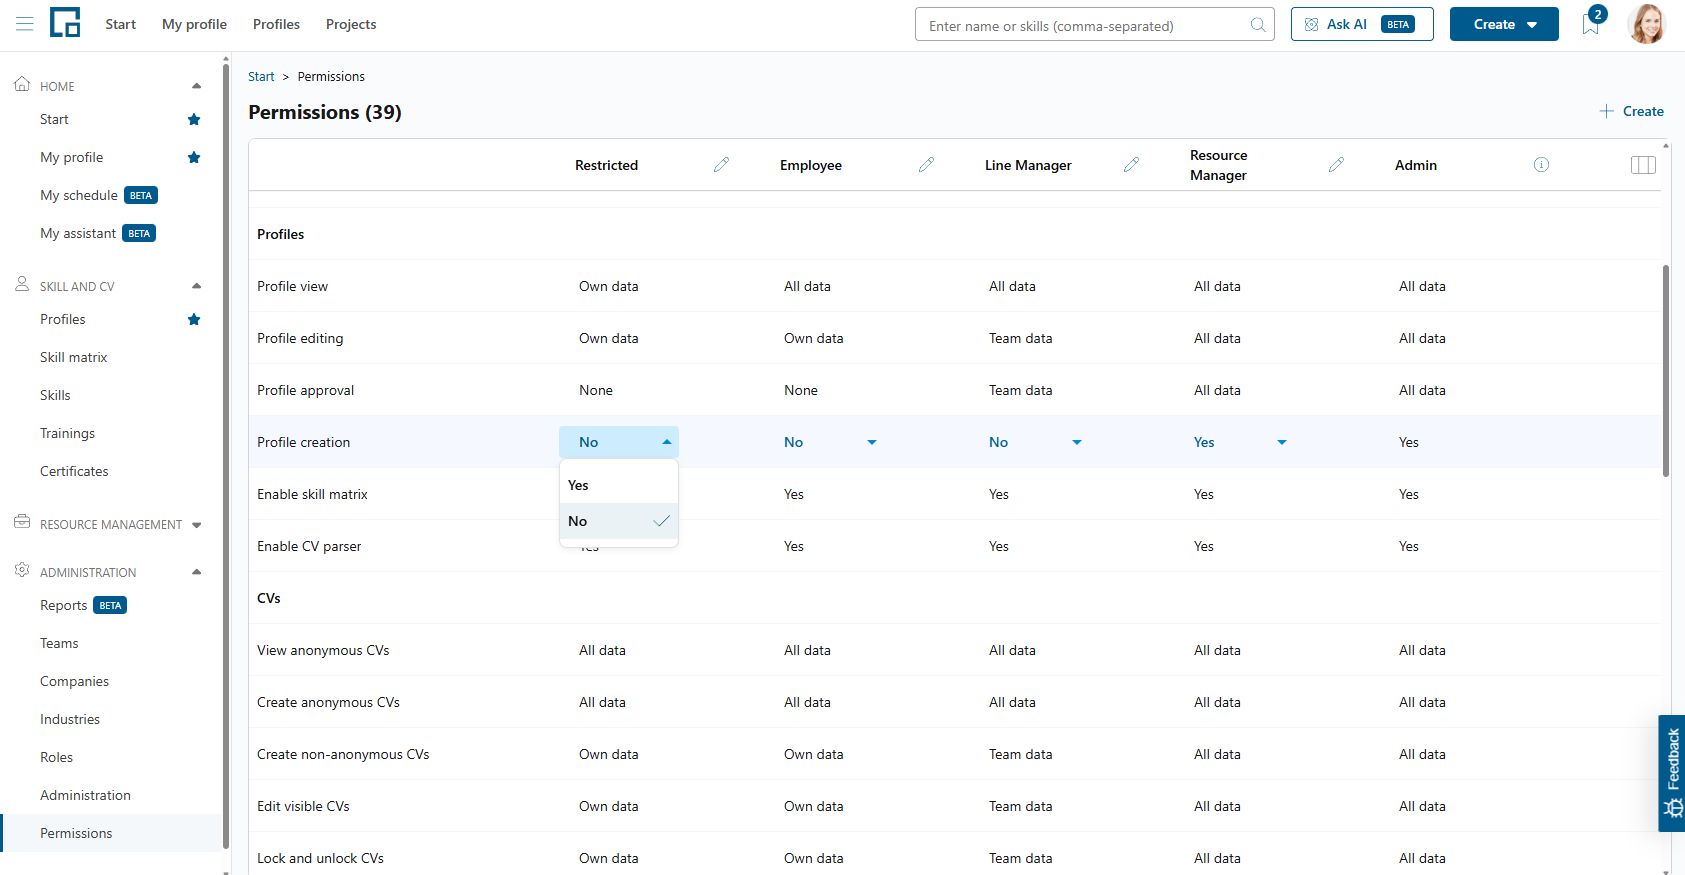
To display all current permission profiles, go to the ‘Permissions’ menu section under ‘Administration’. It is available, if one has the ‘Admin’ permission profile, or the ‘Manage Users, Teams and Permissions’ permission.
Standard permission profiles
When creating a new client, decídalo provides some standard permission profiles necessary for the application’s default behaviour.
| Permission profile | Description | |
|---|---|---|
| 1 | Restricted | Full access to own profile and data. No access to other profiles. |
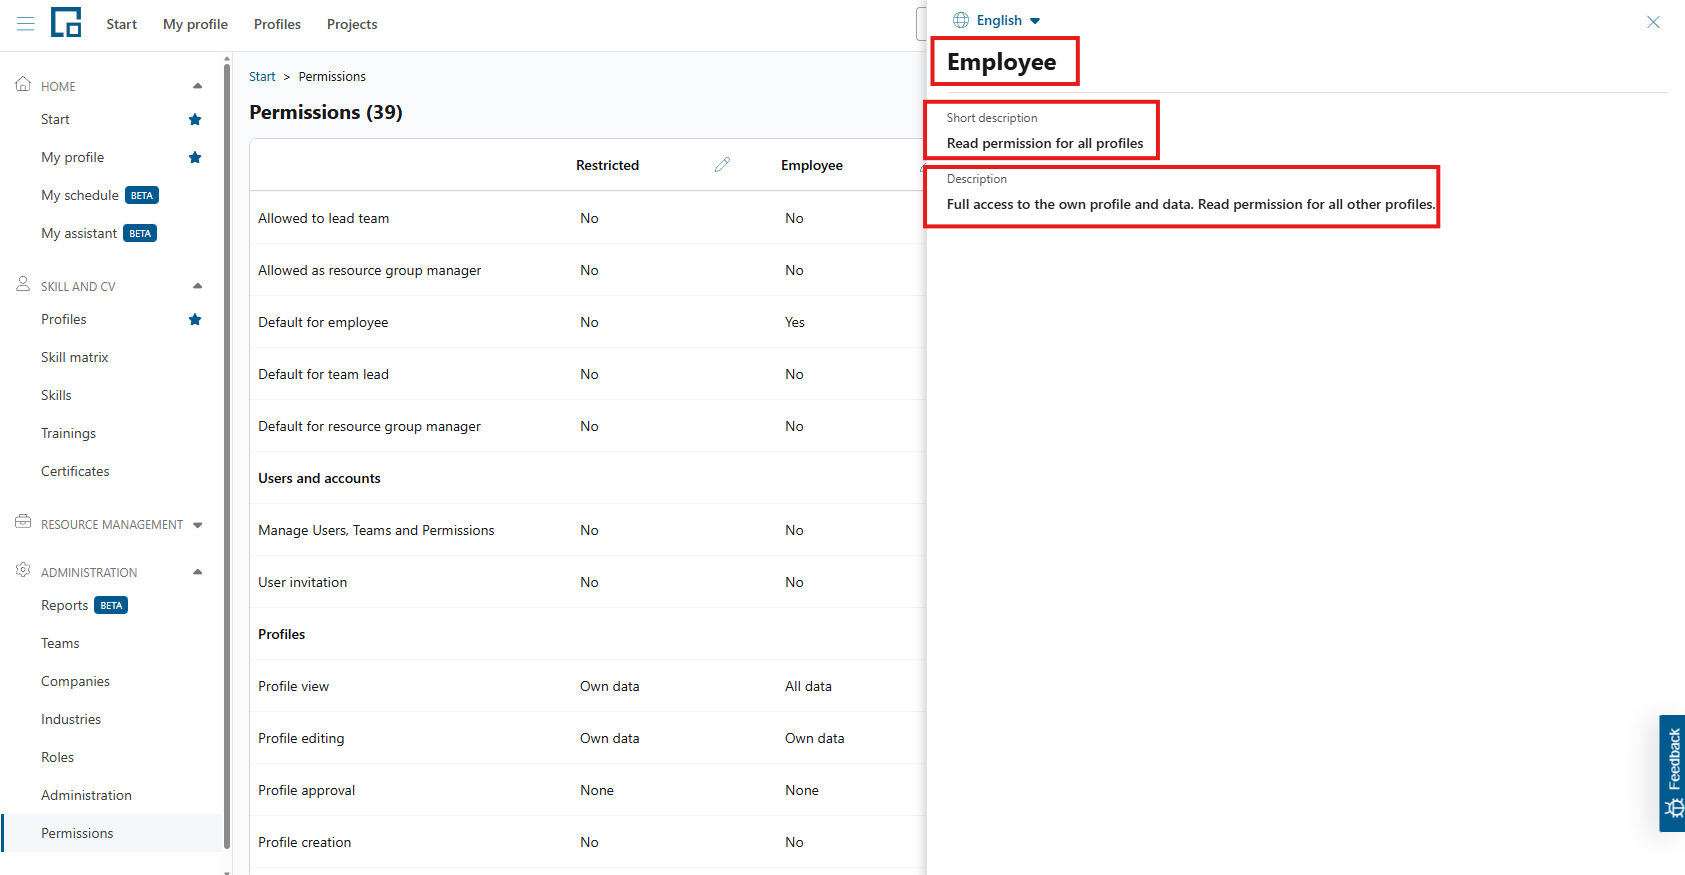
| 2 | Employee | Full access to the own profile and data. Read permission for all other profiles**.** |
| 3 | Team Manager | Full access to profiles of all members of the managed teams and subordinate teams. Read-only access to all other profiles and resource requests. Permitted to manage a team. |
| 4 | Resource Manager | Full access to all profiles, professional data and functions except user administration and system configurations. Permitted to manage a team. |
| 5 | Admin | Full access to all data and functions, including user administration and system configuration. Permitted to manage a team. |
The creator of the new client always gets the ‘Admin’ permission profile. The admin profile is not removable at any time and also has a restricted edibility, because it is essential for the administration of the application.
The standard permission profiles shall simplify the onboarding in decídalo and provide a basic setup to get the business processes started. The easiest way to get familiar with permissions in decídalo is by reviewing the standard profiles and adjusting them as needed.
Additionally, new permission profiles can be created or existing ones deleted.
Creating permission profiles
It is possible to create numerous permission profiles, but it is advised to keep the number as low as possible to limit the maintenance effort. Also, it is good practice to define permission profiles in accordance with established job roles or user groups and name them correspondingly, e.g. ‘Project Manager’. This simplifies relating permission profiles to users and use case.
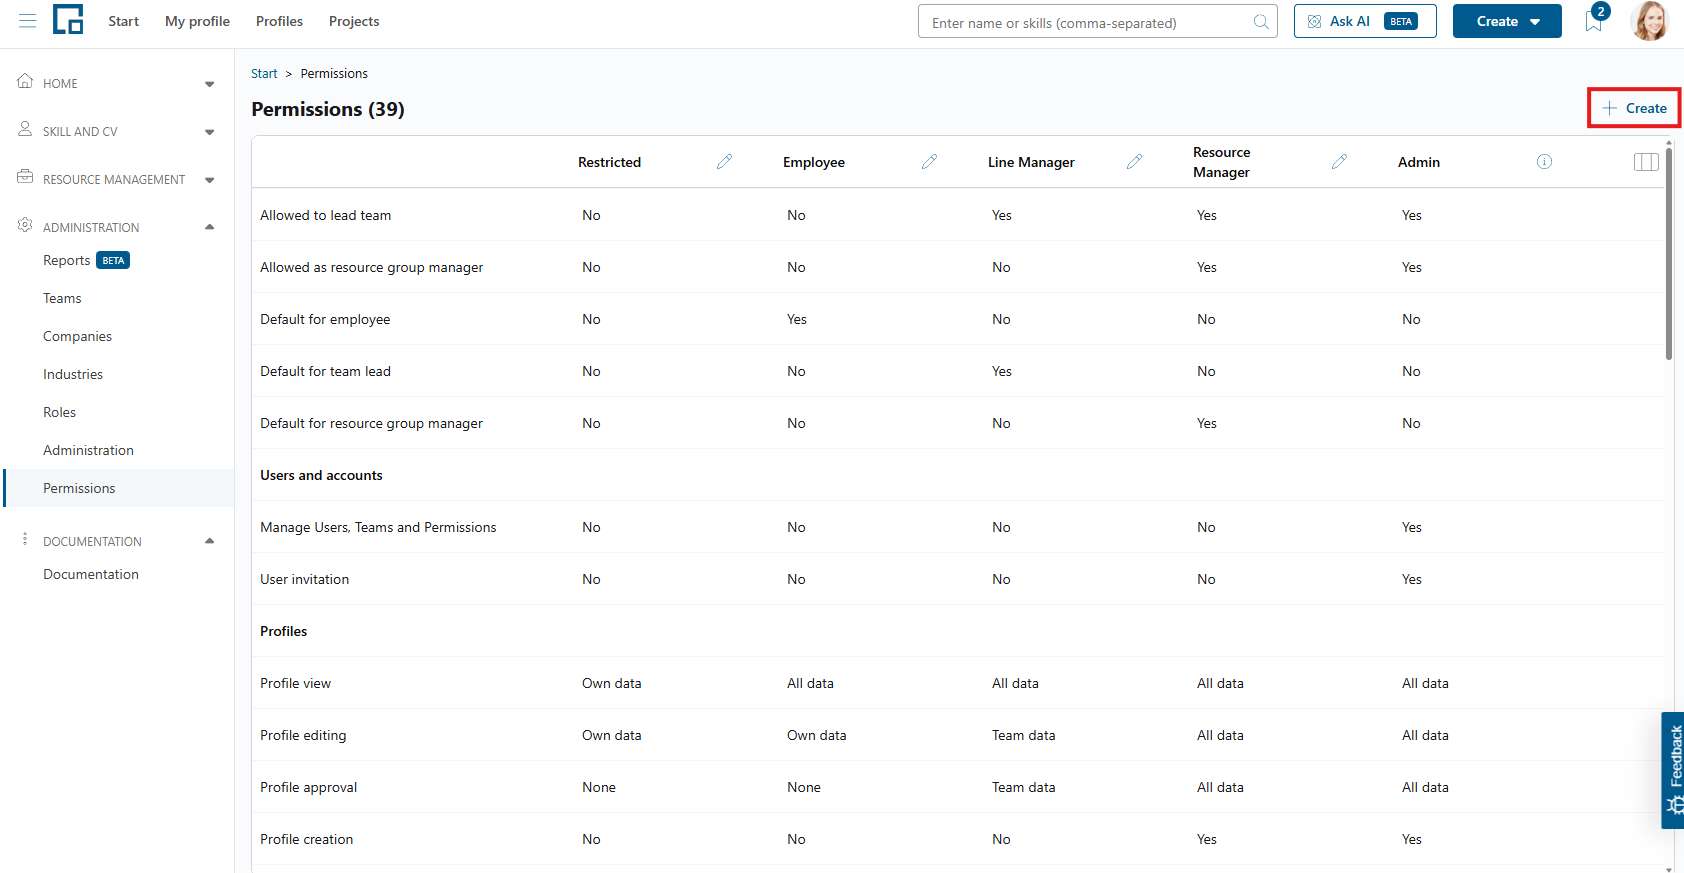
To create a permission profile, click on ‘Create’ above the table.
A pop-up is opened with a form to fill the information for the new permission profile. First, select the language to start in. Enter the permission profile name as well as it’s short and long description. Optionally, the language can be changed after entering the values to provide translations.
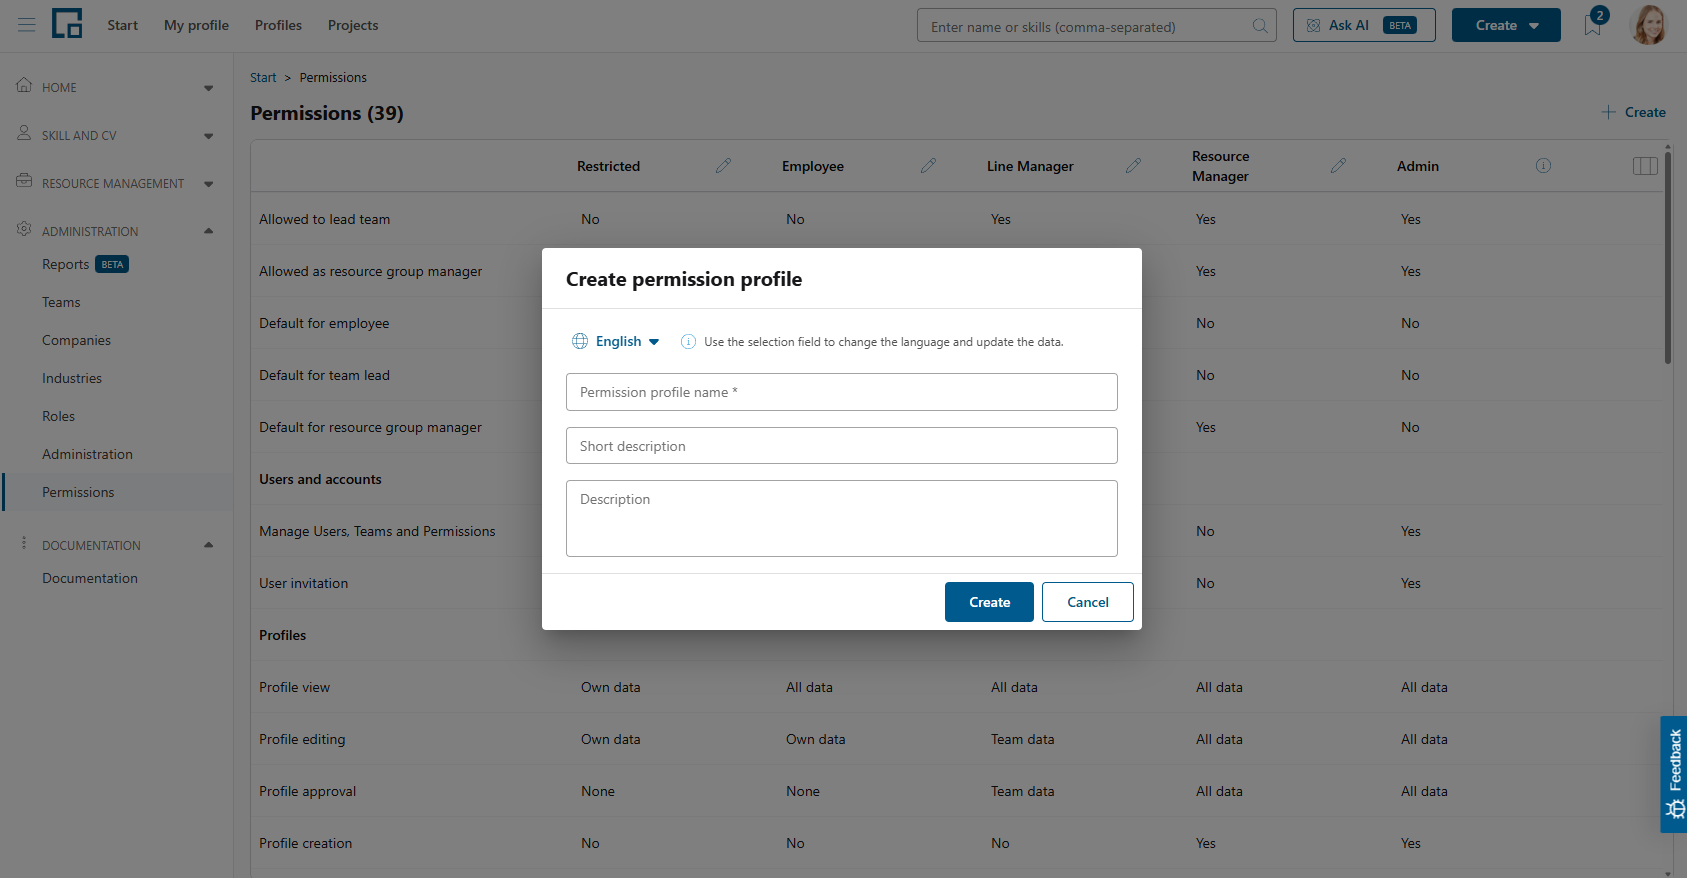
Click the ‘Create’ button to create the permission profile. At first, it has default values for all available permissions which are editable afterwards.
Editing permission profiles
To adjust the basic fields of permission profiles, click on the pencil button next to its name. A side-drawer with inline-edible fields opens on the right side, where the name, short and long description of the permission profile in all available languages can be edited.
Editing the permission details of permission profiles is a very dangerous action in decídalo, because at first some knowledge about the specific permissions is needed (see: ‘Permissions’) and secondly some foresight on the impacts the change has.
To change the value of a permission in a permission profile, scroll for the respective permission row and look on top of the table for the correct permission profile column. Click on the selected table cell and select the desired value. The change is adopted immediately. If one somehow changed the own permissions to not being able to see the current page anymore, one is redirected immediately.
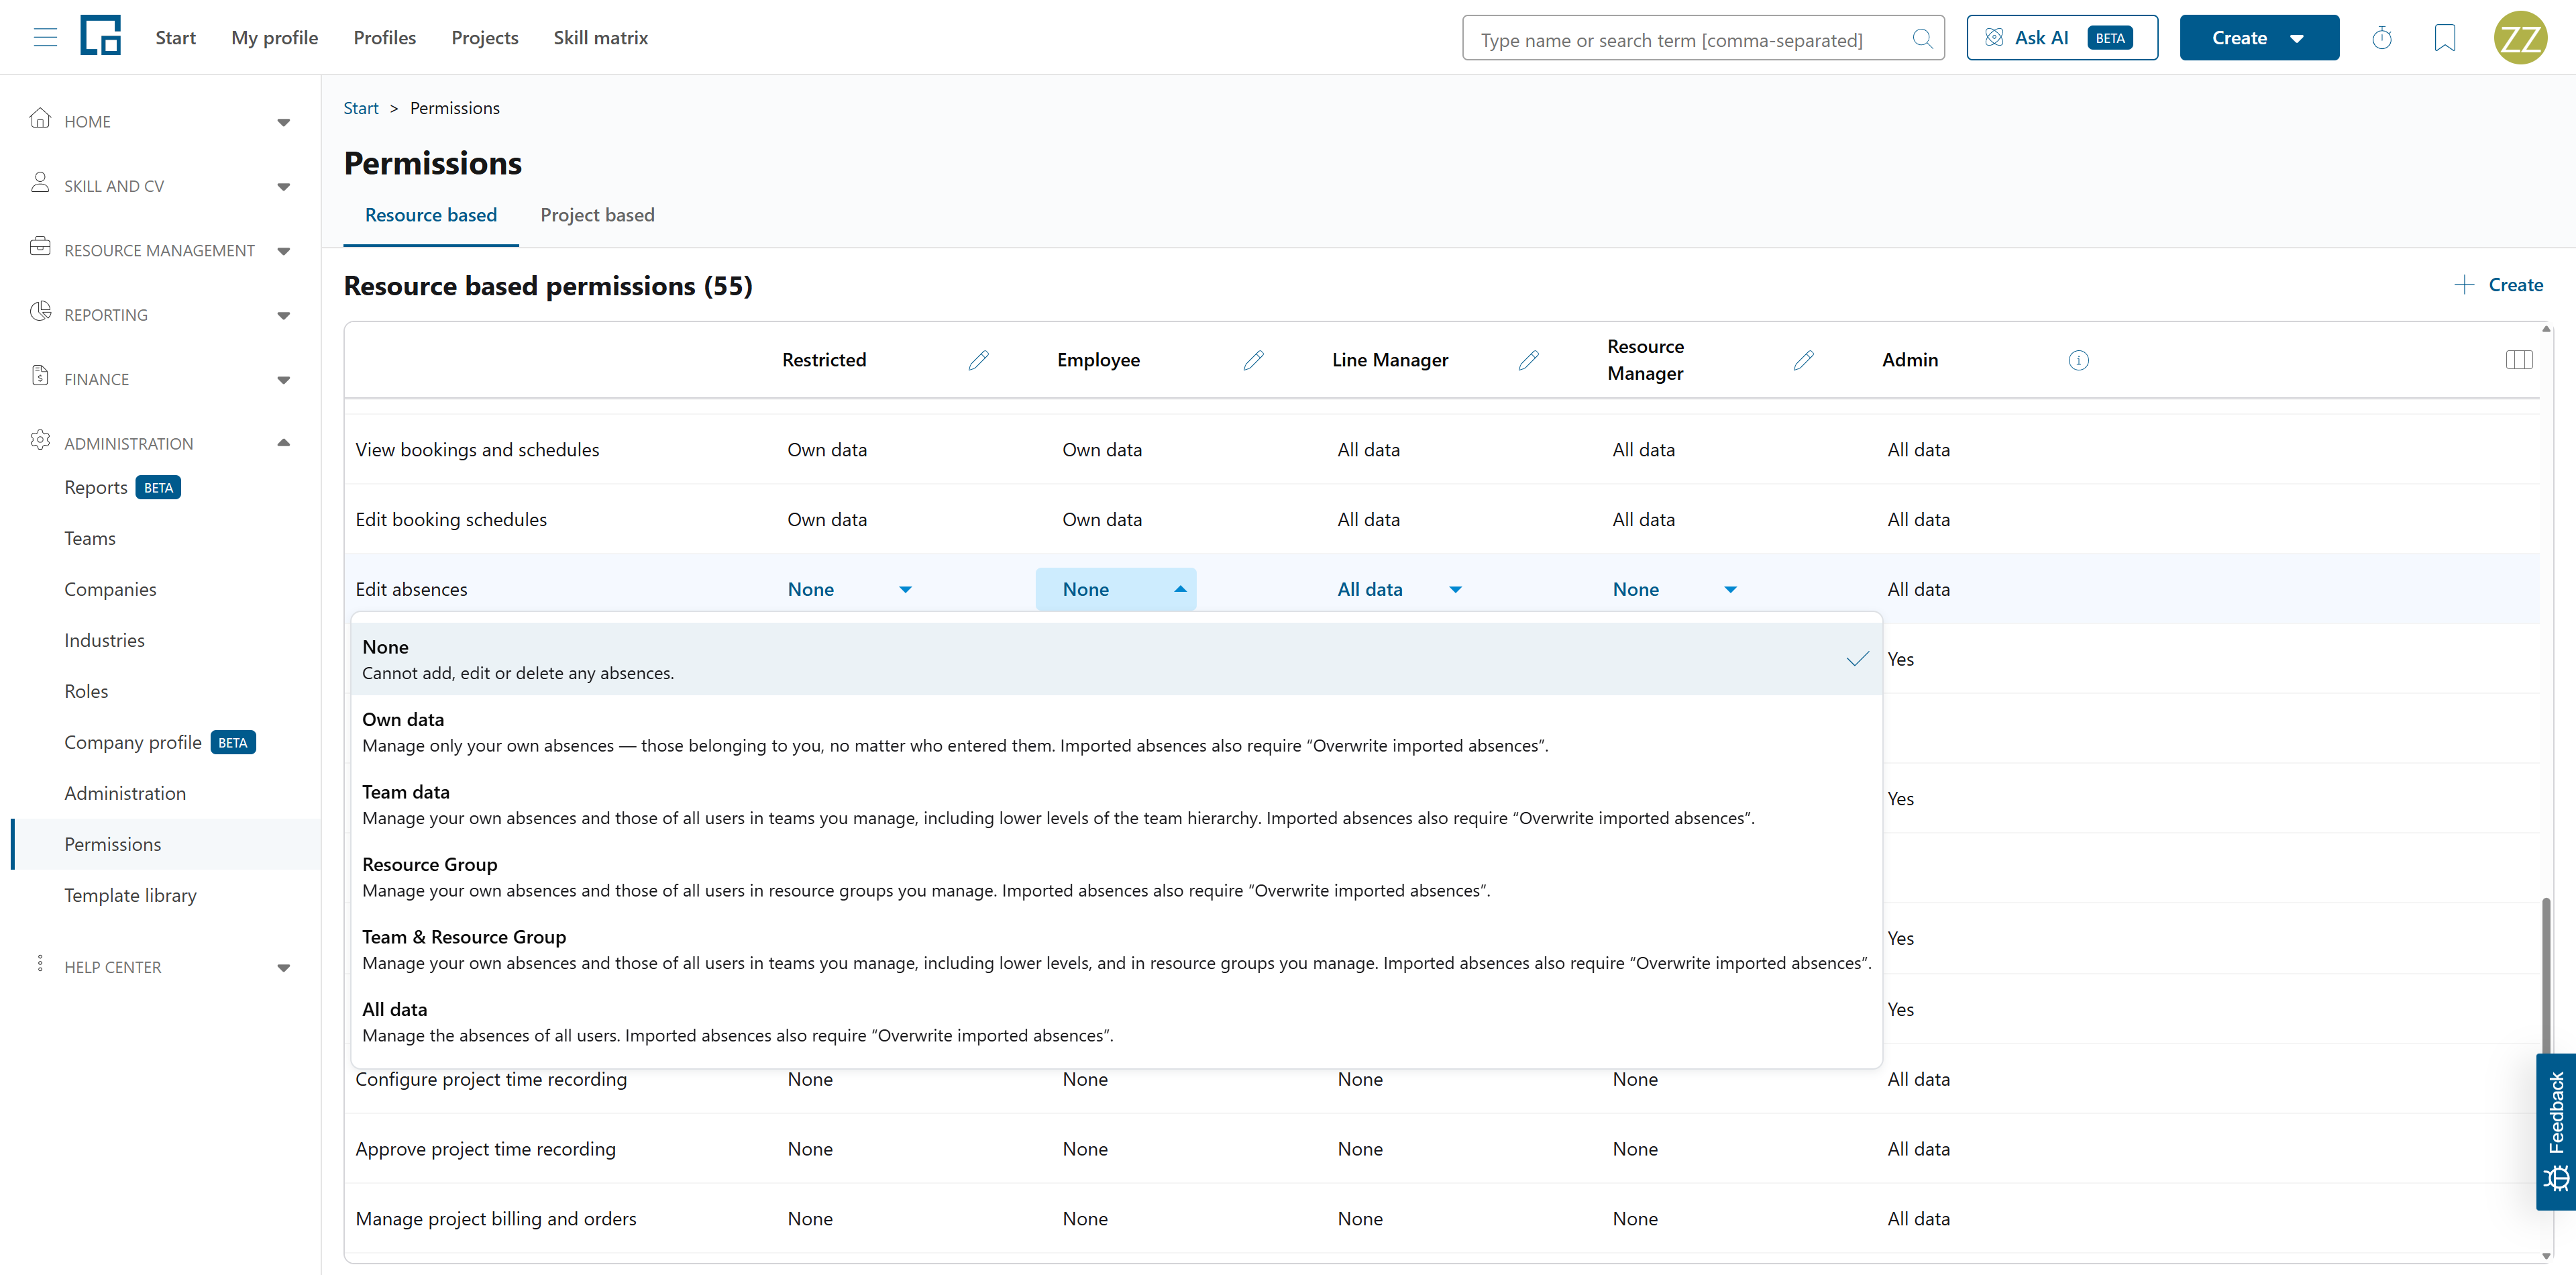
It is advised to perform these changes with collaborating test users that can immediately check their permissions or accesses after the changes. That enables the possibility of instant rollbacks and reduces errors that can have an impact on the business processes of the company.
Deleting permission profiles
To delete a permission profile, click on the pencil button next to its name. A side-drawer opens, where the details of the current permission profile are displayed. Beneath the description, click on the button ‘Remove permission profile’.
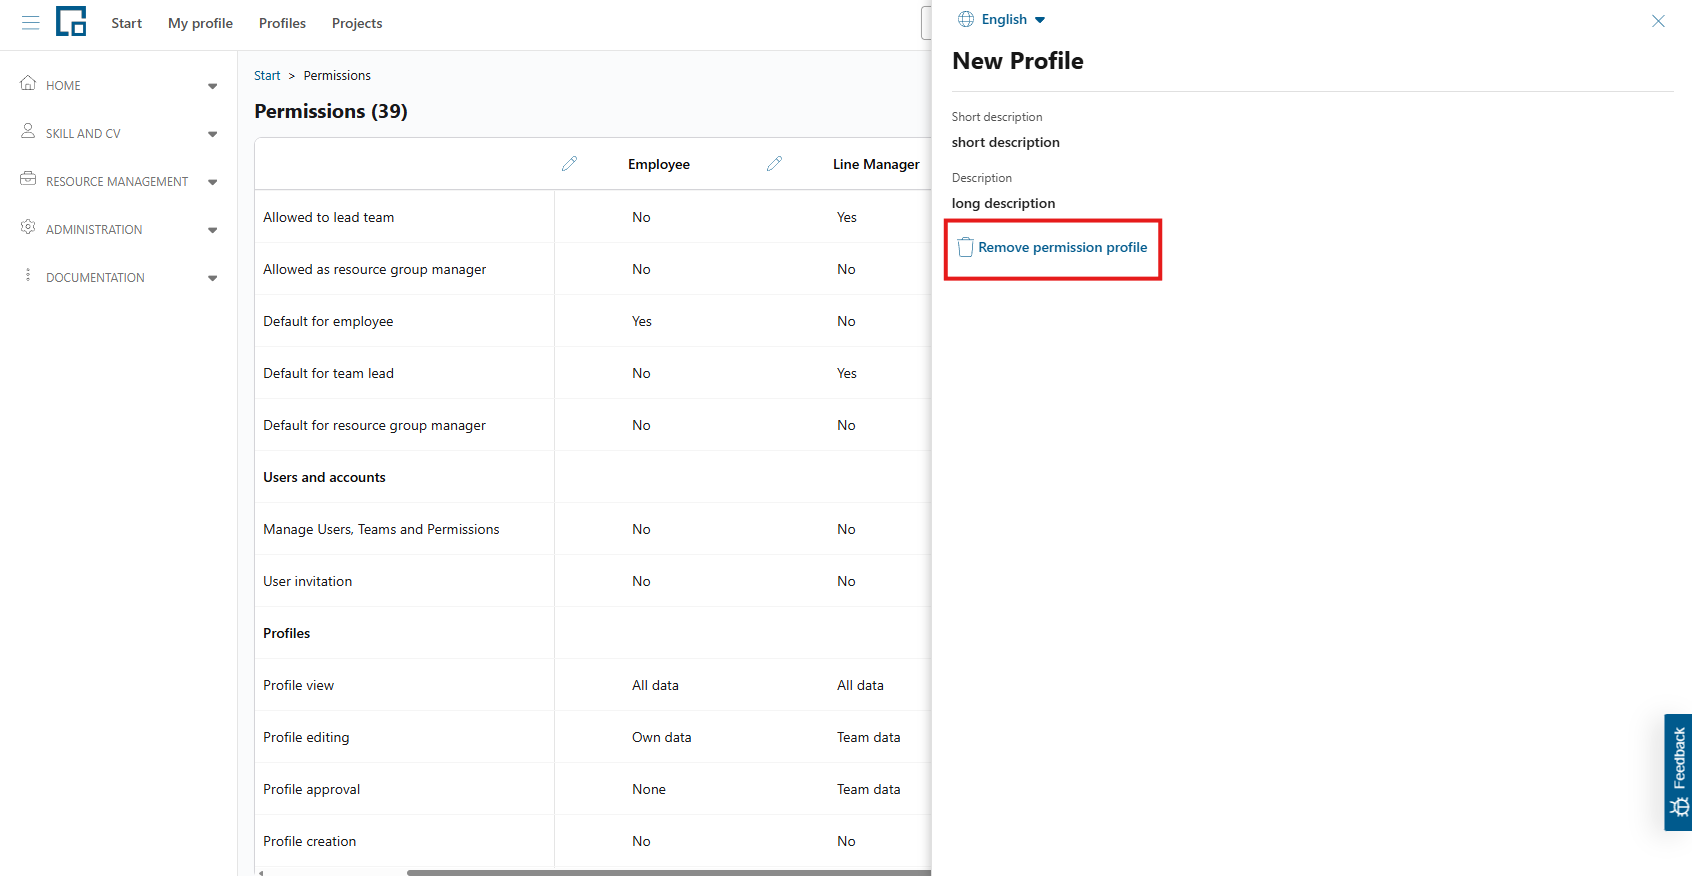
A pop-up with a warning is opened where to confirm the permanent deletion of the permission profile. All currently assigned users get the default ‘Employee’ permission profile after the deletion. By clicking on ‘Remove permission profile’ in the pop-up the delete process is confirmed.
Note that the ‘Admin’ permission profile cannot be deleted.
Assigning a permission profile to a user
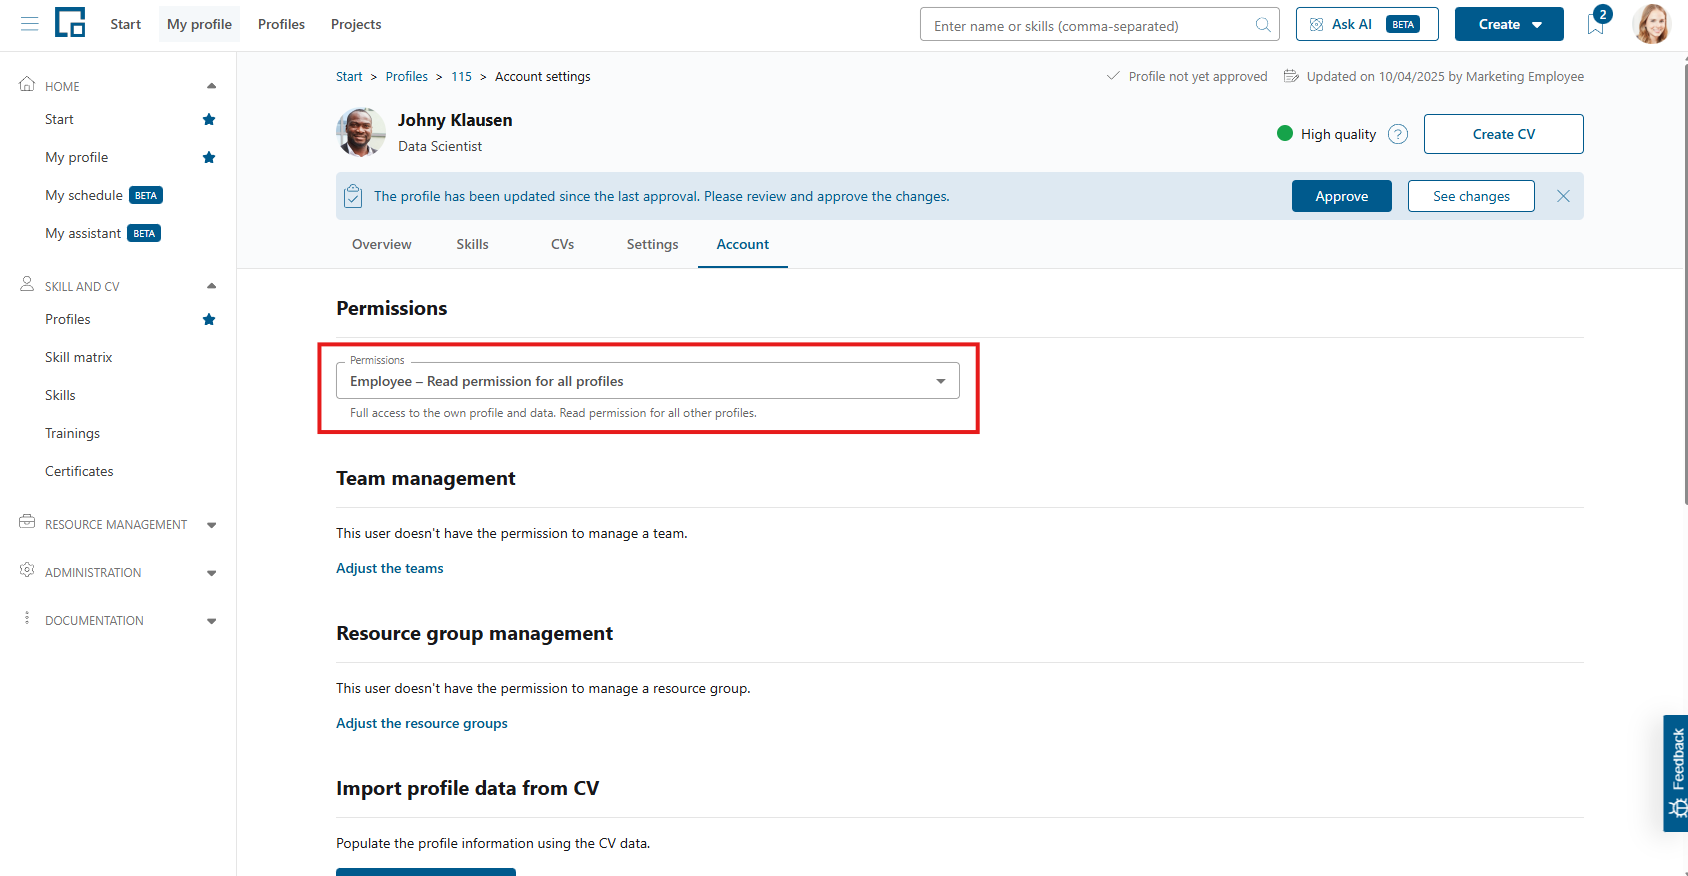
To equip a user with the correct permission profile (and thus with the correct permissions), go to the respective profile and select the ‘Account’ tab under the employee’s name. Please refer to ‘Understanding Profiles, Accounts, and CVs’ for more information.
If the selected employee did not have access to decídalo yet, an invitation can be sent now in the section ‘Create account’ directly at the top of the tab, with two form fields to be filled. Per default, the email address and the default permission profile is filled in the respective fields. One can change the email address here. It is the username of the new decídalo user, so it must be unique application-wide. Additionally, the correct permission profile can be selected to be assigned to this user. Just click on the field and select correct value. After that, click on ‘Send invitation’ to release the email. Newly created users can assign a password themselves and use their account right after the invitation.
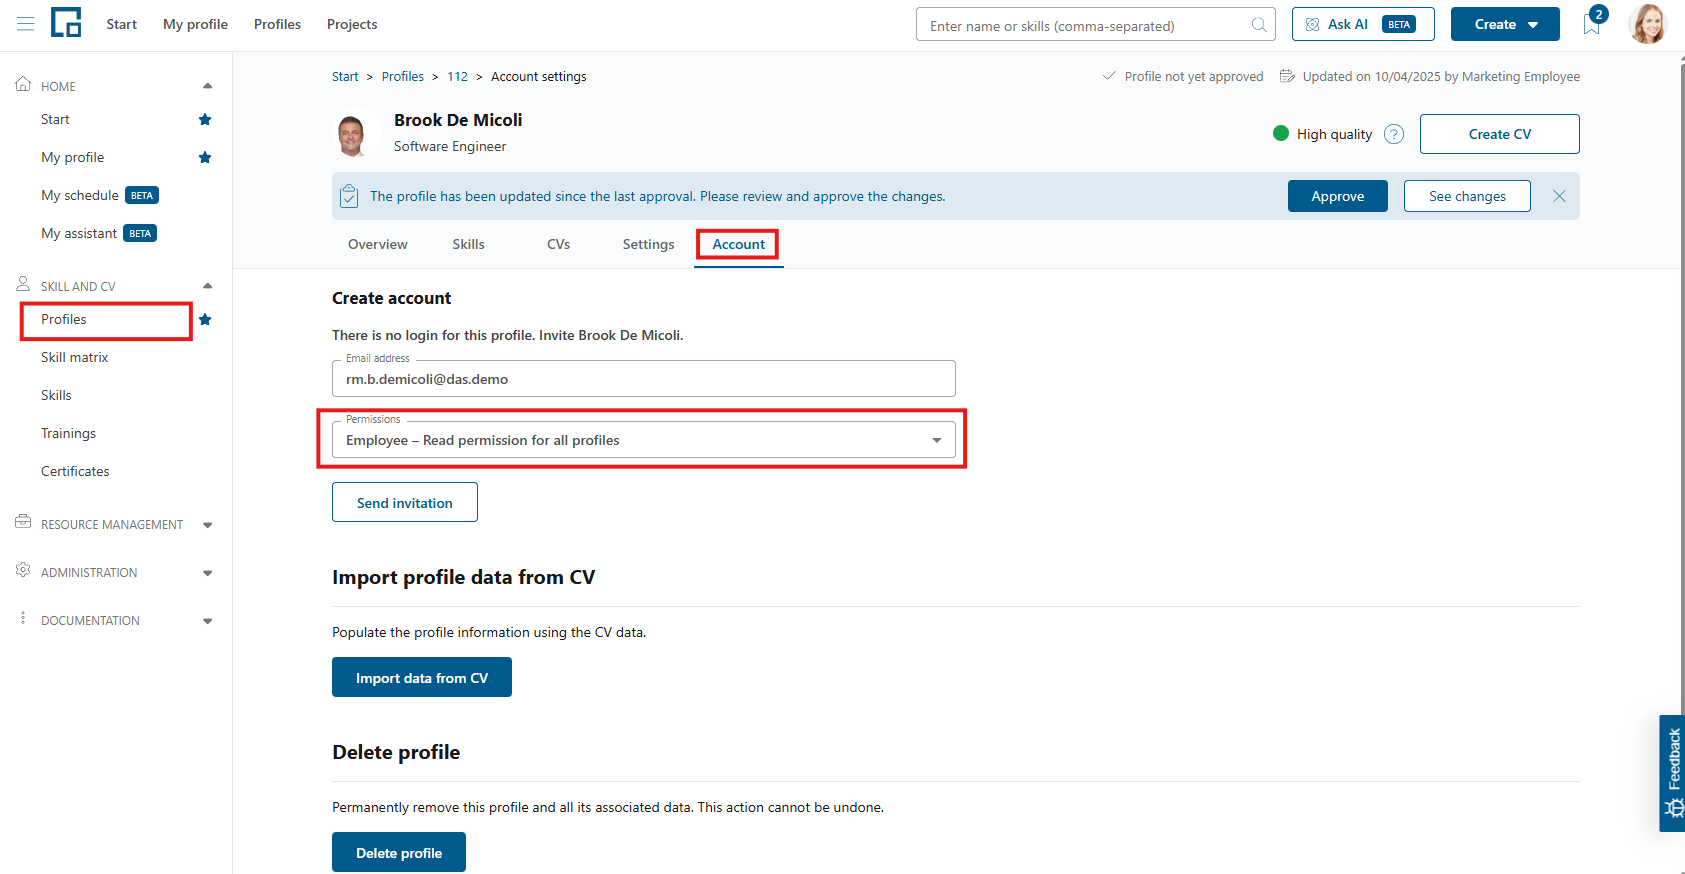
If the selected employee already has an account in decídalo, the ‘Account’ tab only displays a selection of the assigned permission profile. To change it, click on the field and select the new permission profile. The changes are adopted immediately.
Permissions
In decídalo, there is a bunch of different permissions defining a permission profile and therefore controlling the application behaviour. Since decídalo is under continuous development, the number of permissions increases in the future for sure.
In addition to the permission profile settings described here, the AI tool based tab controls which AI assistant tools each permission profile may use. See AI Tool Permissions.
Permission values
Each permission can have different selectable values, though the most use the easy “Yes” or “No” Boolean decision which can be translated as: Either one has the permission to do something, or does not.
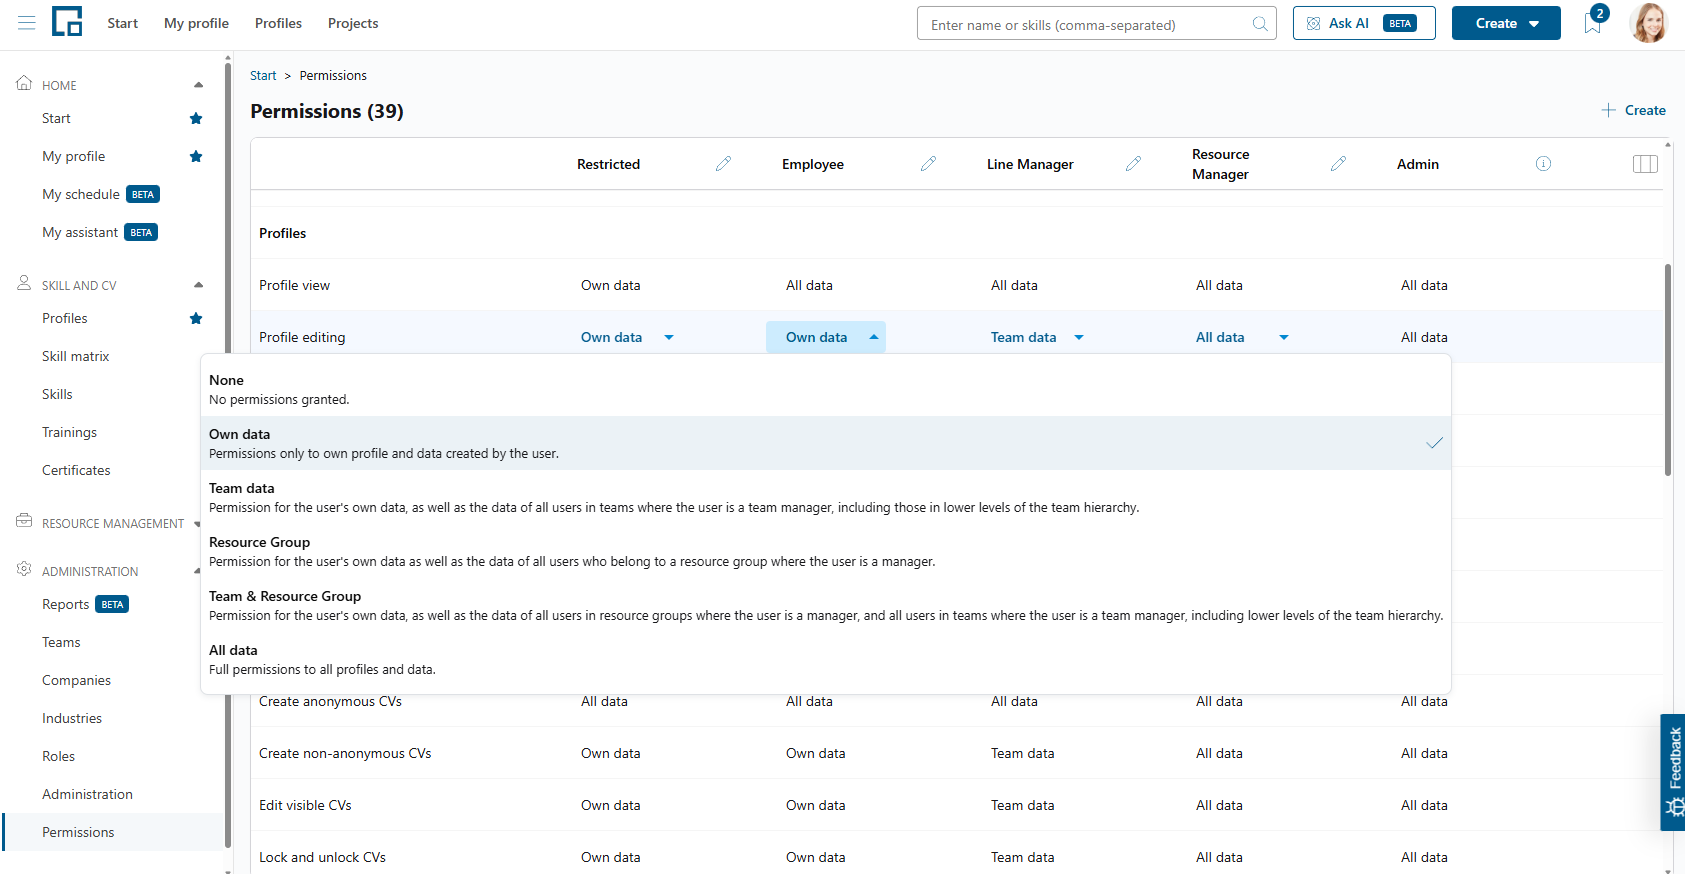
For some permissions though the maximum origin of data that someone can view or edit can be chosen. If the current one is a view or edit permission depends on the permission itself; it is recognizable through its name. The selectable values are:
| Value | Description | |
|---|---|---|
| 1 | None | There is no permission granted at all. |
| 2 | Own data | One is only able to view / edit the own data or created by them. |
| 3 | Team data | One is only able to view / edit the own data, created by them or the data of team members / sub team members where one is team manager of (team hierarchy applies). |
| 4 | Resource group | One is only able to view / edit the own data, created by them or the data of resource group members where one is manager of. |
| 5 | Team & Resource group | One is only able to view / edit the own data, created by them, the data of team members / sub team members where one is team manager of (team hierarchy applies) or the data of resource group members where one is manager of. |
| 6 | All data | There are no restrictions in seeing or editing. |
Note: There can also be situations where multiple permissions must be combined with specific values to gain the expected result in access for the users. We get to it in the next part about the permissions themselves.
Permission explanations
Permission profile settings
Allowed to lead team
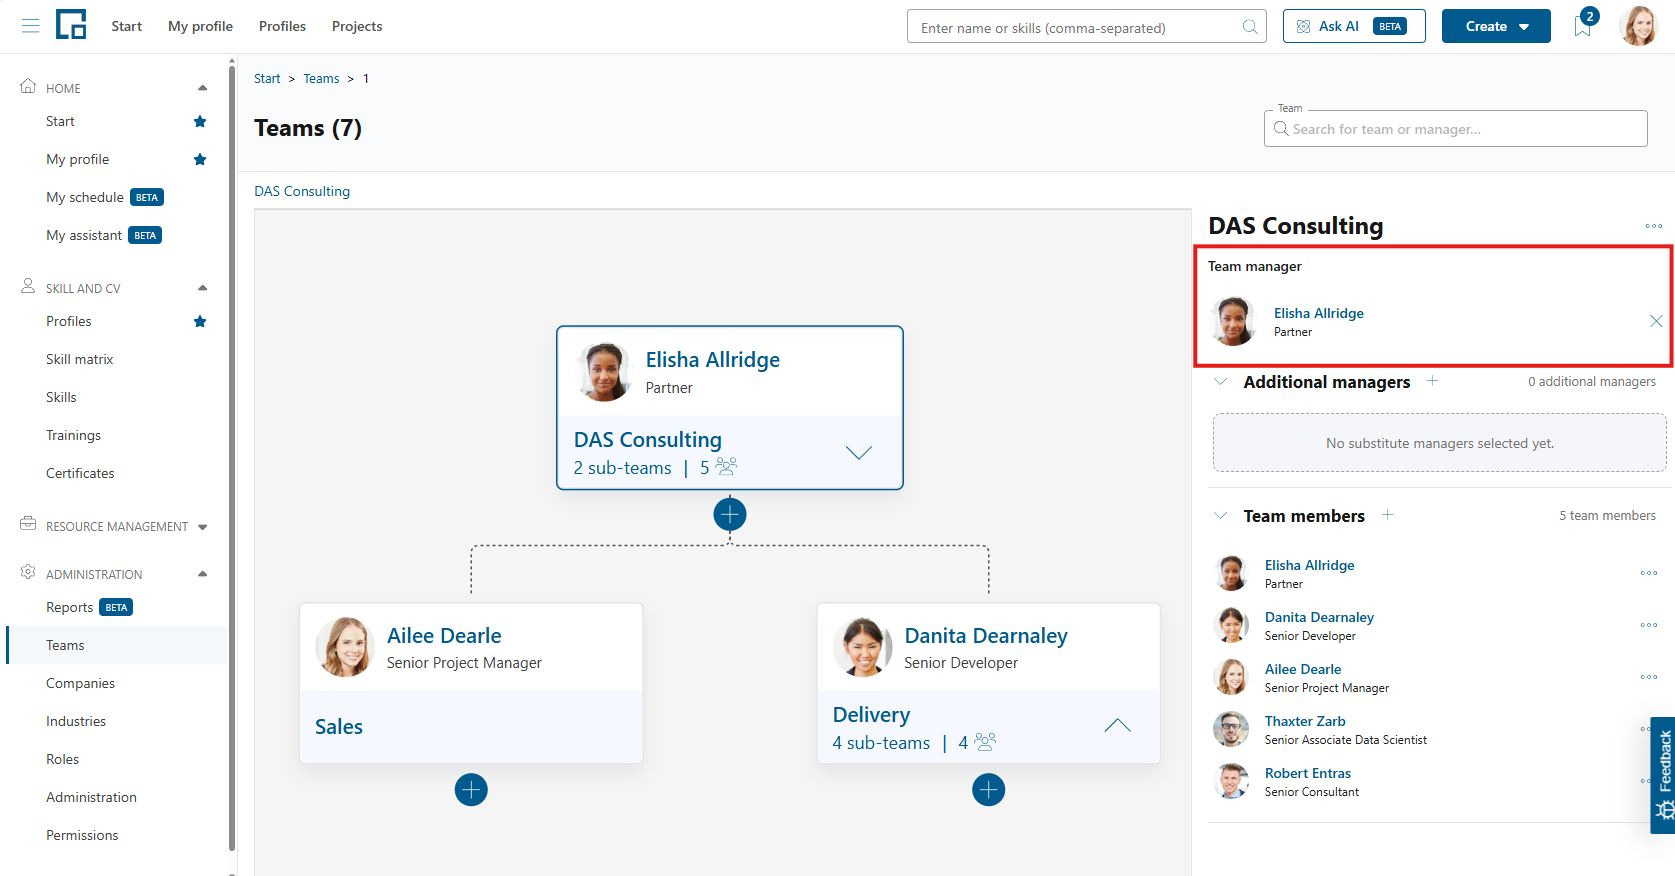
Refer to Administrating Teams on how the team structures work in decídalo. This permission defines if a user can be selected as a team manager in the structure. If this permission is set to ‘No’ the users with the selected permission profile are not selectable as a team manager.
Allowed as resource group manager
Refer to Resource Groups on how resource groups can be administered in decídalo. This permission defines if a user can be selected as a resource group manager. If this permission is set to ‘No’ the users with the selected permission profile are not selectable as a resource group manager.
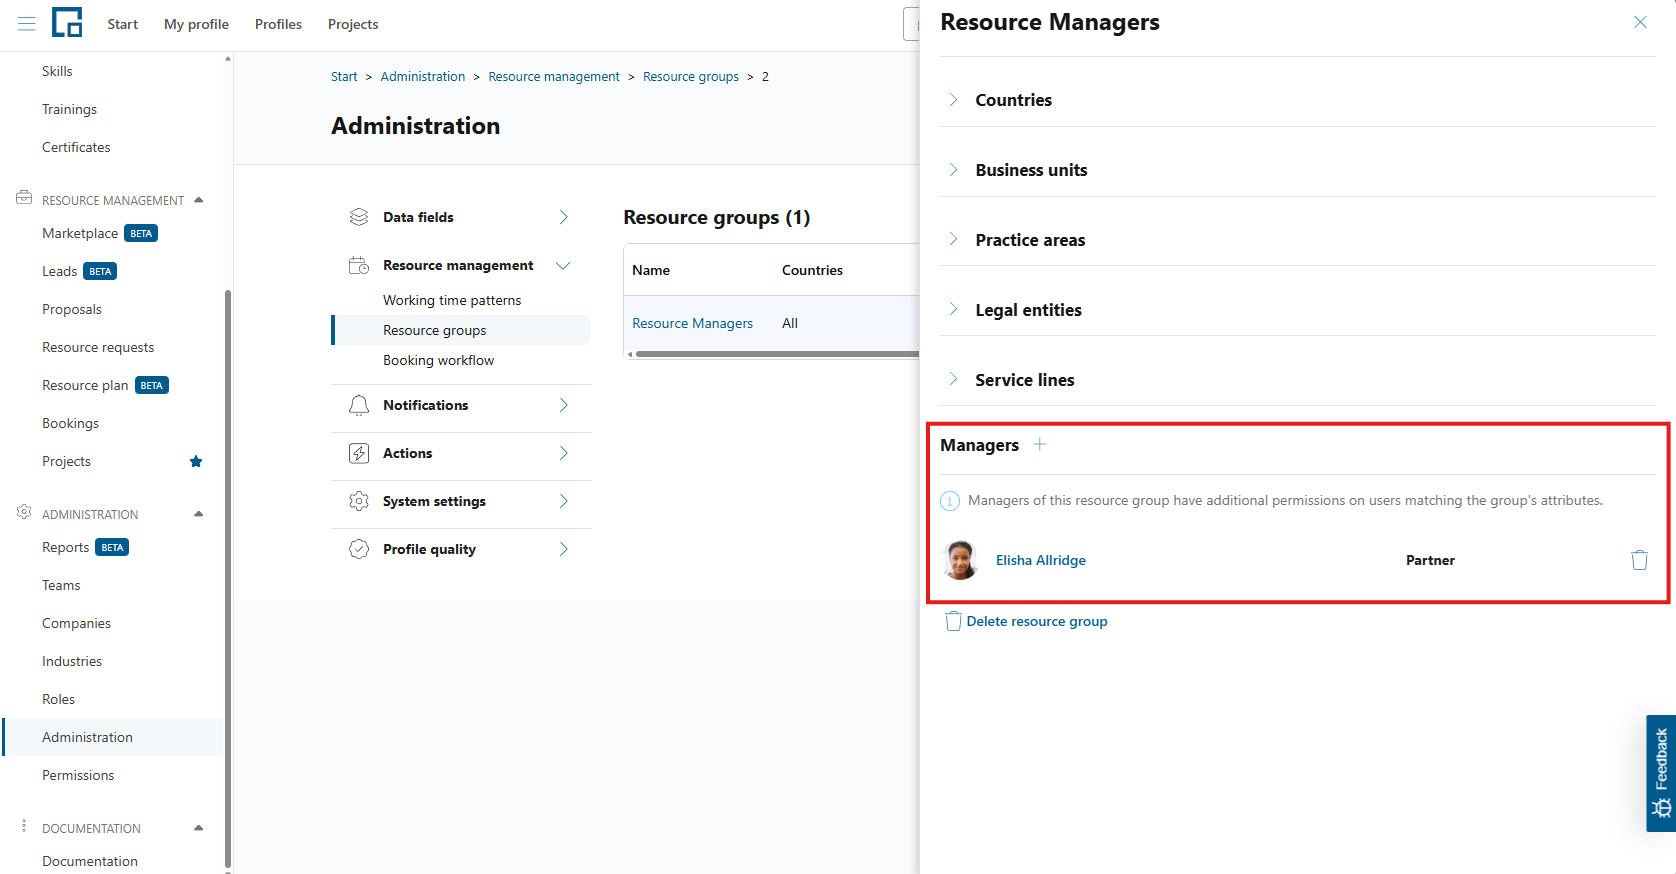
Default for employees
This setting indicates the default permission profile for employees. It is selected for instance, if another permission profile has been deleted and the associated users need a new permission profile (see: Deleting a permission profile). It is also the default permission profile when creating a new account for decídalo on a user’s profile.
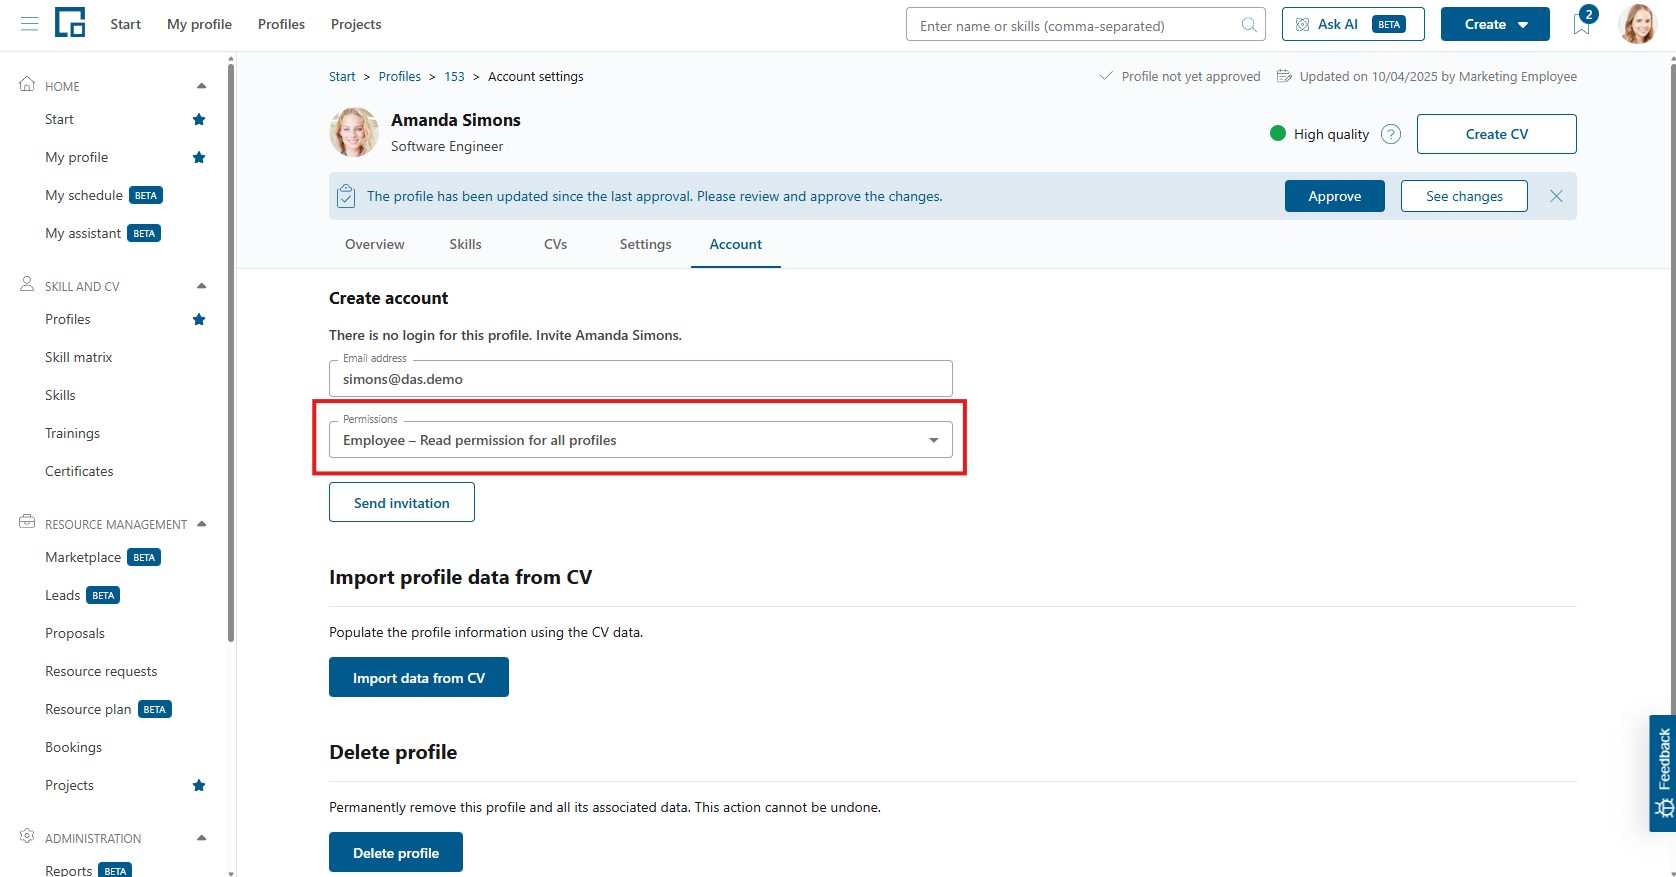
Default for team lead
This setting indicates the default permission profile for a team manager. The permission profile is a must-have requirement for being a team manager. If one sets a user as a team manager that does not have this permission profile, it is assigned automatically after the team update. A warning notifies about this upcoming change.
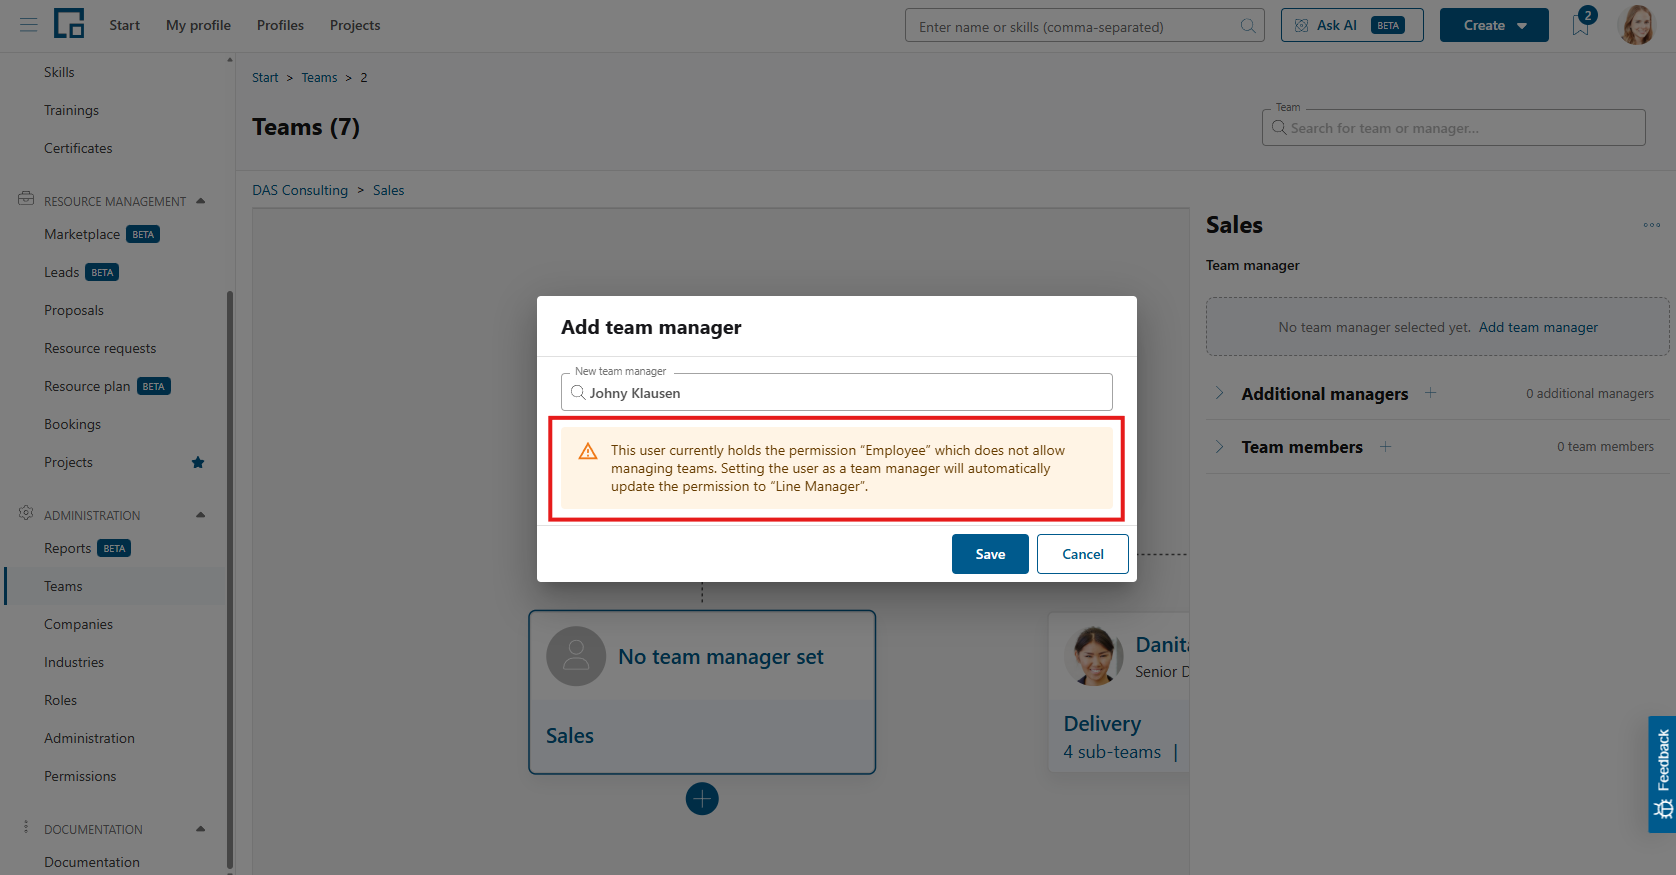
Default for resource group manager
Similar to the team lead default, this setting indicates the default permission profile for resource group managers. The permissions profile is a must-have requirement for being a resource group manager. If a user is a set as a resource group manager that does not have this permission profile, it gets assigned automatically after the resource group update. A warning pop-up notifies about this upcoming change.
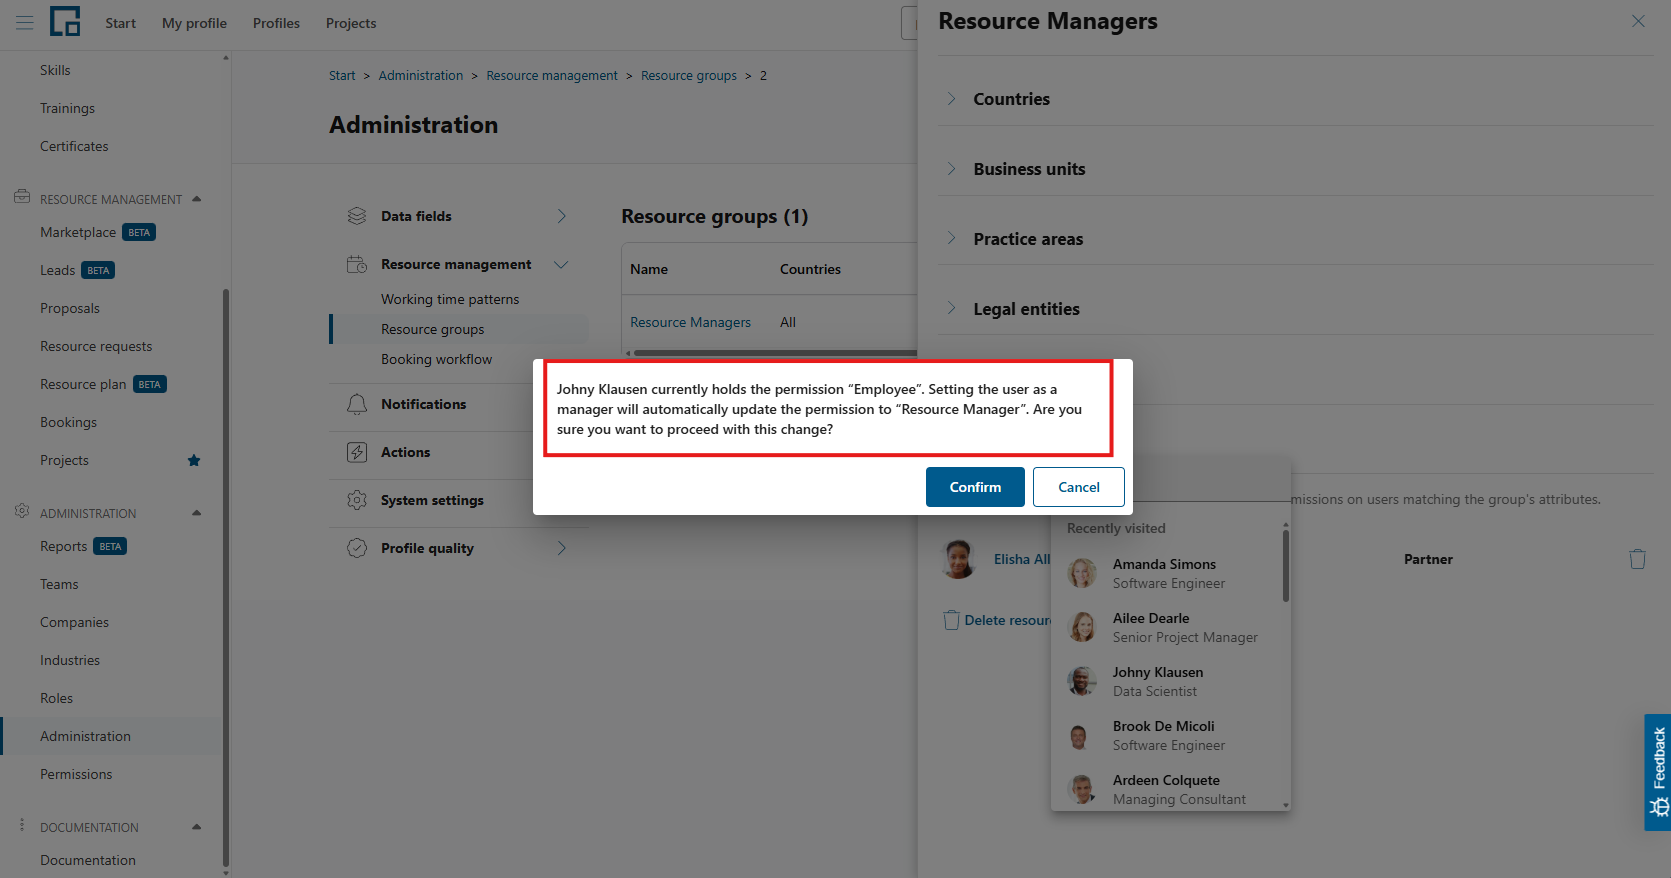
Users and Accounts
Manage Users, Teams, and Permissions
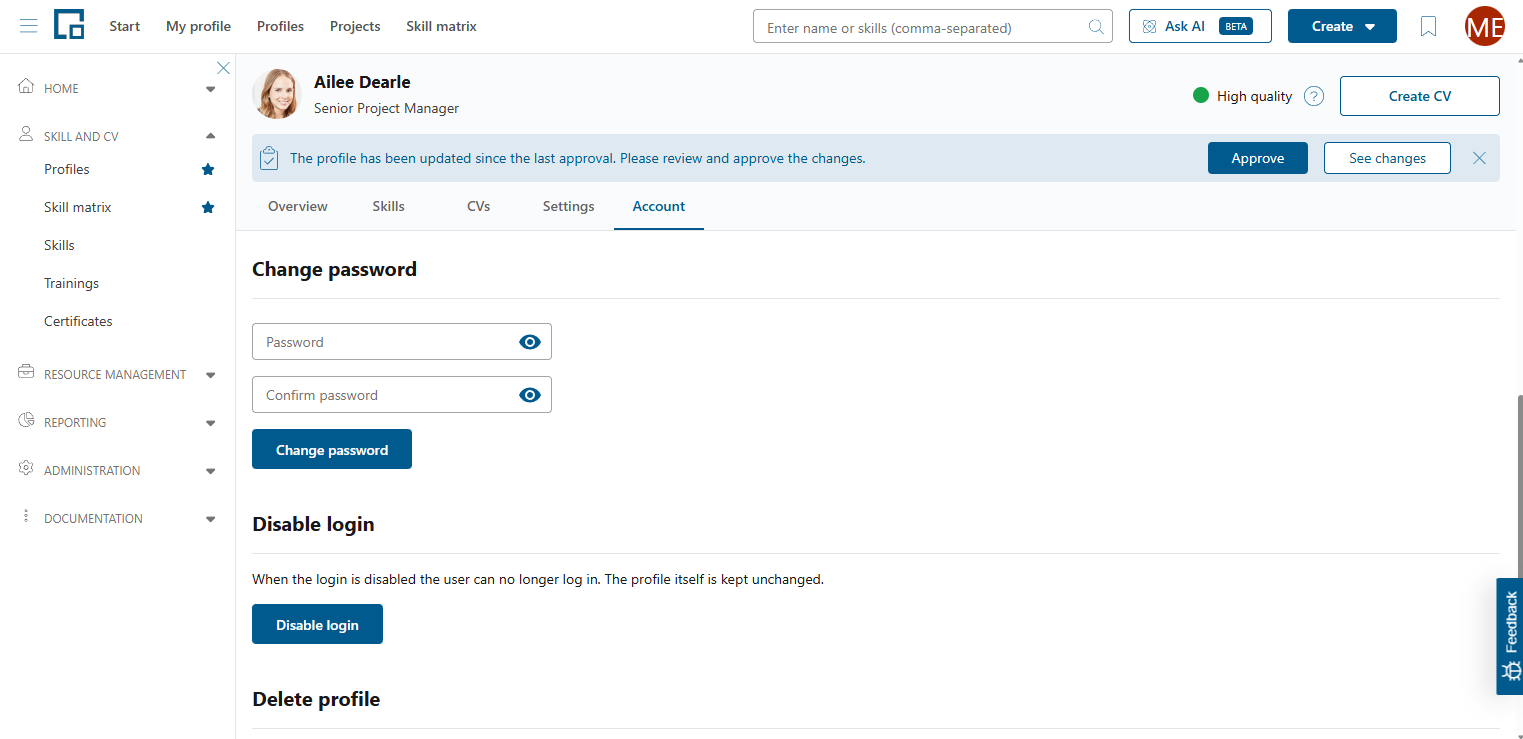
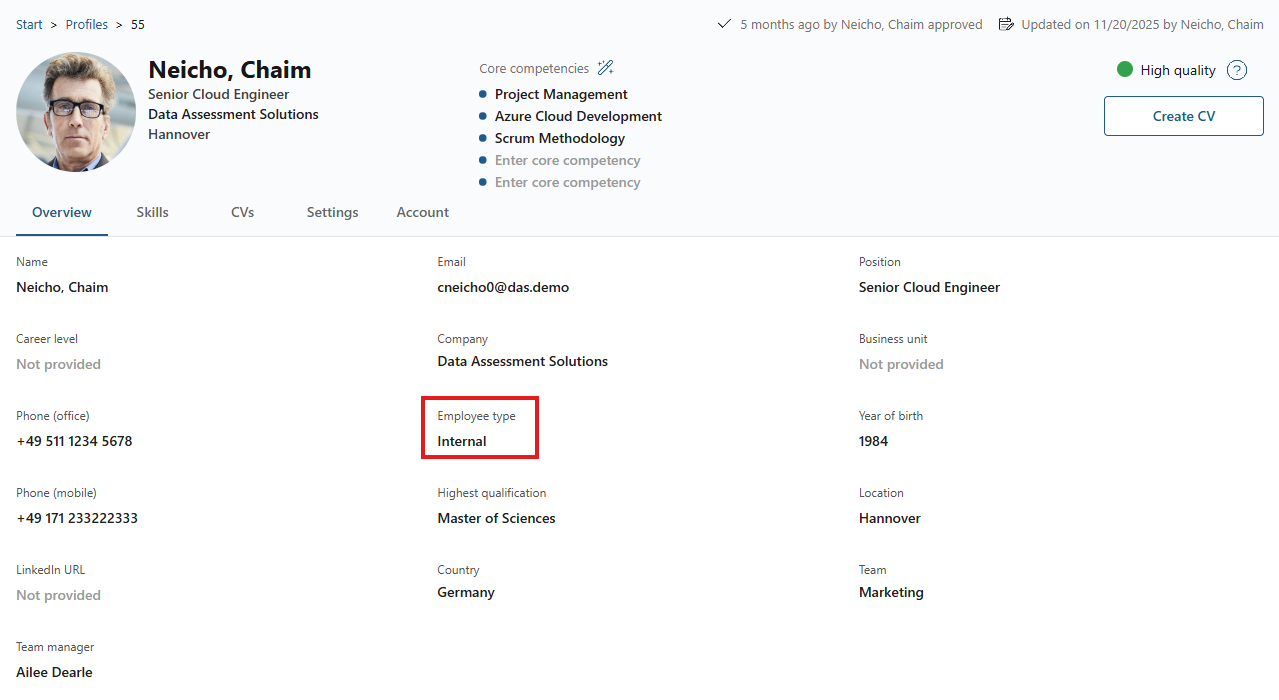
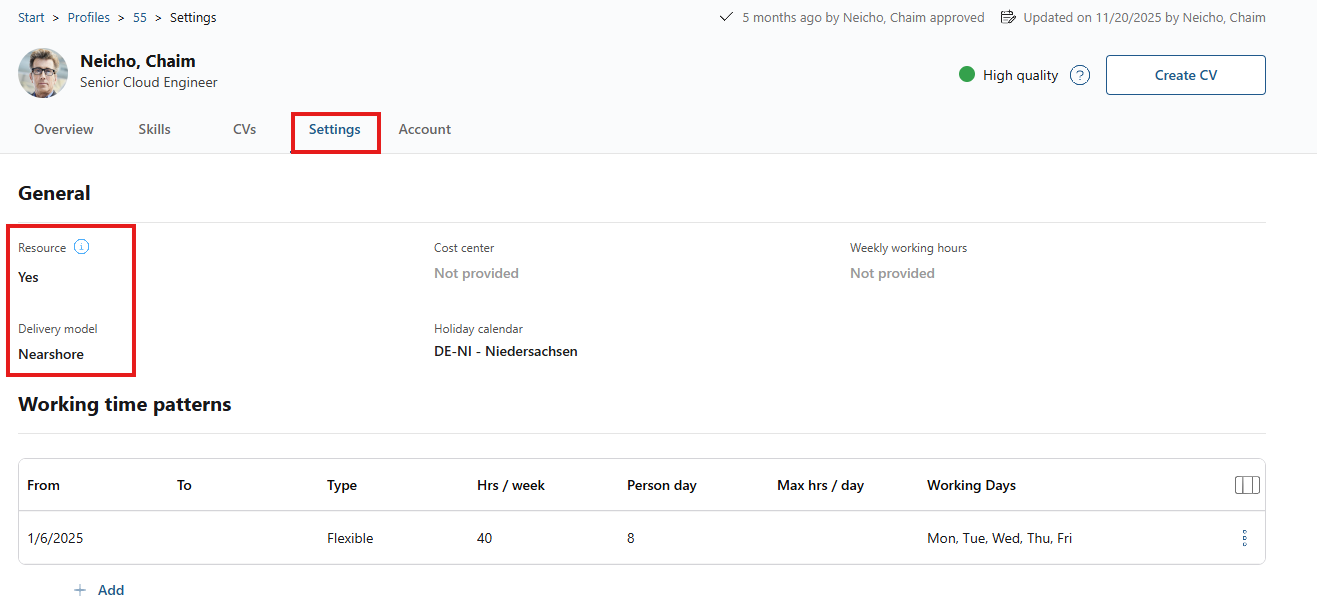
The ‘Manage users, teams, and permissions’ setting determines whether a user is allowed to perform administrative tasks related to user management, team organization, and permission administration. This permission can be set to ‘Yes’ or ‘No’ and is intended as an admin permission. If the user has full administrative capabilities, the following actions can be performed:
- Manage logins: Change passwords for other profiles, update login email addresses, remove access, and assign permission roles
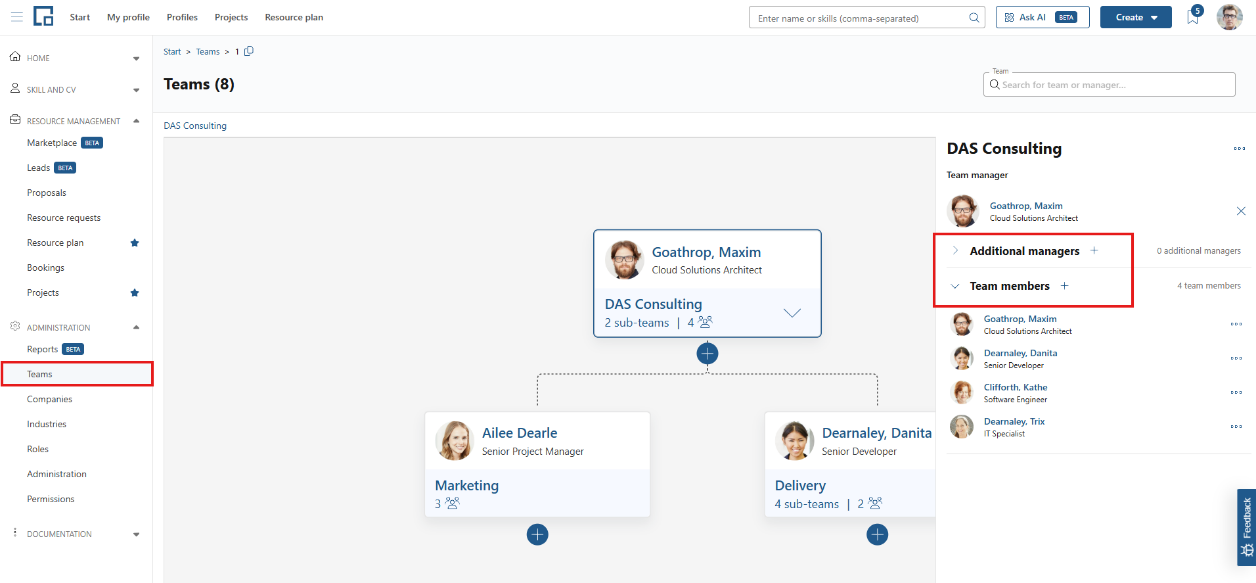
Team administration: Manage teams and assign managers and members
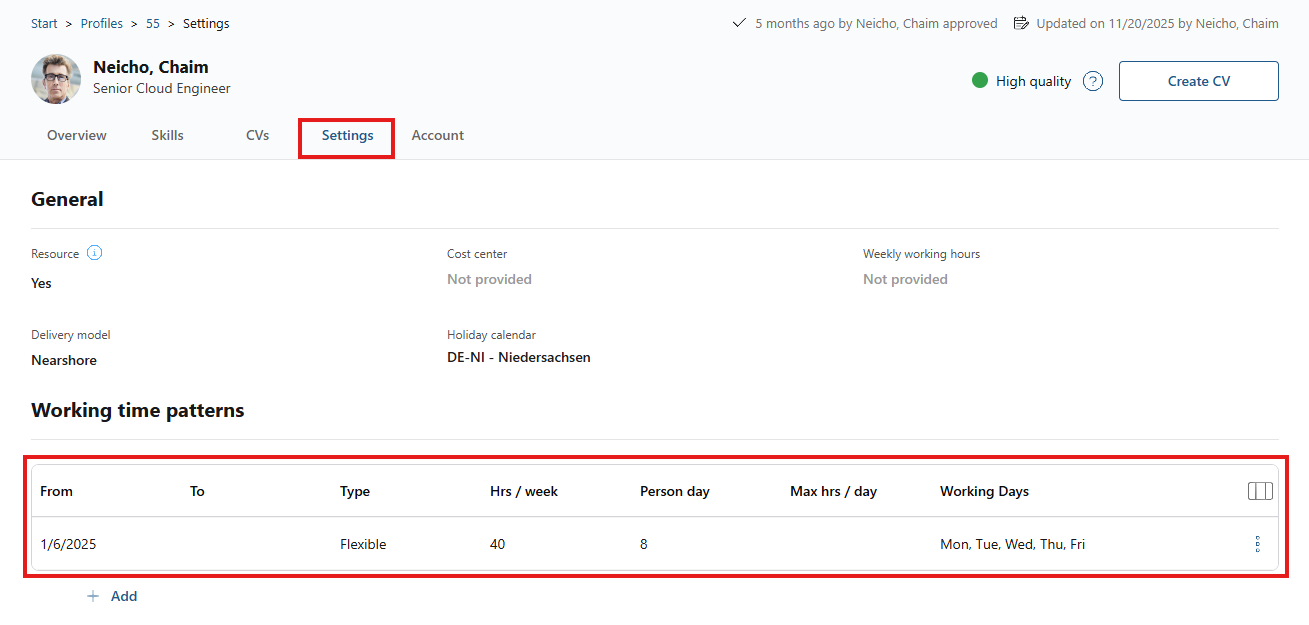
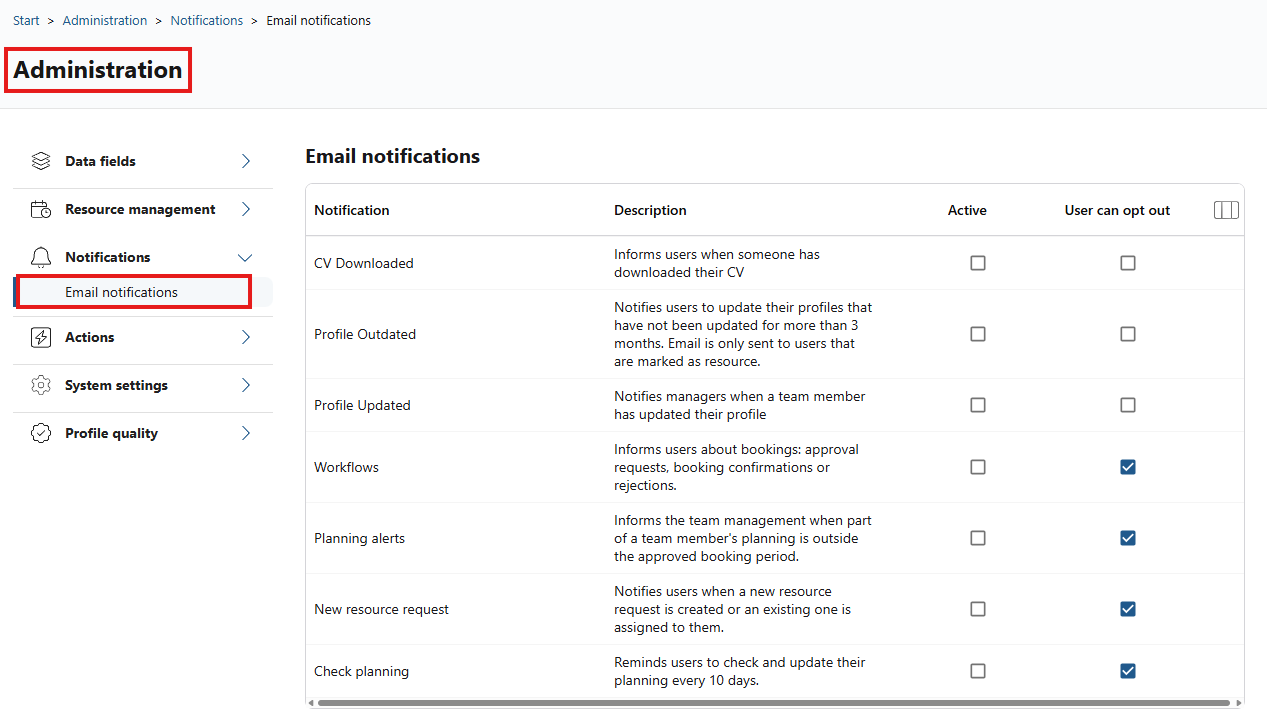
Administration of: Resource groups, permission profiles, email notifications, and working time patterns.
- Update selected profile fields: Employee type, “Resource” and delivery model
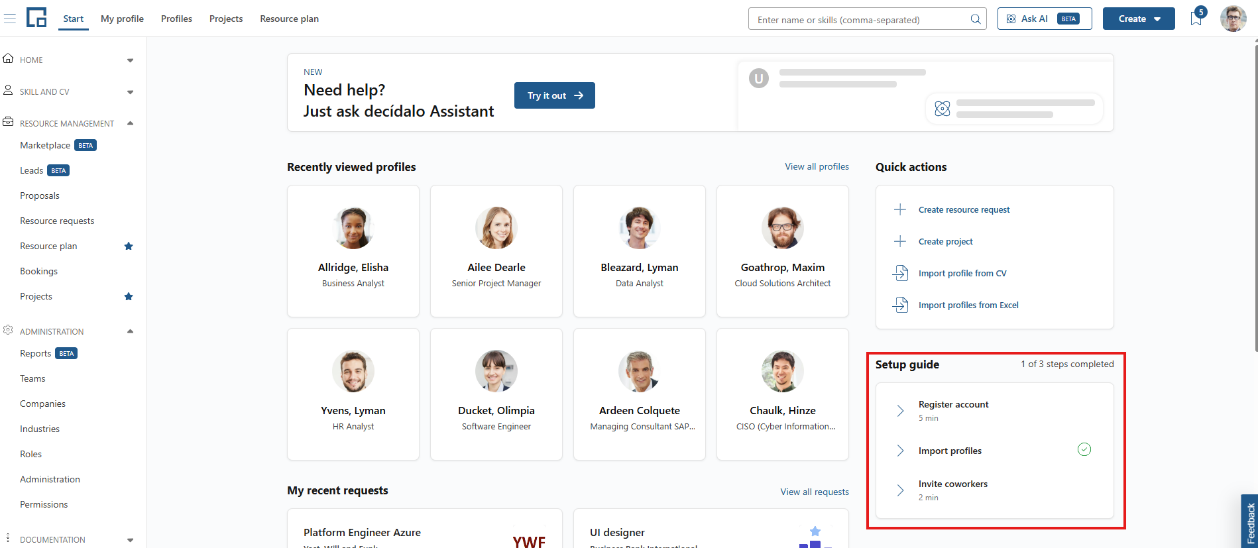
Display the setup guide on the home page
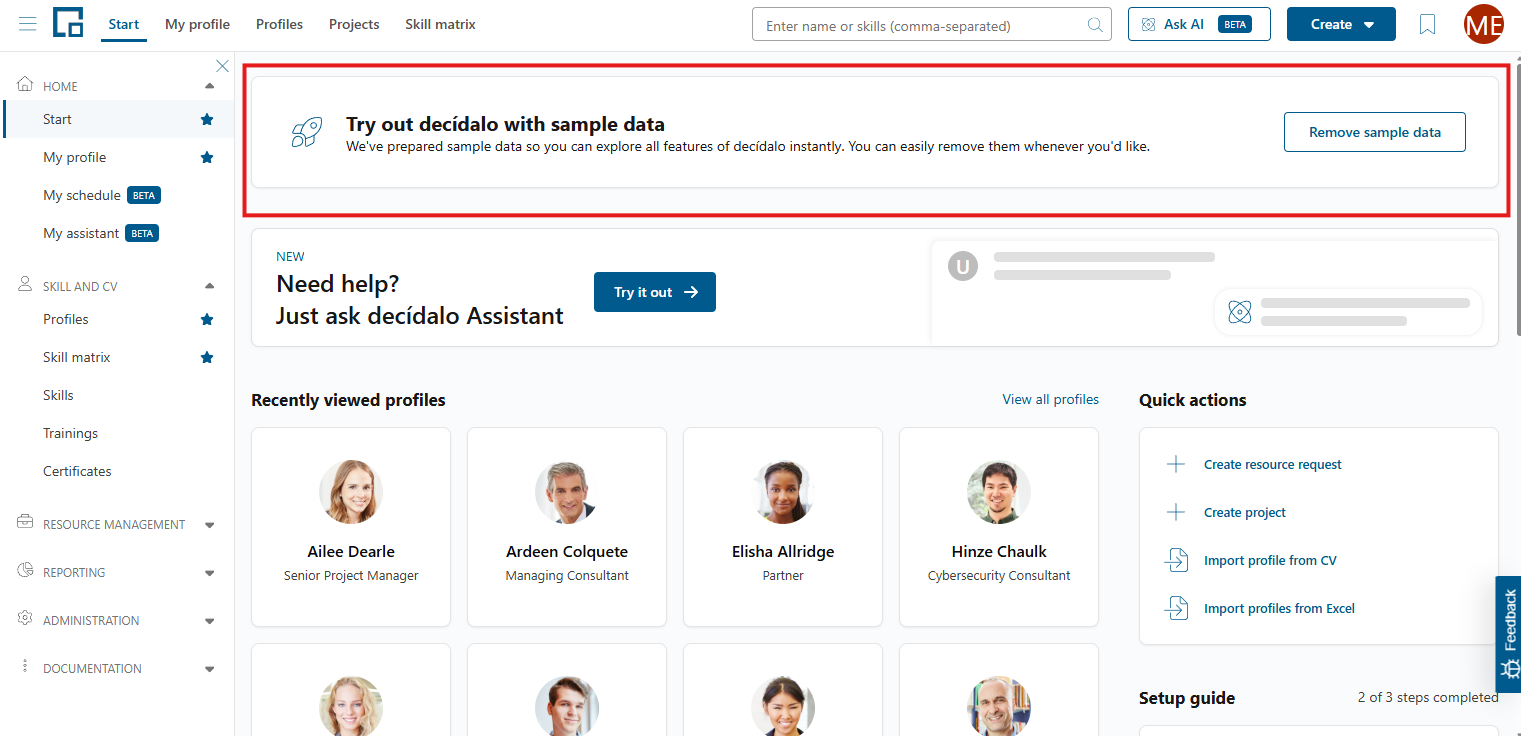
Permission to delete dummy data after registration
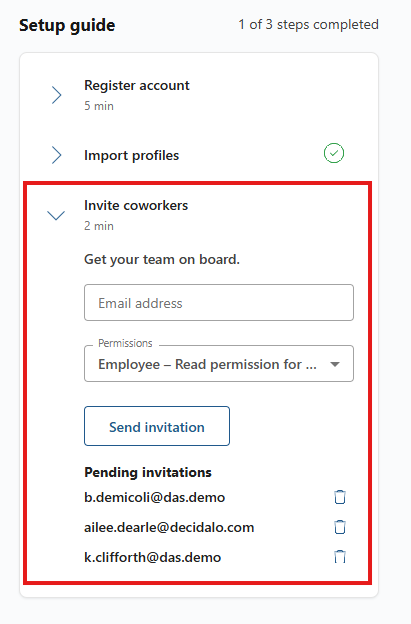
User Invitation
The ‘User invitation’ permission controls whether a user is allowed to invite new users to decídalo via email. When an invitation is sent, the recipient receives a registration email and can log into their account. Together with the invitation email, the user can define the permission role for the recipient.
Profiles
Profile view
The ‘Profile view’ permission determines whether a user can view only their own profile or also the profiles of other users. Depending on their role, users may be able to see the profiles of members in their assigned teams/subteams, users in resource groups they manage, or all profiles if they are administrators.
Only the profiles a user is allowed to view appear on the “Profiles” page.
When a user is not permitted to see certain people, those people are not removed but shown in anonymised form. See Anonymisation for how restricted visibility, search results, and CV anonymisation work together.
Profile editing
The ‘Profile editing’ permission determines whether a user can edit only their own profile or also the profiles of other users. Depending on their role, users may be able to edit the profiles of members in their assigned teams/subteams, users in resource groups they manage, all profiles if they are administrators, or none at all, if they are restricted.
This also covers the holiday calendars of a profile: whoever may edit a profile may add, change and remove its holiday calendar entries, and whoever may see the profile sees them. Absences are the exception on that tab: they have their own Edit absences permission.
Profile approval
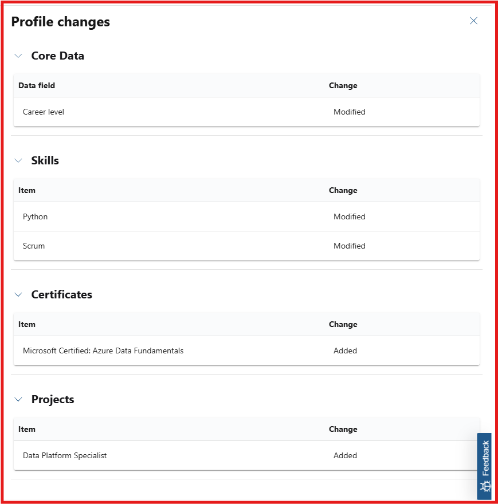
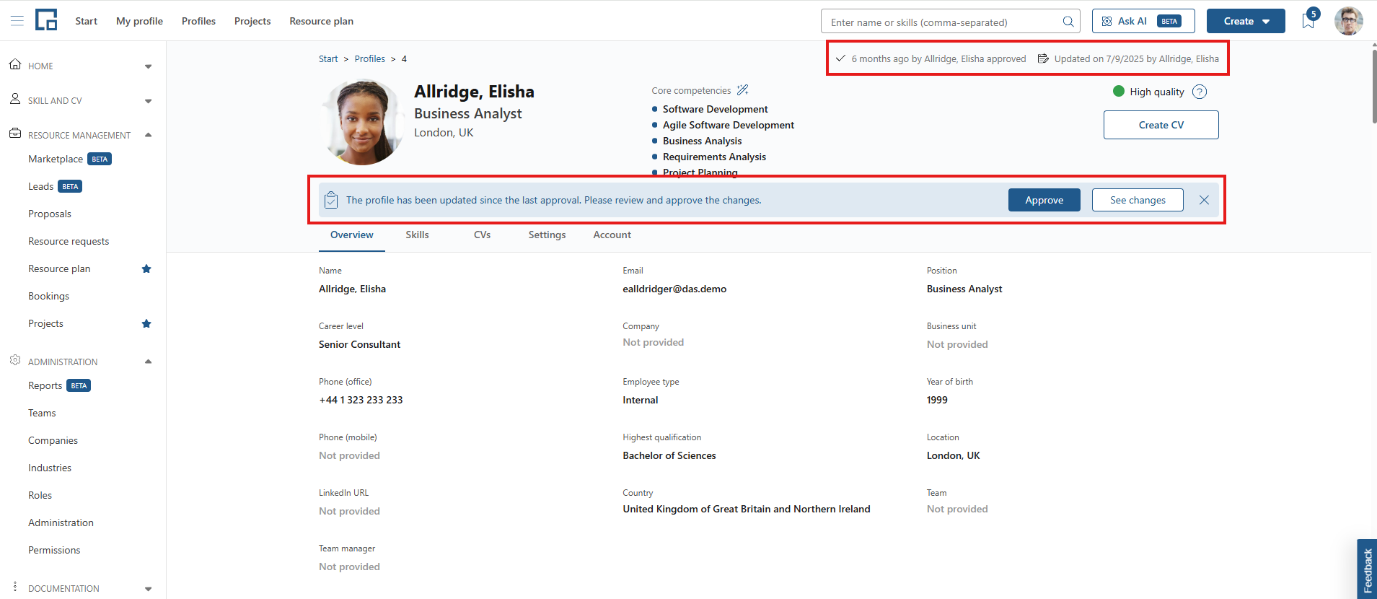
The ‘Profile approval’ permission determines whether a user can approve the profiles of other users. Depending on their role, users may be able to edit the profiles of members in their assigned teams/subteams, users in resource groups they manage, or all profiles if they are administrators.
Changes that have been made to the profile can be reviewed before the approval.
Profile creation
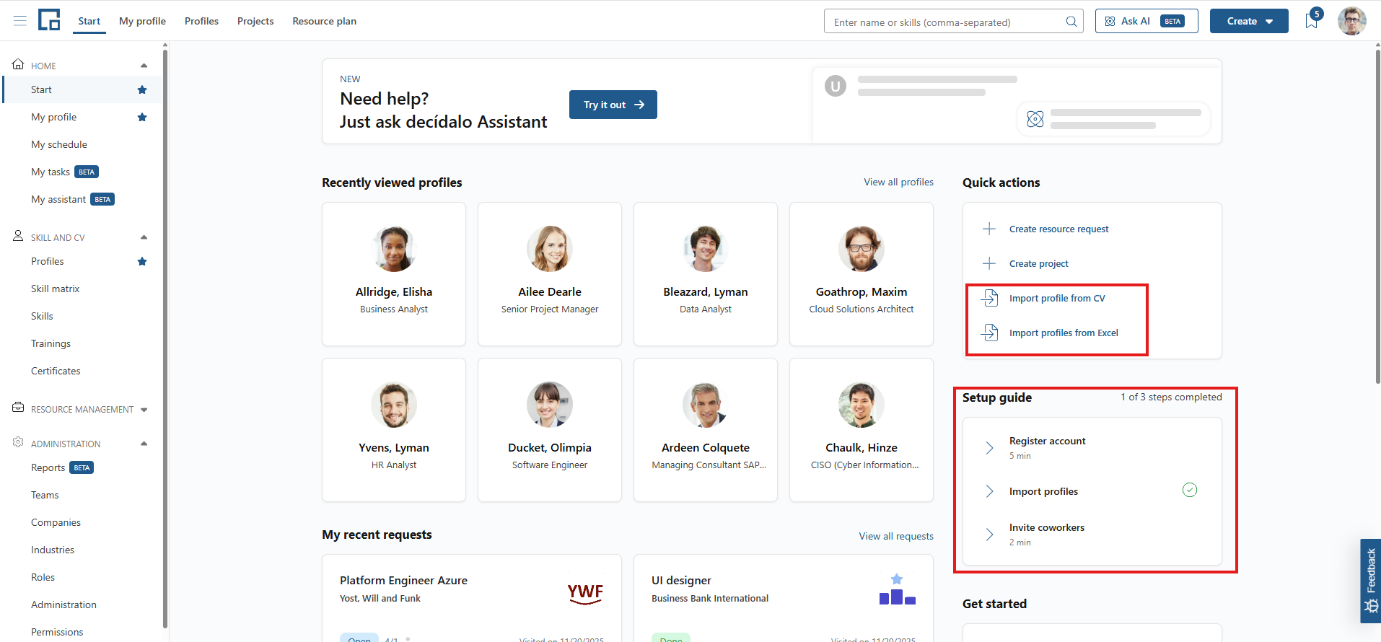
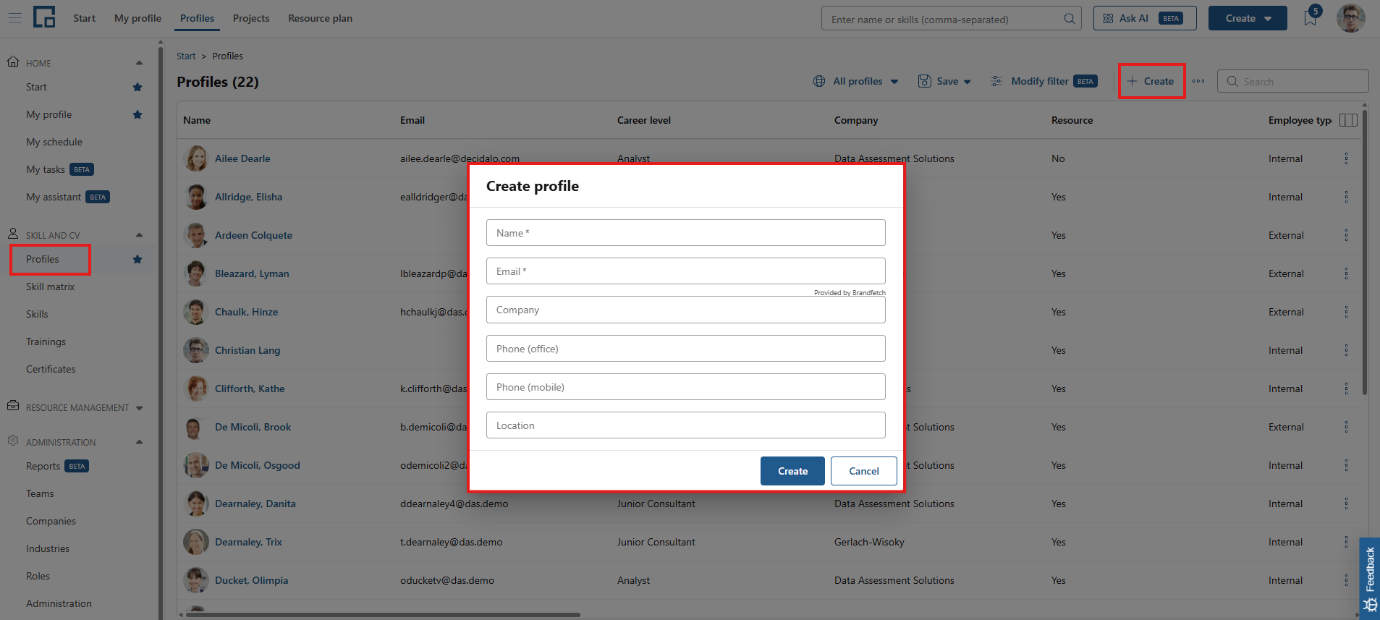
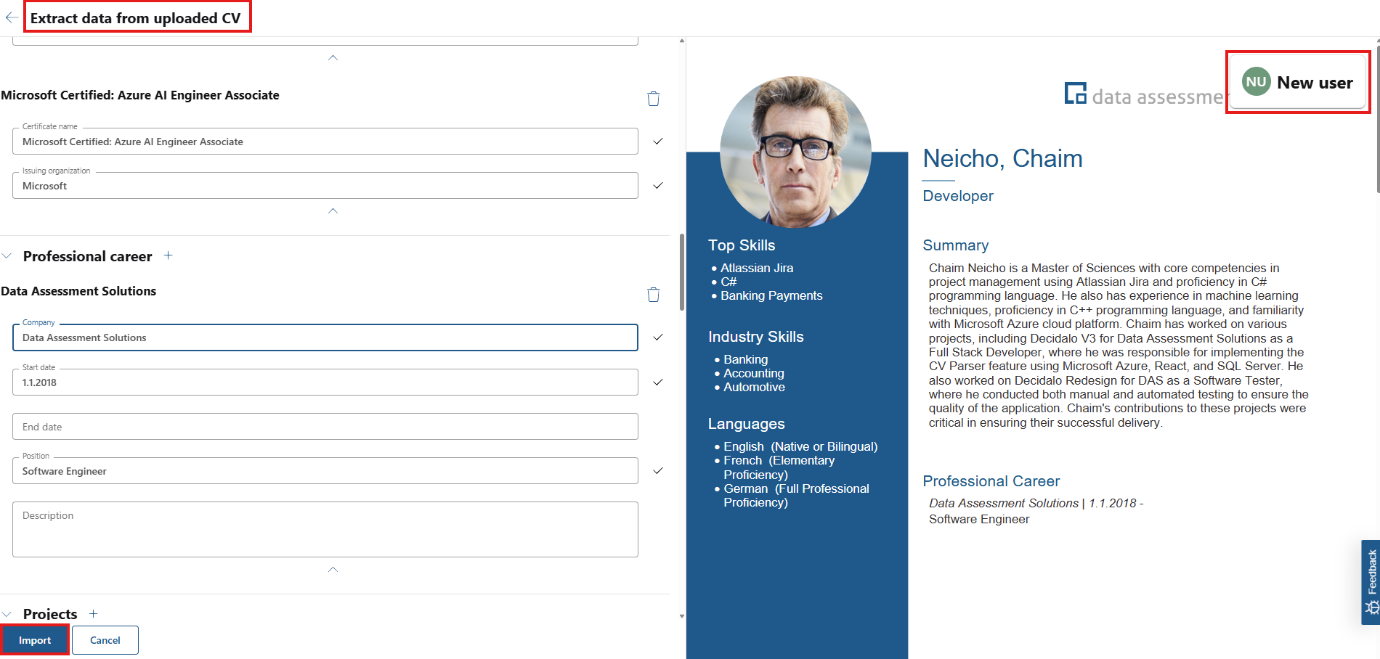
The ‘Profile creation’ permission determines whether a user is allowed to add new profiles to the application. If the user is permitted, they can create new profiles and import profiles using the setup guide, an Excel file, the CV Parser (provided the CV parser is activated) or directly on the ‘Profiles’ page.
Enable Skill Matrix
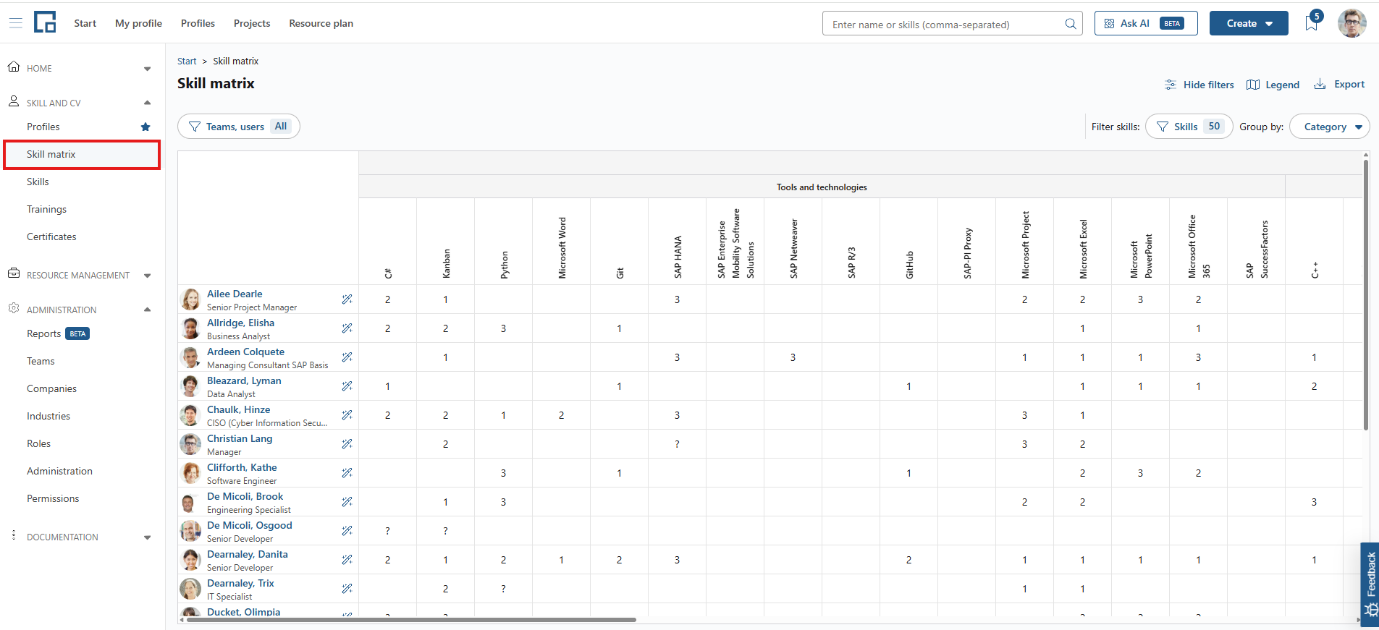
The ‘Enable skill matrix’ permission determines whether a user is allowed to display and use the skill matrix or if the page is hidden and cannot be used.
Check out the documentation on the skill matrix to get more information.
Enable CV Parser
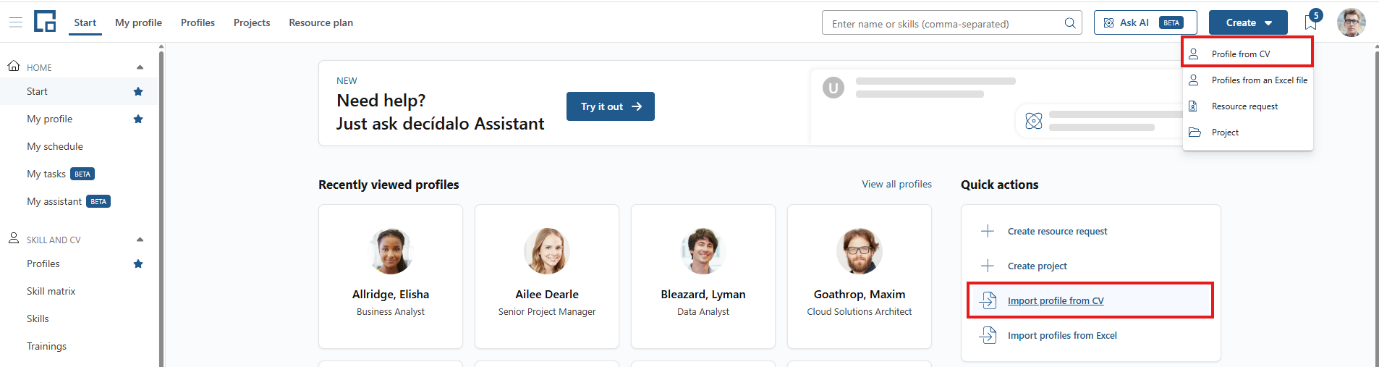
The ‘Enable CV Parser’ permission determines whether a user is allowed to use the CV parser. If the user is not permitted to use the CV parser, it is automatically hidden.
Please note that the CV parser must be enabled for the “profile creation” permission to function properly.
Timesheet view
The ‘Timesheet view’ permission determines whose timesheets a user can open. Depending on their role, users may be able to see only their own timesheet, those of members in their assigned teams/subteams, users in resource groups they manage, or all timesheets if they are administrators.
Note that setting this permission to ‘None’ also hides the user’s own timesheet. It is not only a permission over other people. The “Timesheets” page is hidden entirely, and only the users a caller is allowed to see are offered in its user selection.
Timesheet editing
The ‘Timesheet editing’ permission determines whose recorded time a user can create, change and delete. It is scoped in the same way as ‘Timesheet view’. A user who may view a timesheet but not edit it sees it in read-only form.
Independently of this permission, individual entries can be locked because they have been confirmed, put on a servicesheet, or imported. See Time recording concept.
CVs
View Anonymous CVs
The ‘View anonymous CVs’ permission determines whether a user can view only their own anonymous CVs or the anonymous CVs of other users. Depending on their role, users may be able to see the anonymous CVs of members in their assigned teams/subteams, users in resource groups they manage, or all anonymous CVs if they are administrators.
Please note: If a user can view a resource request and has the ‘Resource request candidates and comments view’ permission for it, they can view and download all CVs linked to that request, regardless of their CV view scopes.
Create anonymous CVs
The ‘Create anonymous CVs’ permission determines whether a user can create anonymous CVs only for themselves, for other users as well or none at all. Depending on their role, users may be able to create anonymous CVs for members in their assigned teams/subteams, for users in resource groups they manage or for all users if they are administrators.
Please make sure that anonymous CV templates are provided to use.
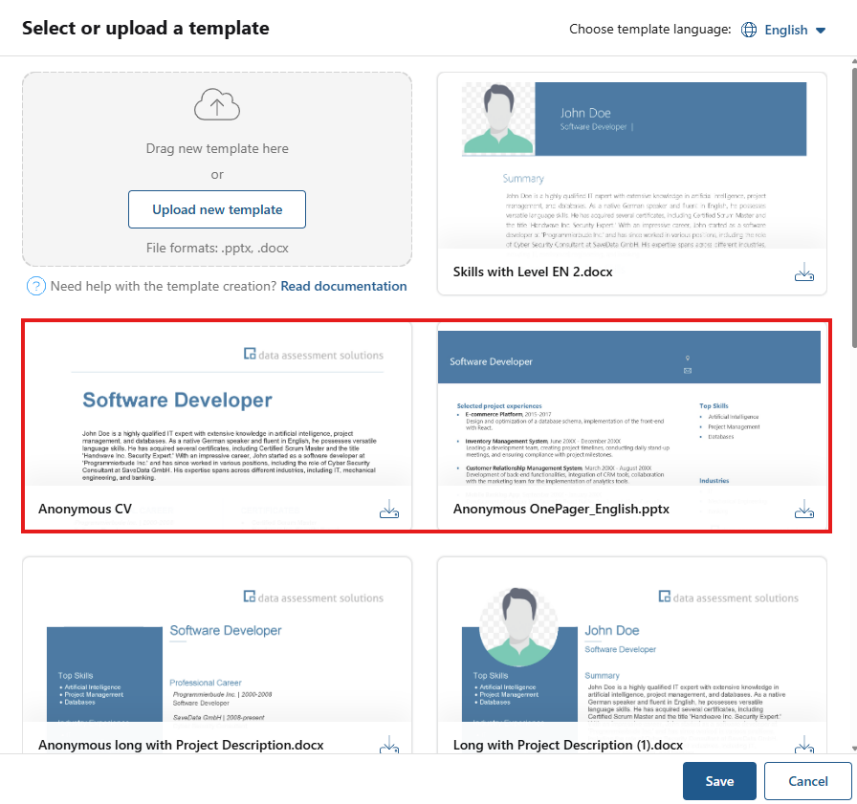
Create non-anonymous CVs
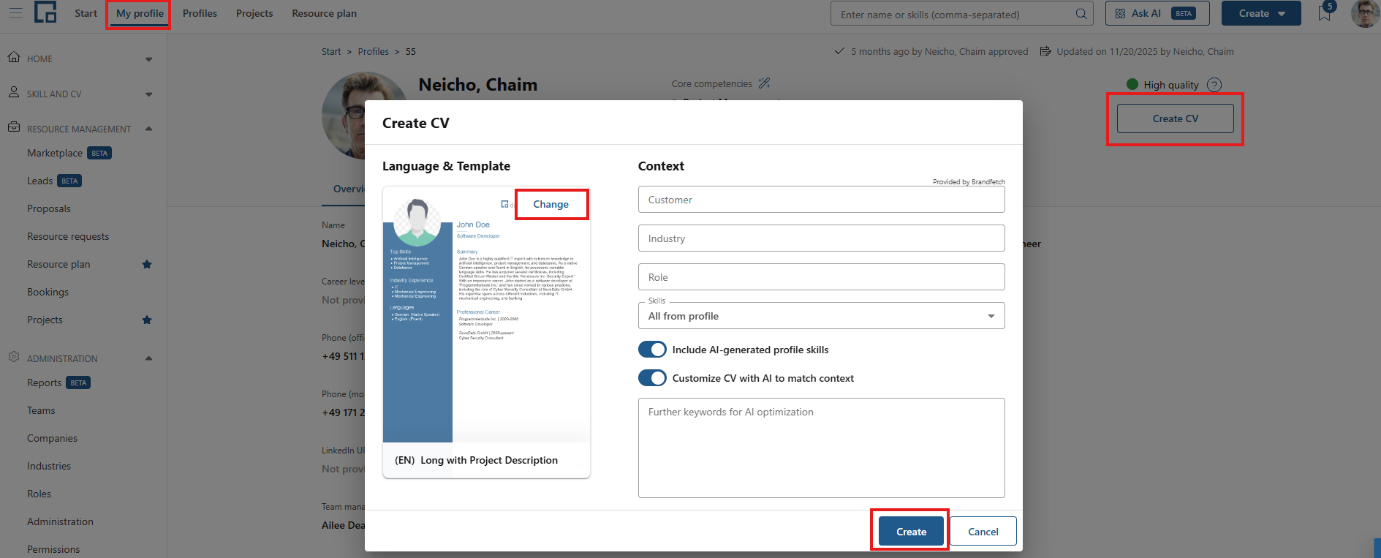
The ‘Create non-anonymous CVs’ permission determines whether a user can create CVs only for themselves, for other users as well or is not permitted to create a CV. Depending on their role, users may be able to create CVs for members in their assigned teams/subteams, for users in resource groups they manage or for all users if they are administrators.
When creating a new CV, the user is able to select a template and fill in some data fields for context.
We provide a detailed documentation on CV creation.
Edit visible CVs
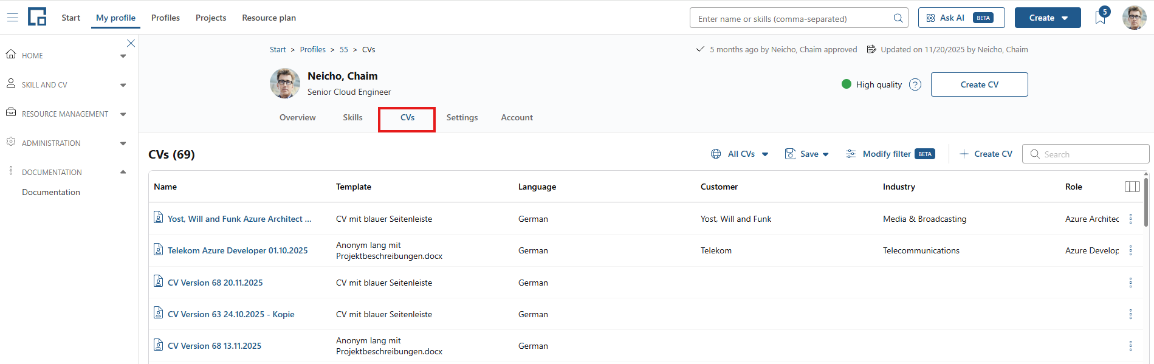
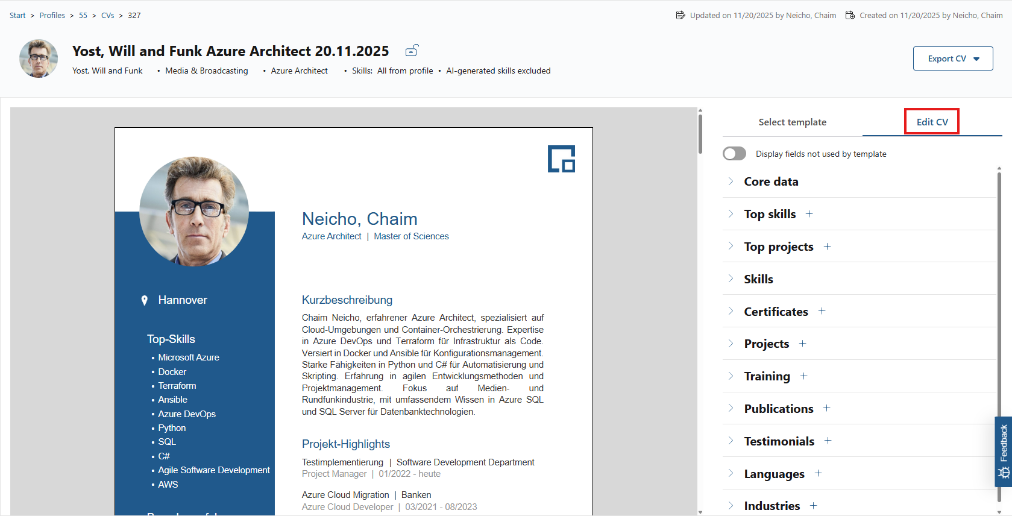
The ‘Edit visible CVs’ permission determines whether a user can edit visible CVs only for themselves, for other users as well, or whether they are not permitted to edit visible CVs at all. Depending on their role, users may be able to edit CVs for members of their assigned teams or subteams, for users in resource groups they manage, or for all users if they are administrators.
Please note: If a user is authorized to edit only their own CVs but can edit a resource request, they can edit all CVs linked to that request.
Please note: Regardless of the selected scope, a user can always edit any CV that they created themselves, including a CV they created on another person's profile.
Projects
Project editing
The ‘Project editing’ permission determines whether a user can edit projects only for themselves, for other users as well, or whether they are not permitted to edit projects at all. Depending on their role, users may be able to edit projects for members of their assigned teams or subteams, for users in resource groups they manage, or for all users if they are administrators.
Please note: Users can only edit a project, if no other user outside authorized structures is assigned to the project.
To edit a project, either go to the profile of a user and select projects for editing by clicking on the project. A pop-up window opens and data fields can be edited.
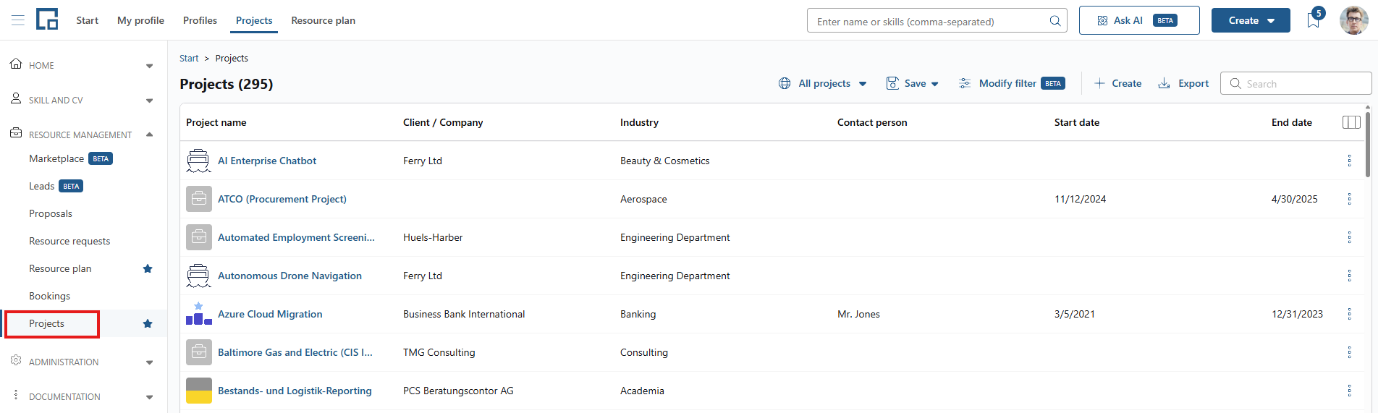
One can also navigate directly to the central project page to view and edit projects that one is permitted to access. 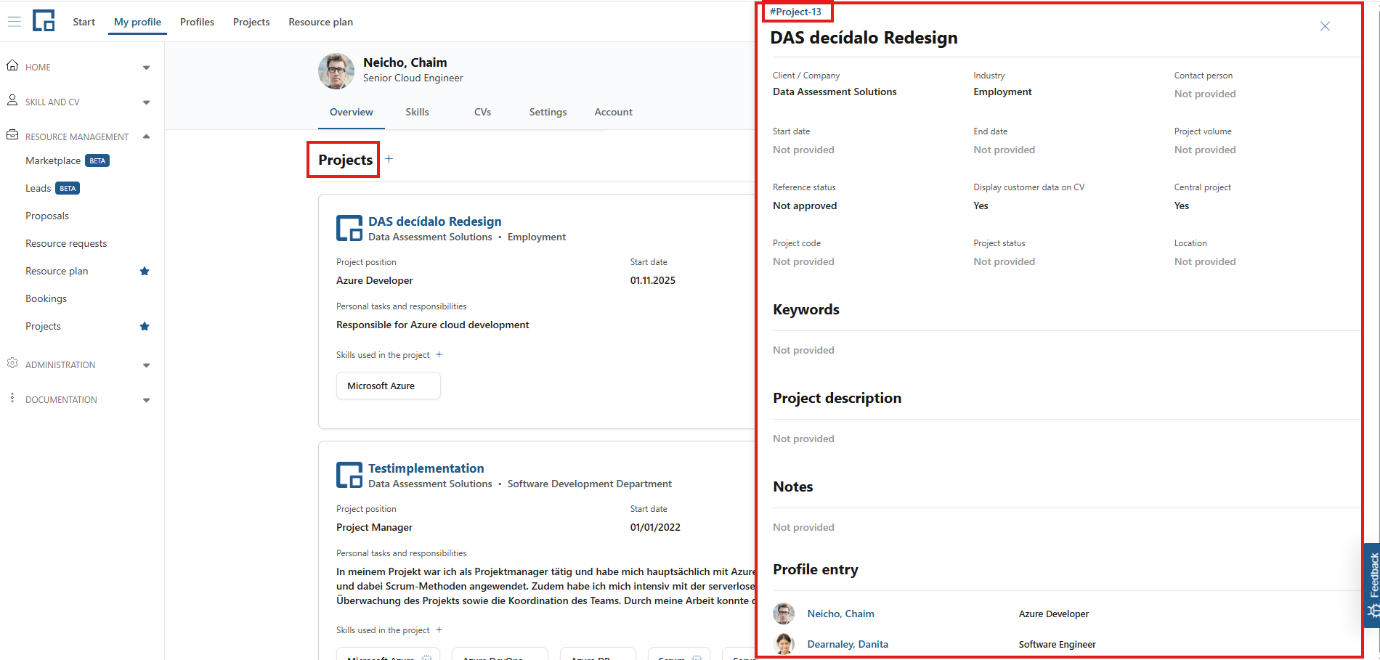
Create and edit project positions and bookings
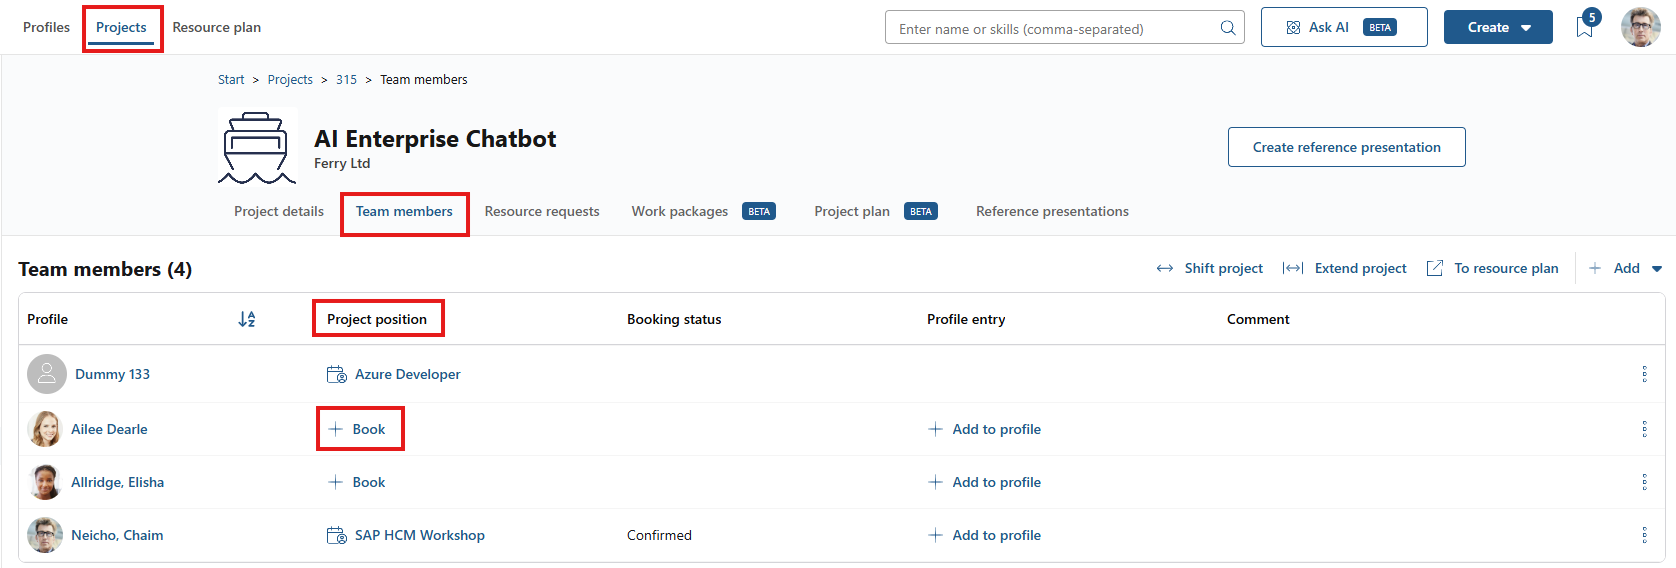
The ‘Create and edit project positions and bookings’ permission defines the scope in which a user can manage positions and bookings within projects. The user may create or edit positions and bookings only in projects they have created themselves or if given admin rights, the user can manage positions and bookings across all projects.
To create and edit project positions and bookings, the user can navigate directly to a specific project, jump to team members and add or edit project positions.
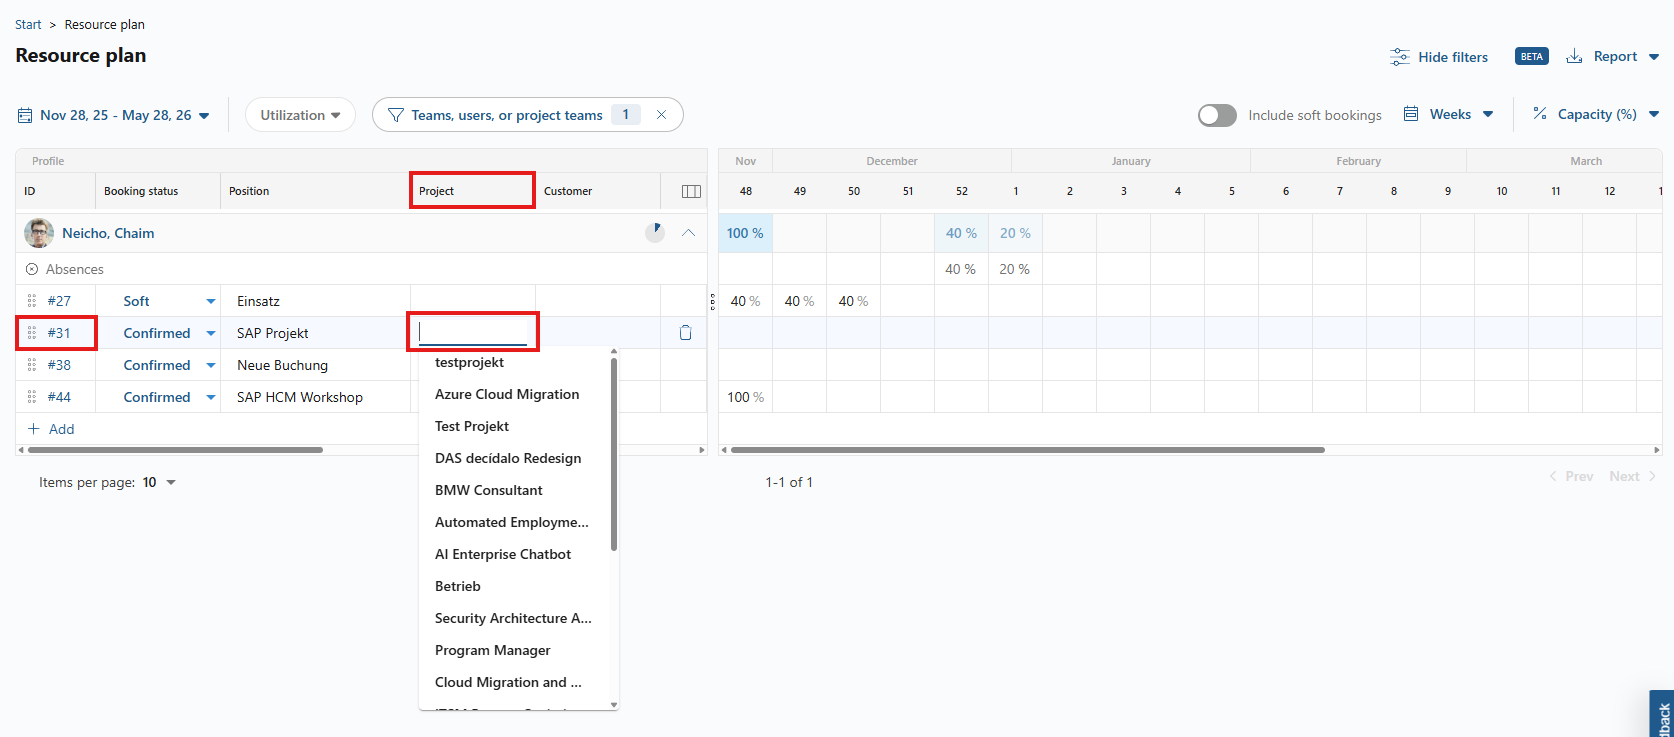
It is also possible to navigate to the resource plan and add a project to an existing booking. Please note: This only works for users and projects the user is permitted to.
Allowed to grant project permissions
The ‘Allowed to grant project permissions’ setting determines whether a user may assign project-level roles (project lead, deputy, resource manager, sales responsible), which grant project-specific permissions.
This permission allows a user to assign project responsibilities such as Sales Responsible, Project Manager or Substitute Project Manager.
When enabled, the user can assign or modify these responsibilities on a project.
Without it, even if the user can edit the project, they cannot change who holds these responsibilities.
Resource requests
Viewing, creating and editing resource requests can additionally be granted through a project contact type that includes ‘Create and edit resource requests’, for the individual projects a user is a contact for. Such a contact sees those projects’ requests, both on the resource requests page and on the project’s resource requests tab, and can create and edit requests from the project, even with role-based scopes of ‘None’. Creating a request outside a project still requires the ‘Resource request editing’ scope. Substitutes act with the reach of the person they represent; see Delegations.
Resource request view
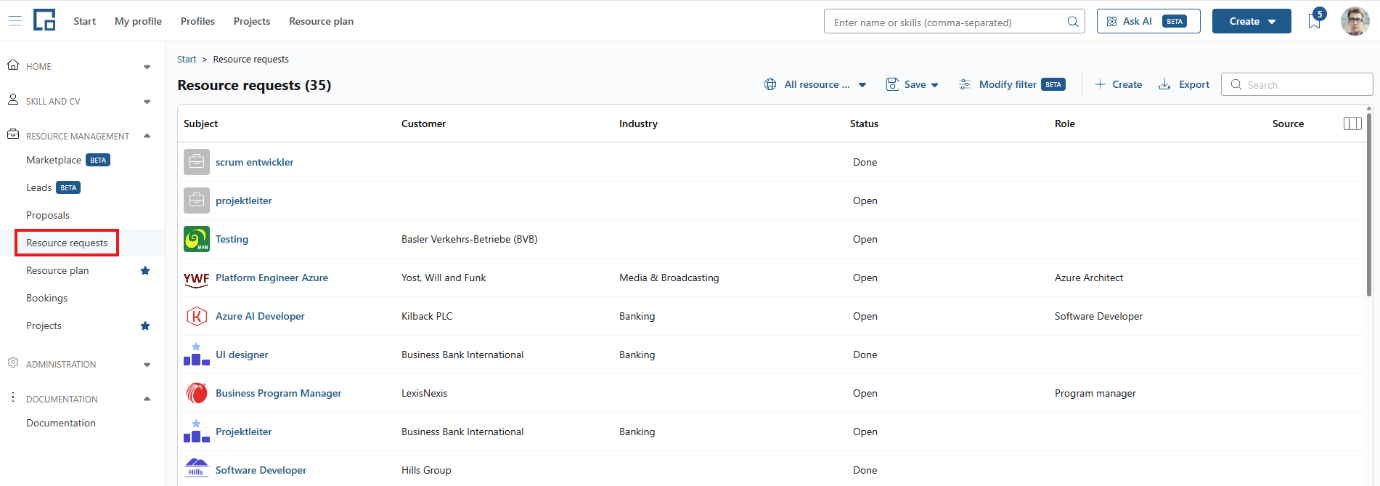
The ‘Resource request view’ permission determines whether a user can view only the resource requests they created, the requests created by other users or none at all. Depending on their role, users may be able to see the resource requests of members in their assigned teams or subteams, users in resource groups they manage, or all resource requests if they are administrators.
Resource request editing
The ‘Resource request editing’ permission determines whether a user can edit only the resource requests they created, the requests of other users as well, or whether they are not permitted to edit resource requests at all. Depending on their role, users may be able to edit the resource requests of members in their assigned teams or subteams, users in resource groups they manage, or all resource requests if they are administrators.
Previously, editing a resource request was implied by the ‘Resource request view’ permission. It is now a separate permission and cannot exceed the view scope: a user must be able to see a resource request in order to edit it.
Editing also covers creating resource requests and a request's staffing: running or re-running a candidate search, editing the search requirements, adding candidates, and suggesting or removing a candidate suggestion all require this permission. (Writing comments is not part of this; see ‘Resource request candidates and comments view’ below.)
Resource request candidates and comments view
The ‘Resource request candidates and comments view’ permission determines whether a user can see the candidates tab and the comments tab of a resource request. It is layered on top of the ‘Resource request view’ permission, so a user must be able to view a resource request first. Three values are available: ‘None’ (both tabs are shown locked and cannot be opened), ‘Own data’ (the tabs are available on the resource requests the user created) and ‘All data’ (the tabs are available on every resource request the user can view).
A user who can edit a resource request (see ‘Resource request editing’) always sees these two tabs for that request, regardless of this permission, because editing a request includes managing its candidates.
Without edit permission the candidates tab and the candidate search open in a read-only mode: the candidate list and ranked search results are visible (and search results can still be exported), but running a search, editing the requirements, adding candidates, and suggesting or removing a candidate suggestion are not available, because all of those require the ‘Resource request editing’ permission. Writing comments is not restricted this way: it is available to anyone who can see the candidates and comments tabs, not only to users who can edit the request.
Please note: This permission also grants access to candidate data of the requests it covers: a user who can see the candidates tab can view and download the CVs linked to that request, regardless of their ‘View anonymous CVs’ / ‘View personalized CVs’ scopes.
Bookings and Schedules
Booking comments view
The ‘Booking comments view’ permission determines whether a user can see and write the comments of a booking. It is layered on top of the ‘View bookings and schedules’ permission, so a user must be able to view a booking first. Two values are available: ‘None’ (the Comments button is not offered) and ‘All data’ (the Comments panel is available on every booking the user can view). There is deliberately no ‘Own data’ value.
A user who can edit a booking (see ‘Edit bookings’) always sees the comments of that booking, regardless of this permission, because coordinating a booking includes taking part in the discussion about it.
Please note: The booked person never sees the comments on their own booking, even with ‘All data’ granted and even if they may edit that booking. Booking comments are internal coordination about a person (availability, rate, alternatives). Super-users are the one exception and can always open the panel.
The permission ships as ‘None’ for every permission profile, so an administrator has to grant it before anyone sees booking comments.
Enable Bookings and Schedules
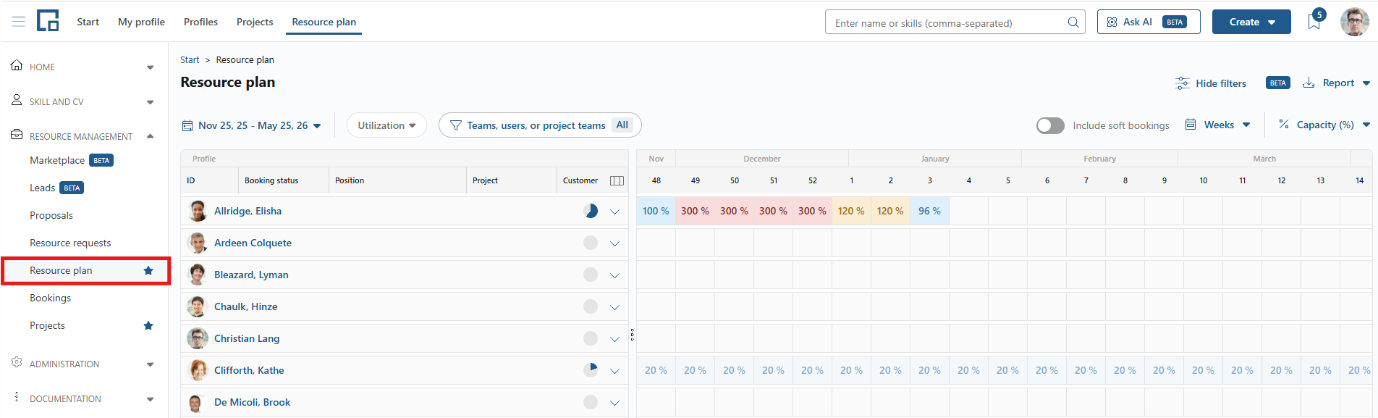
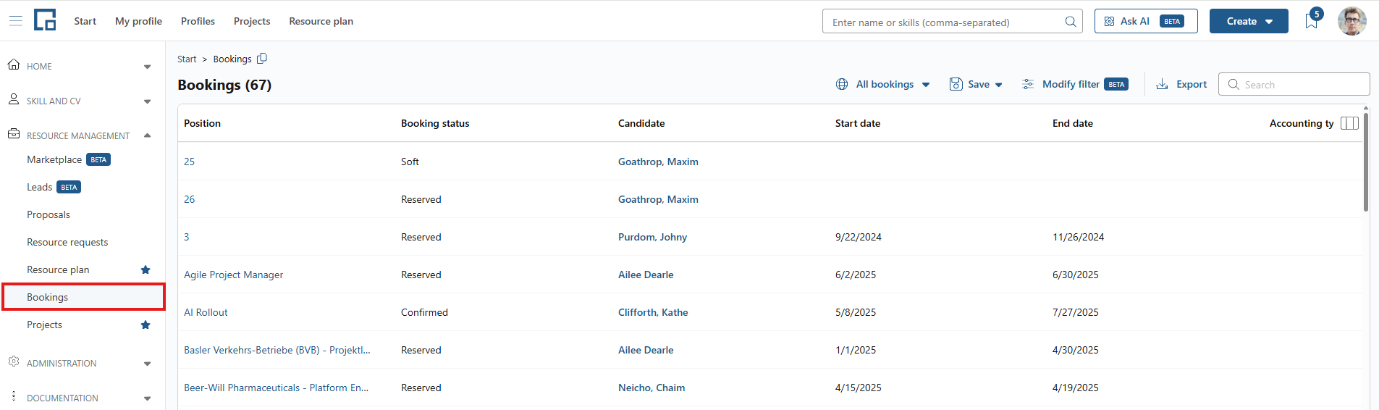
The ‘Enable bookings and schedules’ permission determines whether a user can access the Bookings and Resource Plan pages. If disabled, these pages are not accessible to the user.
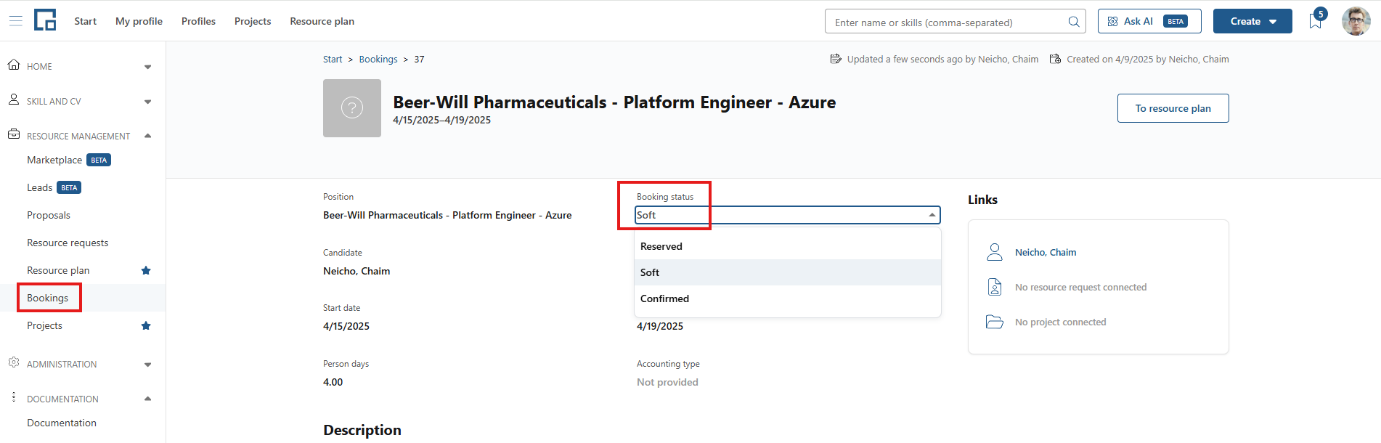
Create and set soft bookings
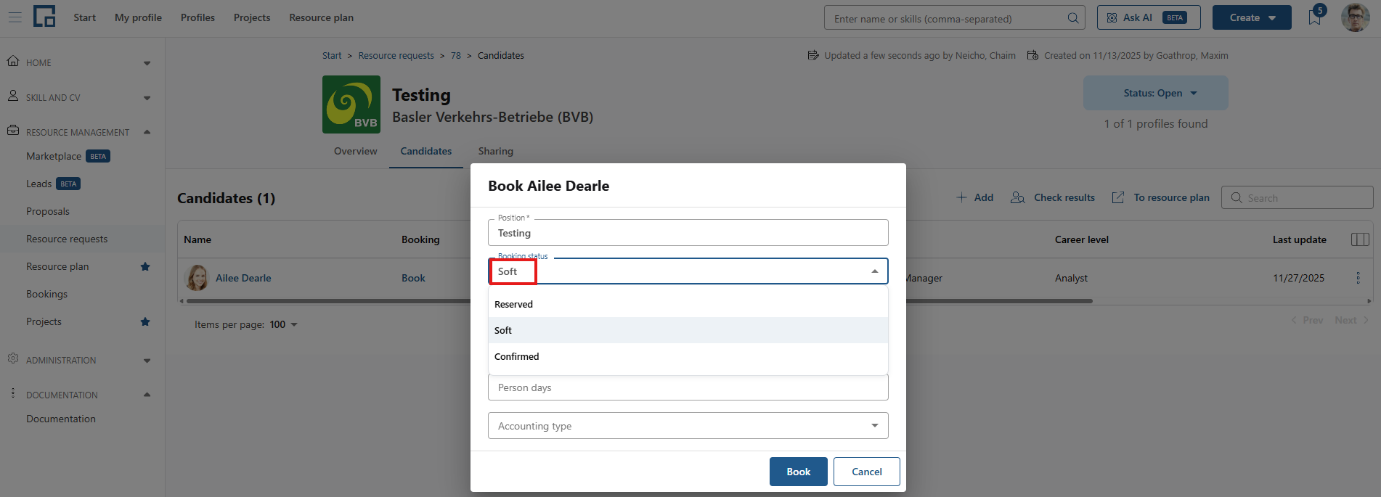
The ‘Create and set soft bookings’ permission determines whether a user can create and set soft bookings, which are intended for reservation purposes in the context of an opportunity. Depending on the permission level, users may be allowed to create and set soft bookings only for themselves, for members of their assigned teams/subteams, for users in the resource groups they manage, or for all users if they are administrators.
Caution: Permission to create and set bookings automatically grants permission to edit them. In this context, and in the following permissions, “create and set” refers specifically to the booking status.
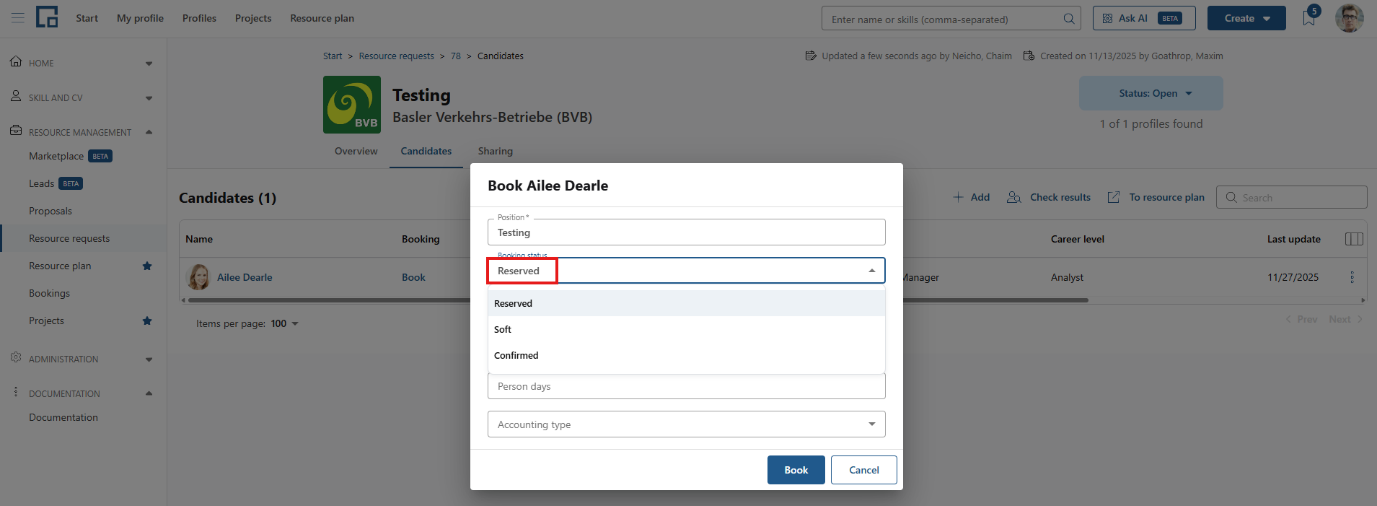
Create and set reserved bookings
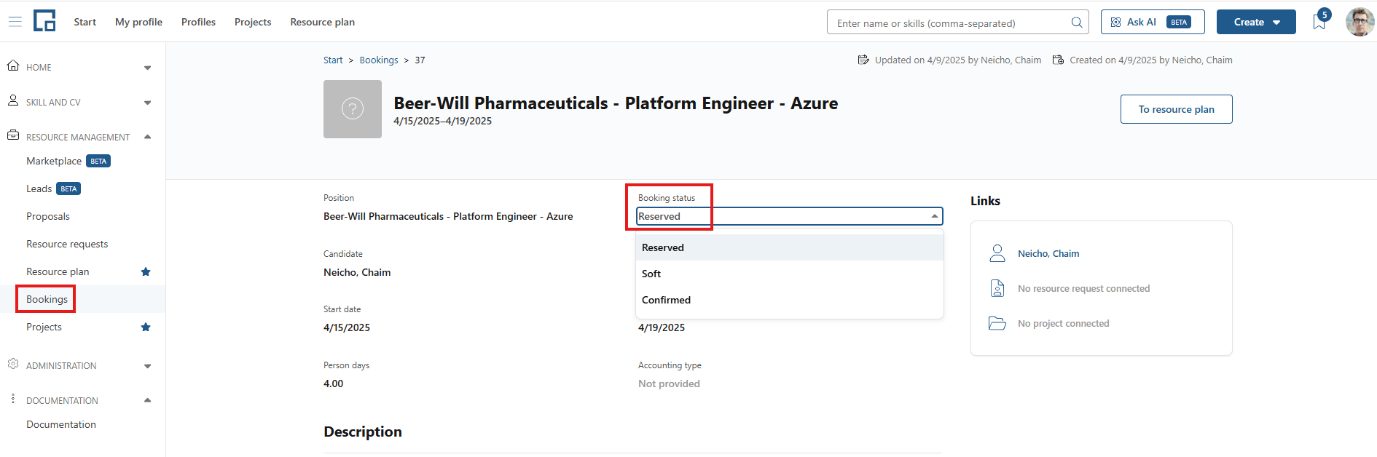
The ‘Create and set reserved bookings’ permission determines whether a user can create and set reserved bookings, which are intended for reservation purposes in the context of an opportunity. Depending on the permission level, users may be allowed to create and set reserved bookings only for themselves, for members of their assigned teams/subteams, for users in the resource groups they manage, or for all users if they are administrators.
Caution: Permission to create and set bookings automatically grants permission to edit them. In this context, and in the following permissions, “create and set” refers specifically to the booking status.
Create and Set Confirmed Bookings
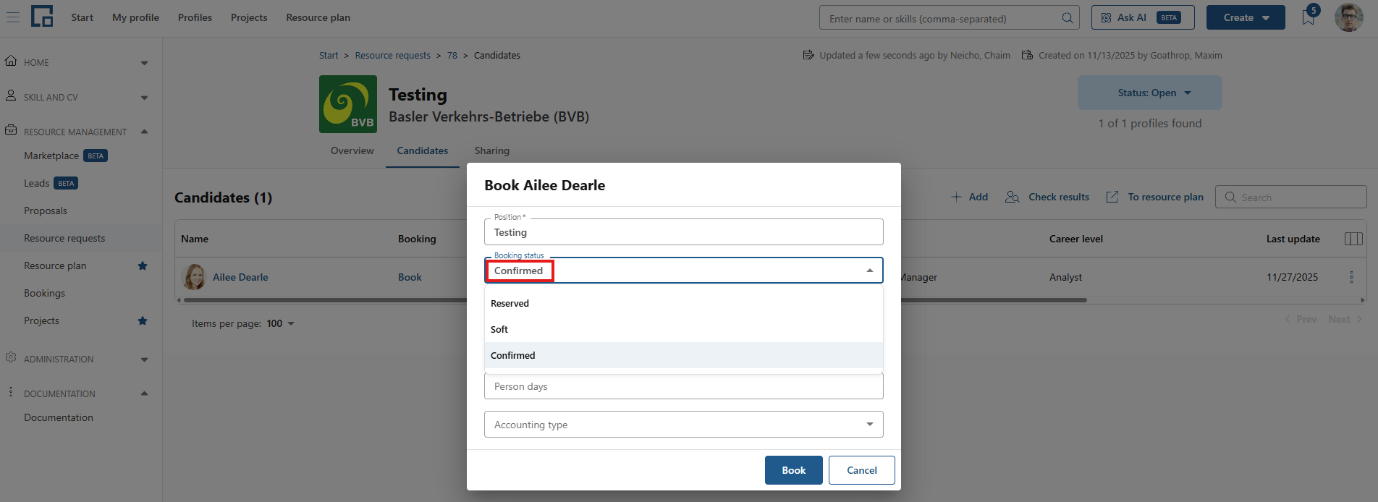
The ‘Create and set confirmed bookings’ permission determines whether a user can create and set confirmed bookings, which are intended for reservation purposes in the context of an opportunity. Depending on the permission level, users may be allowed to create and set confirmed bookings only for themselves, for members of their assigned teams/subteams, for users in the resource groups they manage, for all users if they are administrators, or none at all.
When the permission is set to “Own data”, the user can confirm bookings they are assigned to, i.e. also bookings that were not created by the user themselves.
Caution: Permission to create and set bookings automatically grants permission to edit them. In this context, and in the following permissions, “create and set” refers specifically to the booking status.
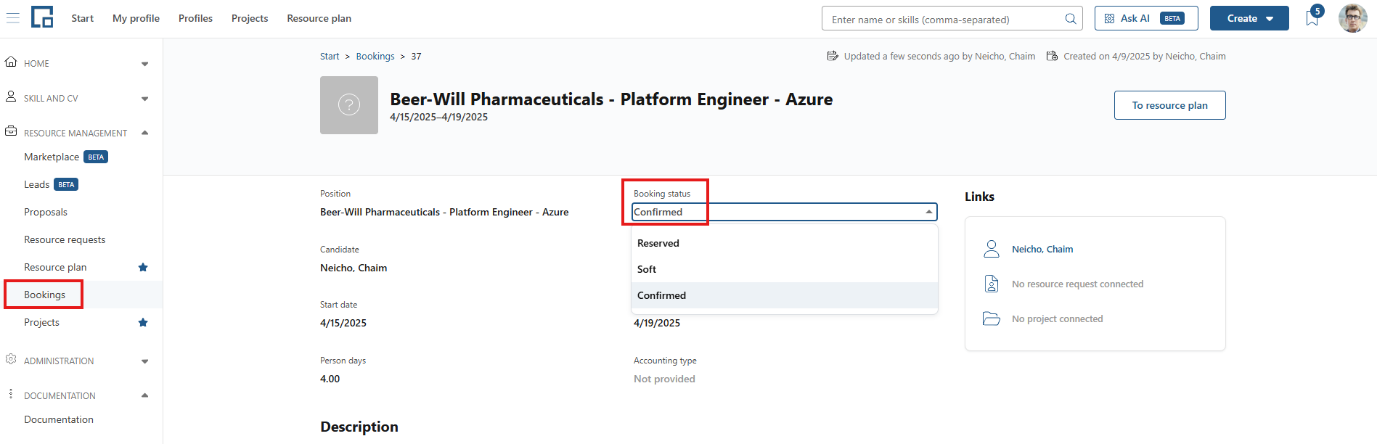
Edit Bookings
The ‘Edit bookings’ permission determines which bookings a user is allowed to edit.
If set to ‘None’, the user can edit only their own bookings, unless they are authorized to create and set bookings of any type. In that case, the user can edit bookings even if None is selected here, as the ability to create and set bookings automatically grants editing rights.
If set to ‘Own data’, the user is authorized to edit bookings they created themselves.
The user may also edit bookings they are assigned to, i.e. also bookings that were not created by the user themselves.If set to ‘Self-created’, the user is authorized to edit only the bookings they created themselves. Bookings created by others cannot be edited, even if the user is assigned to them.
If set to ‘Team data’, the user can edit their own bookings as well as the bookings of users in their team and subordinate teams.
If set to ‘Resource group’, the user is allowed to edit their own bookings and the bookings of all users in the resource group they manage.
‘Team & Resource group’ combines both scopes, granting permission to edit their own bookings, the bookings of their team and subordinate teams, and the bookings of the users in their managed resource group.
If set to ‘All’, the user has administrative rights and can edit all bookings.
Find out more about Bookings
View Bookings and Schedules
The ‘View bookings and schedules’ permission determines whether a user can view only their own bookings and schedule or also the bookings and schedules of other users. Depending on their role, users may be able to see the bookings and schedules of members in their assigned teams/subteams, users in the resource groups they manage, or all bookings and schedules if they are administrators.
Edit booking timelines
The ‘Edit booking timelines’ permission determines whether a user can edit only their own booking timelines or also the booking timelines of other users. Depending on their role, users may be able to edit the booking timelines of members in their assigned teams/subteams, users in the resource groups they manage, or all booking timelines if they are administrators.
Edit absences
The ‘Edit absences’ permission determines whose absences a user may create, edit, and delete on the Settings tab of a profile.
If set to ‘None’, the user cannot manage absences at all. The absences section is still shown, but without an add button, and no row offers edit or delete.
If set to ‘Own data’, the user can manage the absences on their own profile.
If set to ‘Team data’, the user can manage their own absences as well as those of users in their team and subordinate teams.
If set to ‘Resource group’, the user can manage their own absences and those of all users in the resource groups they manage.
‘Team & Resource group’ combines both scopes.
If set to ‘All’, the user has administrative rights and can manage every absence.
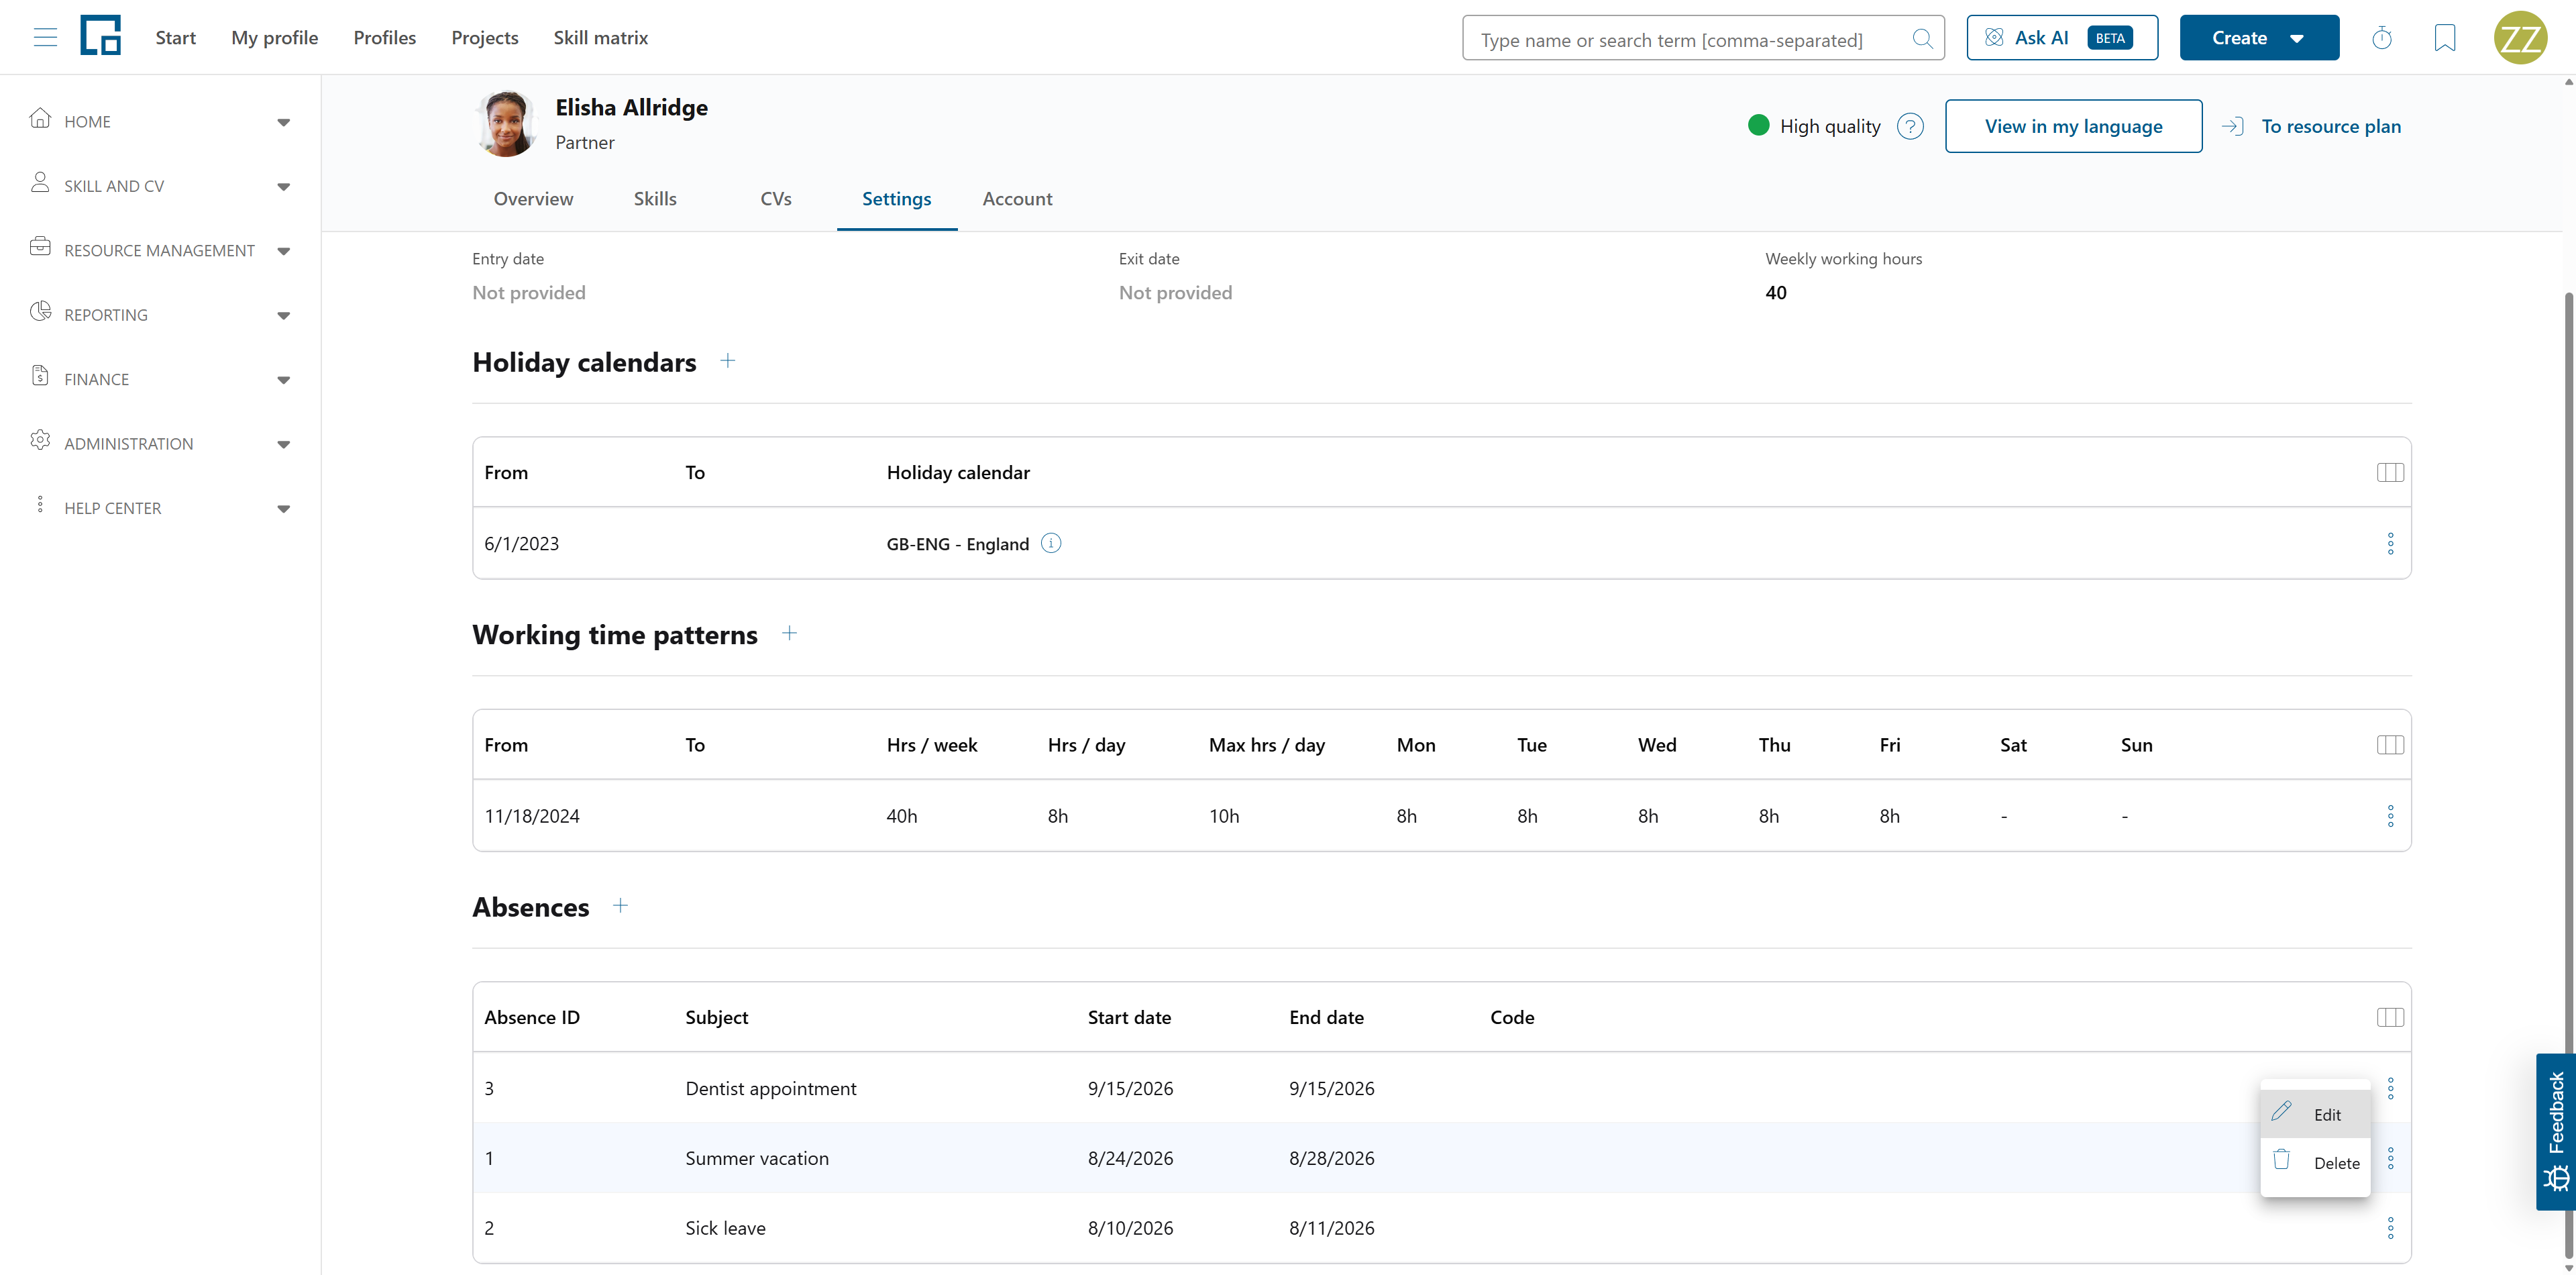
After an upgrade only the Admin role has this permission set to ‘All’; every other role starts at ‘None’, so nothing changes for existing roles until you grant the permission deliberately.
This permission only covers absences that were created by hand in decídalo. Imported absences additionally require the following permission.
Overwrite imported absences
The ‘Overwrite imported absences’ permission determines whether a user may also change absences that came from an import, on top of the ‘Edit absences’ permission.
If set to ‘No’, imported absences are read-only for the user. They are still listed, but show a lock instead of the action menu. The user also cannot set an absence code on a manual absence (the code field is disabled), because the code is what an import addresses an absence by.
If set to ‘Yes’, the user can edit and delete imported absences within the scope of their ‘Edit absences’ permission, and may set absence codes.
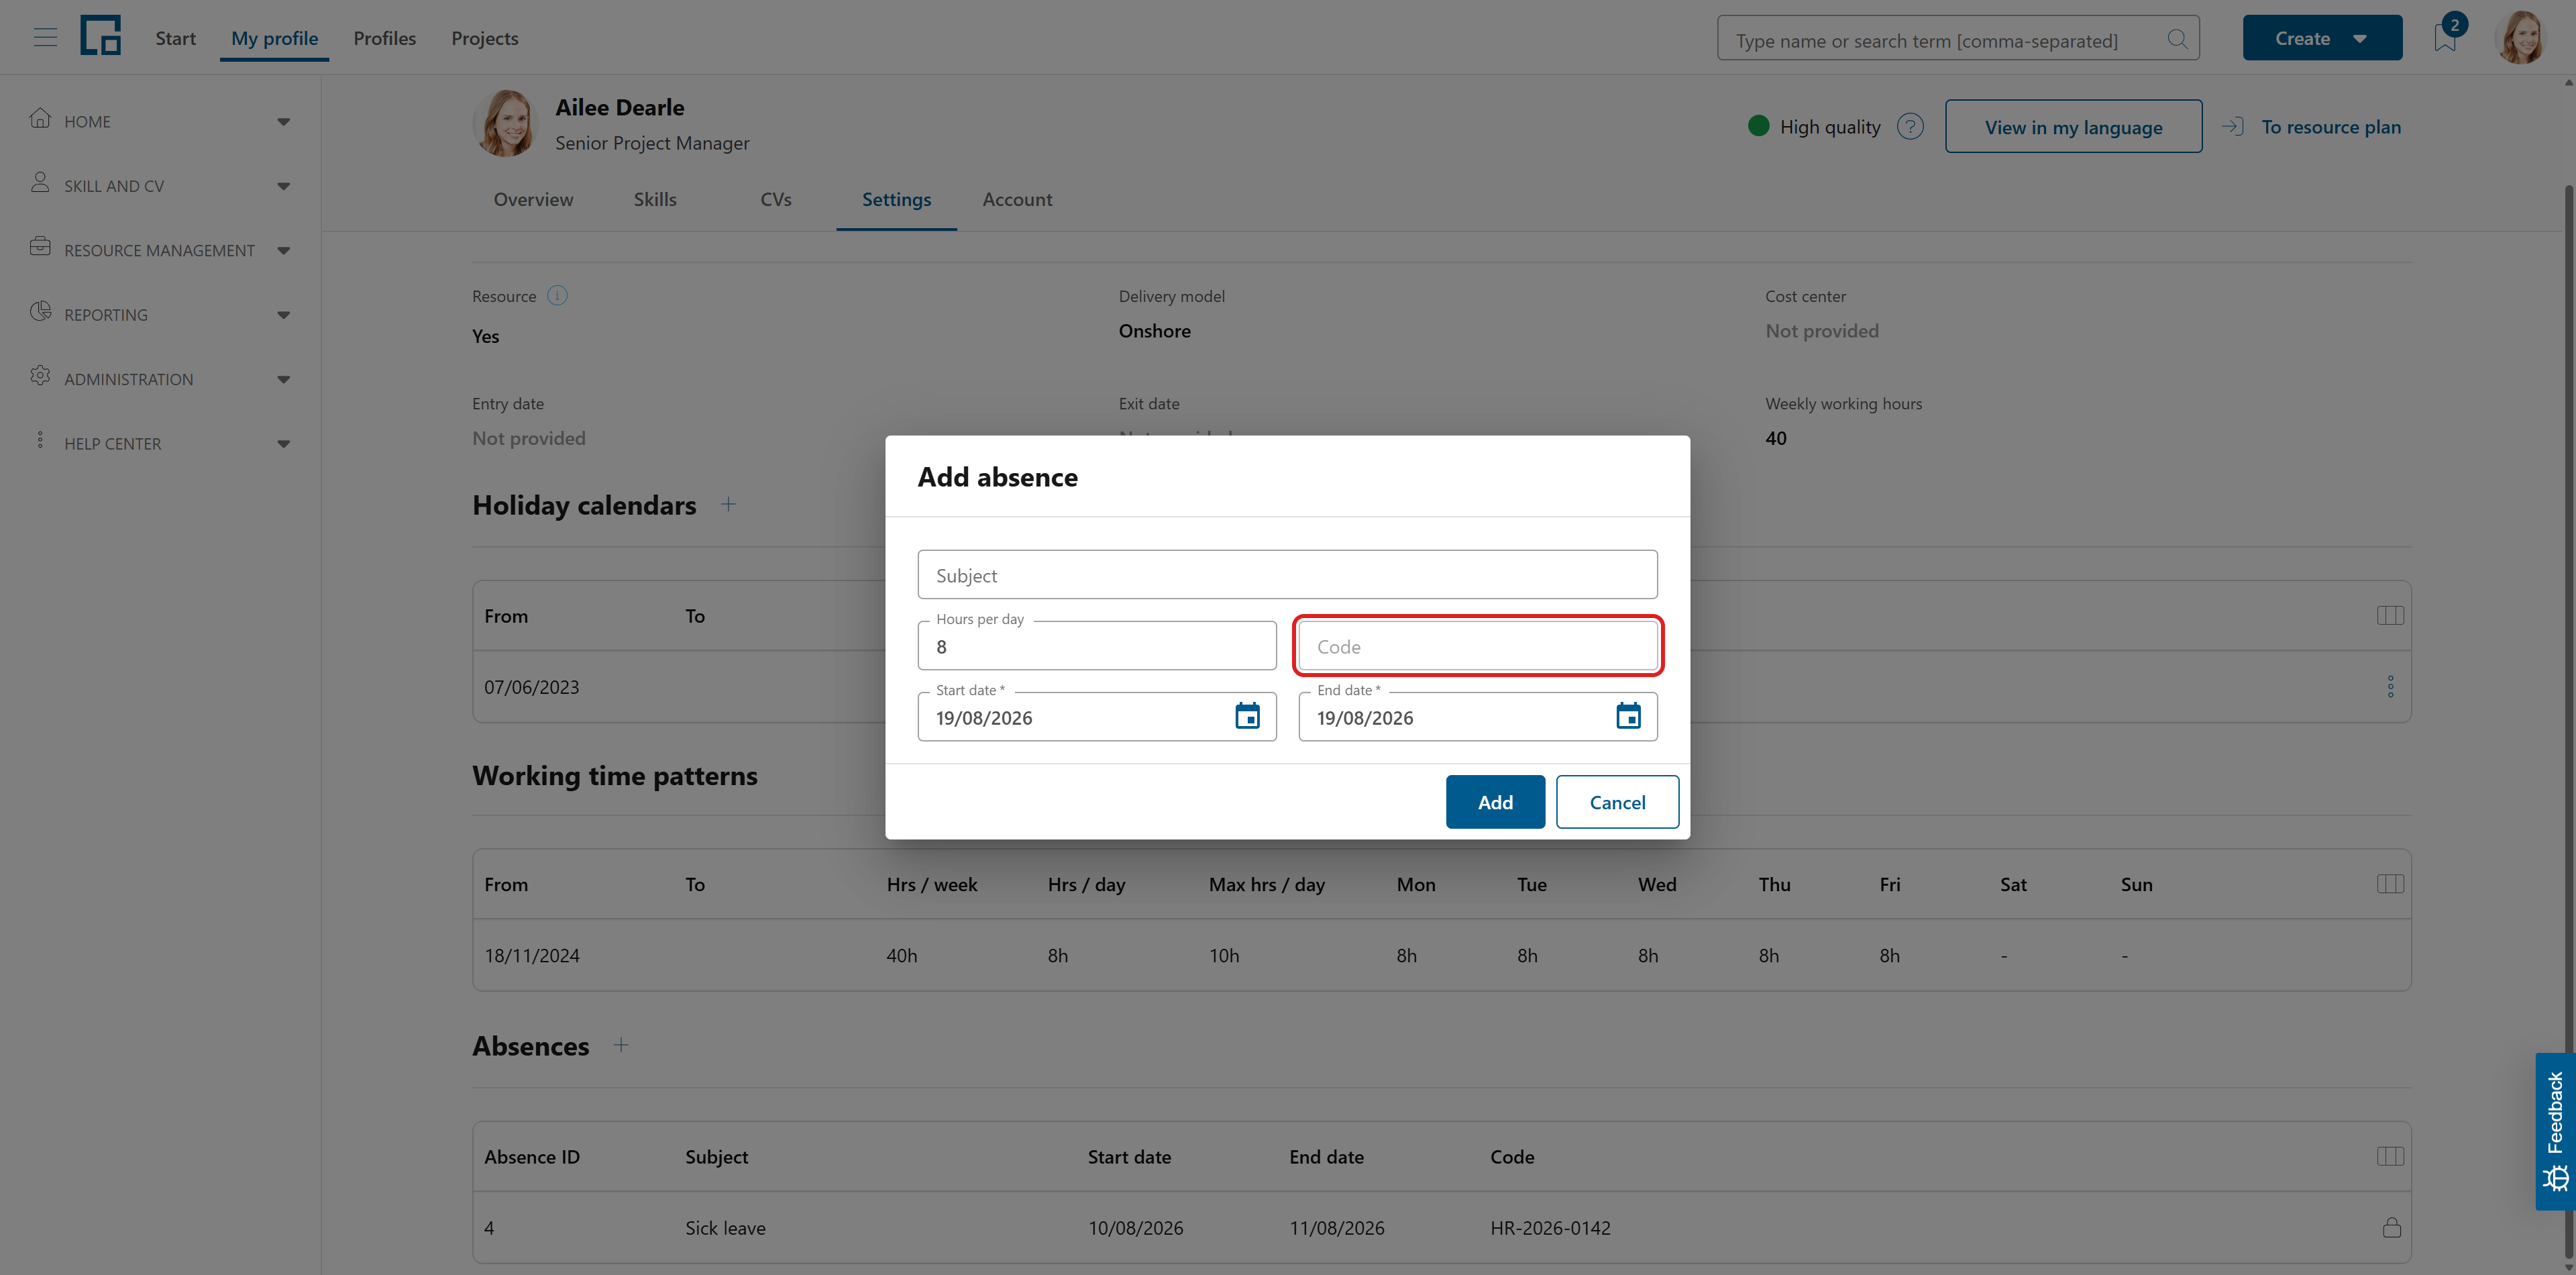
By default only the Admin role has this permission, since an imported absence normally has to stay in sync with the source system. Note that editing an imported absence in decídalo does not write back to that system, and the next import may overwrite the change.
Find out more about absences
Proposals
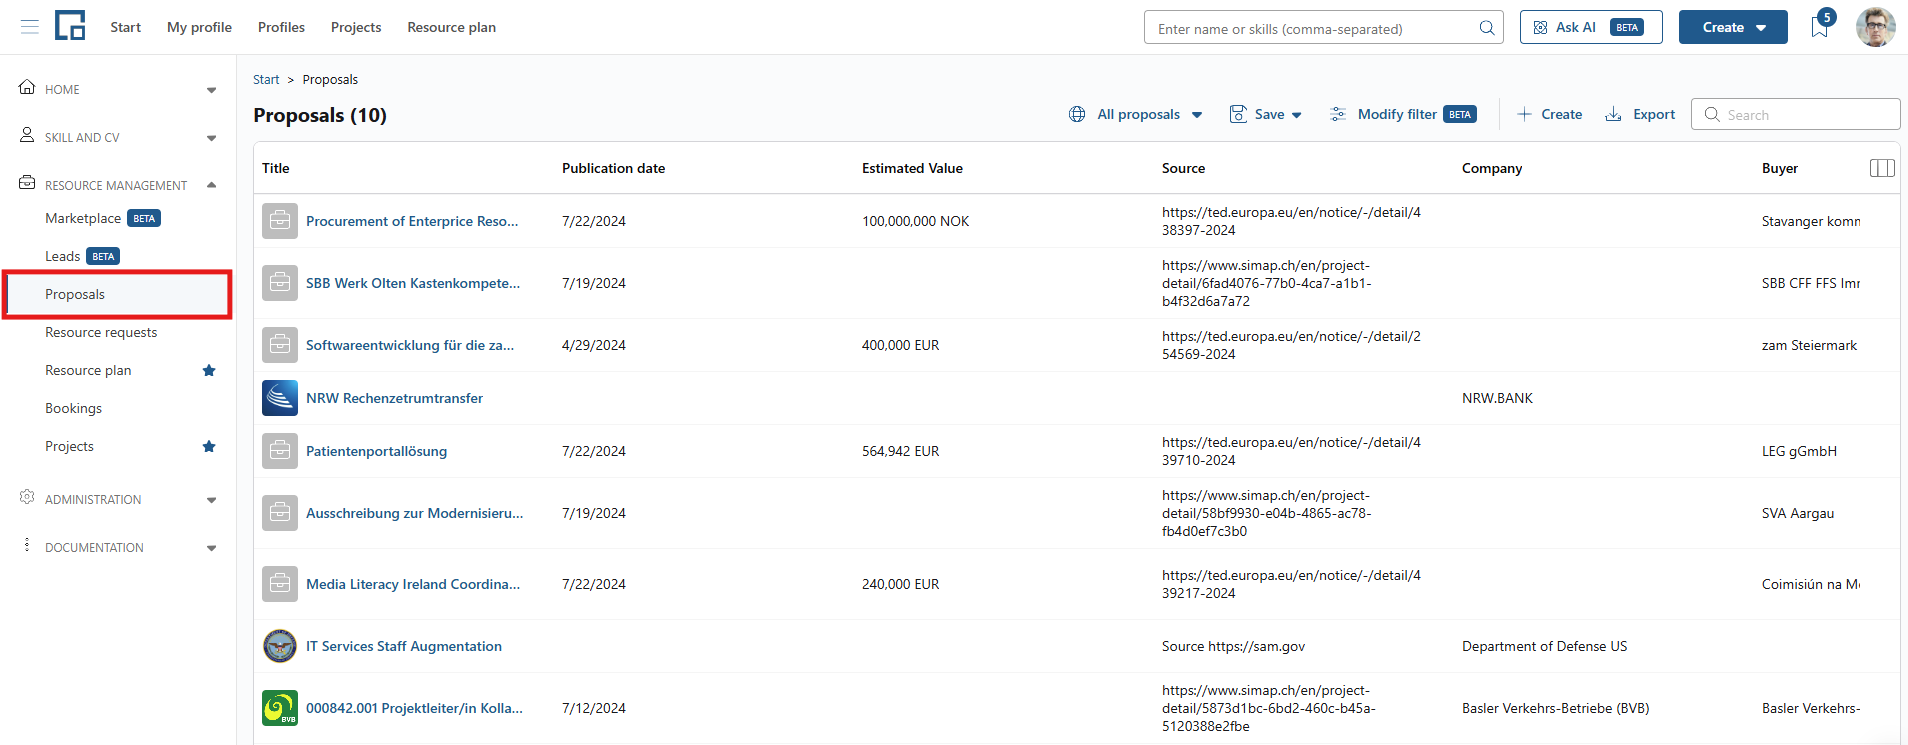
View and edit proposals
The ‘View and edit proposals’ permission determines whether a user can access the proposals page and edit the data. If disabled, the page is not accessible to the user.
Administration and Customization
Allow data export
The ‘Allow data export’ permission determines whether a user is allowed to export data from the application. If enabled, the user can access and use export options, which are available on various pages throughout decídalo. If disabled, all export buttons are hidden and the user cannot export any data.
Companies and industries management
The ‘Companies and industries management’ permission determines whether a user can create, edit, and delete companies and industries, which can then be selected for projects. If the permission is set to Yes, the user can fully manage these entries. If set to No, the corresponding pages are hidden and users cannot edit or delete companies or industries.
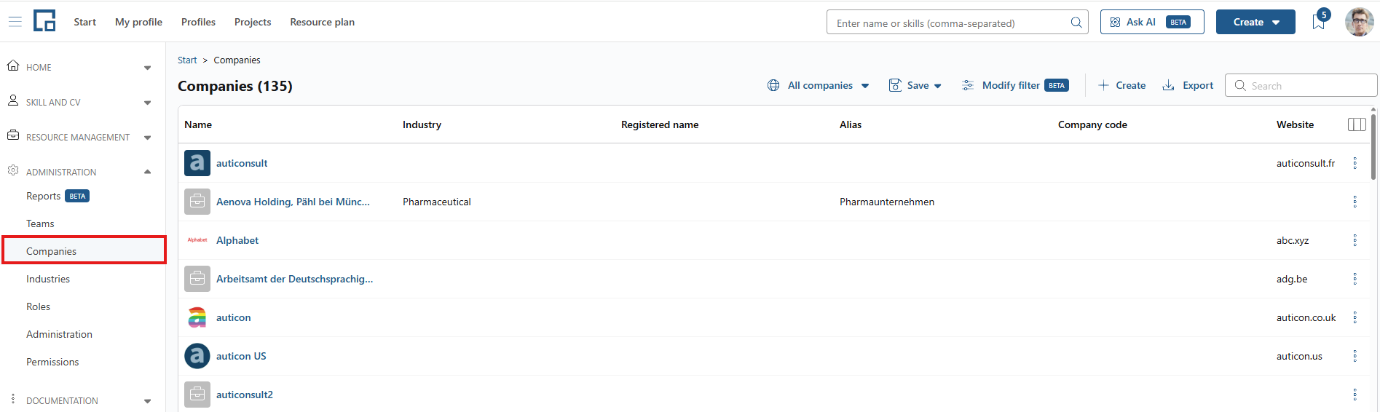
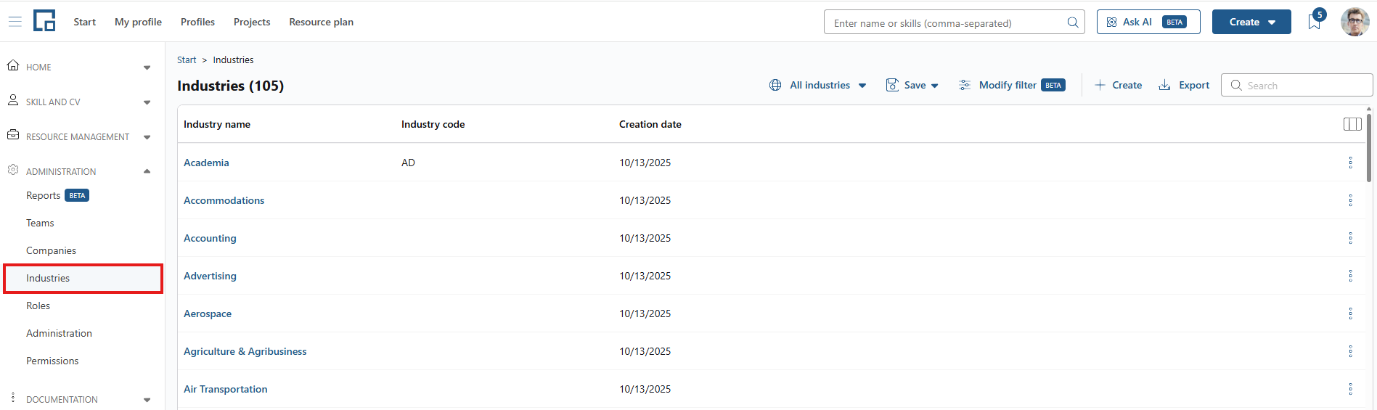
This permission also influences how companies can be created in different contexts. While this permission allows users to edit companies, creating companies must remain possible even without this permission, as users may need to reference previous employers in their profiles, which are not necessarily customers of the current company.
Since customers can be defined on the companies page, please note: For fields with the behaviour type Customer, the logic differs:
Users without this permission can only select from existing customers, while users with the permission may also create new companies when needed. These users automatically receive the right to manage companies on the Companies page, including the ability to modify the IsCustomer flag.
Training Management
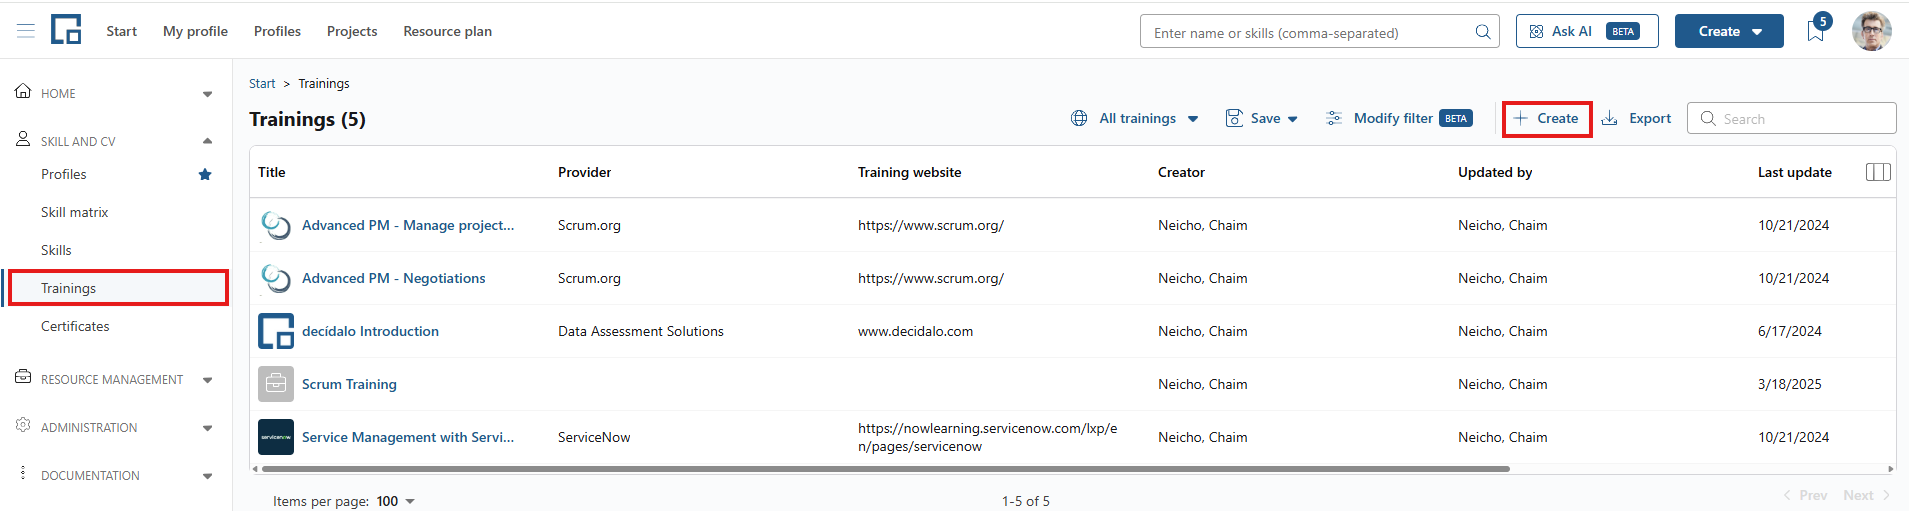
The ‘Training management’ permission determines whether a user can create, edit and delete trainings on the central trainings page. If the user is not permitted to do so, the page is hidden. However, they can still add and edit trainings on their own profile.
View skills, certificates and roles
The ‘View skills, certificates and roles’ permission determines whether a user can open the central skills, certificates and roles pages. If enabled, the user can browse, search and filter the full catalogs. This is the permission to give regular employees who need to look up which skills, certificates or roles exist. If disabled, the three pages are hidden; the user can still manage skills, certificates and roles on their own profile.
Viewing also covers the lists of who holds a given skill, certificate or role, but those lists respect the ‘Profile view’ permission: holders whose profile the user may not open are shown anonymized (a masked name, no picture and no link to the profile), while the skill, certificate or role details themselves stay visible.
Together with ‘Allow data export’, this permission is also enough to export the role list. The exported file leaves out the Holders tab unless the user additionally has ‘Manage skills, certificates and roles’.
Manage skills, certificates and roles
The ‘Manage skills, certificates and roles’ permission determines whether a user can create, edit, rename, merge and delete skills, certificates and roles in the central catalogs, and reach the AI cleanup suggestions page. It also unlocks the certificate holders export, and it adds the roles export’s Holders tab, which lists the people holding each role together with their email and team. Without it, the catalog pages offer no editing options. Managing the catalogs requires reaching them, so this permission is normally granted together with ‘View skills, certificates and roles’.
Template management
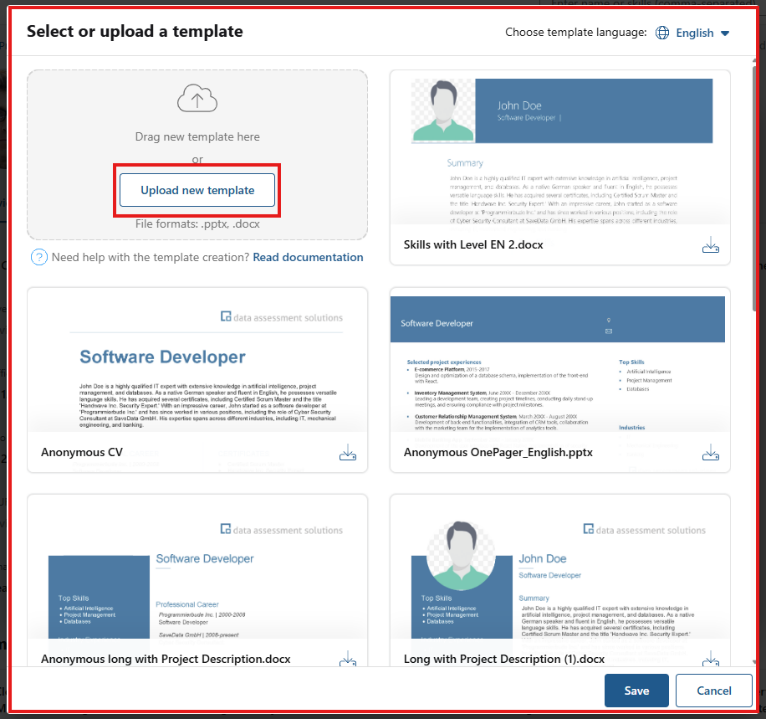
The ‘Template management’ permission determines whether a user can upload new templates and download, edit and re-upload existing templates. If the user is not permitted to do so, they can still use and download available templates. See CV Templates for the template formats this covers and Best Practices for authoring guidance.
Skill matrix list management
The ‘Skill matrix list management’ permission determines whether a user has access to the skill matrix lists and can edit them. Depending on their role, users may be able to edit their own skill matrix lists, those of members in their assigned teams/subteams, all skill matrix lists if they are administrators, or none at all.
Administer data fields
The ‘Administer data fields’ permission determines whether a user can create, edit and delete data fields or not.
Beta Features
New features are often released initially as beta features.
If certain users should have access to beta features, one must explicitly grant them the permission ‘Beta features’ permission determines whether a user can access the features and pages that are flagged at ‘beta’. If disabled, beta features are not accessible to the user.
Show decídalo Documentation
The ‘Show decídalo documentation’ permission determines whether a user can access the documentation page. If disabled, the page is hidden.
Time recording & billing
These permissions only take effect where time recording is enabled for the company. Because the feature is still in beta, users also need the ‘Beta features’ permission described above. See Time Recording Setup for the setup these permissions govern.
The three project-scoped permissions in this group (‘Configure project time recording’, ‘Approve project time recording’ and ‘Manage project billing and orders’) can additionally be granted through a project contact type, for the individual projects a user is a contact for. Substitutes act with the reach of the person they represent; see Delegations.
The two permissions over the timesheets themselves, Timesheet view and Timesheet editing, are not in this group. They are listed under Profiles, because they are scoped over people rather than over projects.
Configure project time recording
The ‘Configure project time recording’ permission determines on which projects a user can set up time recording: which activity types are allowed on the project, its work packages and its order positions, and who may record time on it. The selectable values are: no configuration on any project, configuration only on projects the user created, or configuration on all projects.
Without this permission the project’s “Time recording” tab is not available.
Approve project time recording
The ‘Approve project time recording’ permission determines on which projects a user can confirm recorded time, on the project’s “Delivery” tab. The selectable values are: cannot confirm recorded time on any project, confirm recorded time only on projects the user created, or confirm recorded time on all projects.
Whether confirmation is required before recorded time can be billed depends on the ‘Time recording approval’ system setting.
Manage activity types and general activities
The ‘Manage activity types and general activities’ permission determines whether a user can create, edit, deactivate and delete the central catalogues under Administration → Time recording. Despite its name it covers all three of them: activity types, general activities and recording types. If the permission is set to ‘No’, the corresponding administration pages are hidden.
Manage project billing and orders
The ‘Manage project billing and orders’ permission determines whether a user can work with orders and open a project’s “Accounting” and “Delivery” tabs. The selectable values are: no billing management and no order creation, managing the orders the user created and creating new orders, or managing billing and orders on all projects.
This permission covers orders, order positions and the project’s framework agreement assignment. Composing and accepting a servicesheet always requires ‘Manage billing’ in addition. ‘Manage accounting’ grants the same reach over every project’s orders, regardless of the value set here.
Manage accounting
The ‘Manage accounting’ permission determines whether a user can work with the commercial groundwork of billing: rates and rate cards, framework agreements, and the data fields of orders. It is a single ‘Yes’ or ‘No’ decision with no scope. It also acts as a company-wide grant over orders and project-level billing: a user who holds it manages the orders and the “Accounting” and “Delivery” tabs of all projects, without needing ‘Manage project billing and orders’. If disabled, the “Framework agreements” page and the “Rates” and “Rate cards” administration pages are hidden.
Manage billing
The ‘Manage billing’ permission determines whether a user can work with servicesheets: composing them, accepting them, marking them as paid and withdrawing them, together with the billable work overview and the servicesheet policies. It is a single ‘Yes’ or ‘No’ decision with no scope. If disabled, the “Servicesheets” and “Billable work” pages and the “Servicesheet policies” administration page are hidden.
It also opens every project’s “Delivery” tab, in a reduced form: a user who holds only this permission sees the servicesheets that bill the project and the lines behind them, but not the recorded-time view or the summary figures above it. Those read project-level billing, which belongs to ‘Manage accounting’ and to ‘Manage project billing and orders’.
Note: ‘Manage accounting’ and ‘Manage billing’ are independent: neither one implies the other, and a role can hold either, both or none. Somebody who is to do the whole accounting and billing job needs both. When the two permissions were separated, every role that held ‘Manage billing’ received ‘Manage accounting’ as well, so nobody lost access; from then on they are granted separately.
See the Billing concept for what these pages do.